How To Set up a Secure VPN Connection in LinuxHow To Set up a Secure VPN Connection in Linux
This guide explains VPN installation and configuration processes on Linux systems. We demonstrate these processes for OpenVPN, ProtonVPN, and NordVPN.

Using a virtual private network is a smart way to stay safe online. VPNs add a protective layer by encrypting your data, concealing your IP address, and channeling network traffic through secure “tunnels.”
Most of us are familiar with using VPN apps on smartphones and Windows or MacOS computers. But what about Linux? Can you use your favorite VPN? Are there open-source VPN options for Linux?
In this article, I will introduce you to the OpenVPN project and explain how to set up its Community Edition using Easy-RSA. Additionally, I will guide you through the steps of installing the ProtonVPN GUI – an easy, fast, and free method to connect to one of the most trusted privacy platforms.
Why Use a VPN?
A VPN establishes a secure and private connection between your device (like a phone, tablet, or computer) and the internet. It protects your online activity by routing your internet data through a secure tunnel and masking your IP address with the VPN server’s IP address. In this way, VPNs help keep your identity hidden and your data private, which will help keep you safe from online criminals.
Using a VPN is also handy for bypassing geo-restrictions. For instance, if you can’t access your favorite software or watch a program because of where you are, a VPN can help you get around these restrictions.
Choosing the Right VPN Service Provider
When selecting a VPN service provider, consider factors such as whether the provider has the proper infrastructure, a good track record, and positive user feedback.
The VPN service provider should:
Prioritize privacy
Use strong encryption protocols
Offer a wide network of servers for your convenience and choice
Provide support for Linux users
Preparing Your Linux System for VPN Use
As a starting point, ensure your system is up to date. For Debian-based systems, run the commands sudo apt-get update and then sudo apt-get dist-upgrade. These commands will update and upgrade your operating system. On Red Hat-based systems, use the sudo dnf update command to update the operating system.
Since I am using Ubuntu, which is a Debian-based Linux distribution, I will verify that it has Network Manager installed. Network Manager is a graphical user interface (GIU) tool for managing network settings, including VPN connections. Usually, Network Manager is installed on Ubuntu by default. If it’s not, run this command:
sudo apt install network-manager-openvpnOpenVPN Installation and Configuration With Easy-RSA
OpenVPN is a protocol widely recognized as the standard for networking in the open-source space. OpenVPN is compatible with all major operating systems, including desktop and mobile platforms. The OpenVPN standard provides excellent security and can easily integrate with third-party software. To keep the connection secure, OpenVPN uses 256-bit encryption through the OpenSSL library.
There are two versions of OpenVPN available: the free “Community Edition” and the paid “OpenVPN Access Server,” offering premium features. Using the OpenVPN Community Edition on Linux involves a few steps at the command line.
Install OpenVPN and Easy-RSA packages
First, you will need to install the Easy-RSA packages on your system. Use the following command to install both OpenVPN and Easy-RSA (as shown in Figure 1):
sudo apt install openvpn easy-rsa
image001_10
Figure 1. The command to install OpenVPN and Easy-RSA.
After running this command and completing the installation, you should create a directory called easyrsa. To do so, use the mkdir command (see Figure 2):
mkdir ~/easyrsaAfter creating the directory using the mkdir command, link it to the recently installed Easy-RSA package using the following command (also shown in Figure 2).
ln -s /usr/share/easy-rsa/3/* ~/easyrsa/
image002_7
Figure 2. The command to create a directory for Easy-RSA, followed by linking the package and the folder.
Create a public key infrastructure for the OpenVPN client
Creating a public key infrastructure (PKI) for the OpenVPN client involves generating and importing certificates and keys. Certificates and keys play a vital role in establishing a secure VPN connection. If you plan to use only OpenVPN, you will need to generate these certificates and keys yourself.
Begin by navigating to the easy-rsa directory. Execute the following command to initialize the public key infrastructure (see Figure 3):
sudo. /easyrsa init-pki
image003_9
Figure 3. The command to set up the PKI in Easy-RSA.
If you want to use OpenVPN with another service provider, you will have to generate keys and certificates according to their instructions. Typically, these instructions can be found on the provider’s website. This process often involves using the Easy-RSA utility or custom tools provided by your VPN provider. Once generated, import the certificates and keys into the appropriate locations on your Linux system.
Configure OpenVPN
After you have generated the certificates and keys, the next step is to configure OpenVPN. To do this, create a new configuration file using this command:
sudo nano /etc/openvpn/server.confConfigure OpenVPN by creating a configuration file specific to your VPN service provider. This file typically includes connection details, authentication settings, and encryption parameters. Your VPN provider should provide you with either the configuration file or instructions. Modify the configuration file as needed, then save it.
Figure 4 demonstrates the process of opening and editing the OpenVPN server configuration file using the Nano text editor.

Figure 4. The OpenVPN configuration file is opened in the Nano for modification if needed.
Set up firewall rules
Configuring the firewall correctly will ensure that only authorized VPN traffic is allowed through. Use your distribution’s firewall management tool to adjust the settings with your specific VPN configuration.
Using OpenVPN
Setting up and using OpenVPN can be complex, whether on its own or with other VPN services. Once you have followed the above steps, OpenVPN should be ready for use. However, you will need to check your distribution’s guidelines for running it.
For a quick and streamlined OpenVPN setup, follow these steps:
Find your IP address using the ifconfig command. Make a note of the IP address.
In your terminal, input the following command:
wget https://git.io/vpn -O openvpn-install.shAfter downloading the script (as shown in Figure 5), grant executive execution permissions using:
sudo chmod +x openvpn-install.shRun the script with this command:
sudo bash openvpn-install.sh
This will open the script and prompt you to provide information for the VPN setup.
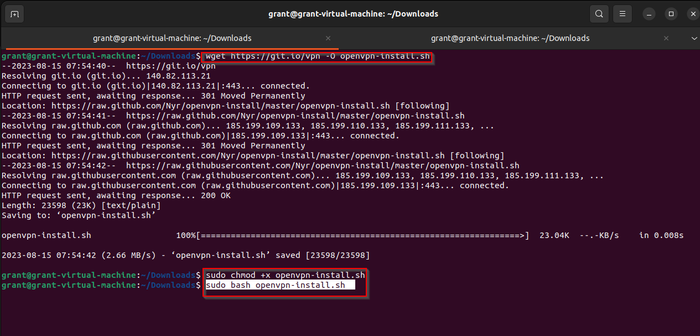
image005_5
Figure 5. The commands to allow execute permissions and then run the bash script we downloaded.
An interactive shell will open when you enter the sudo bash openvpn-install.sh command. The interactive shell will prompt you to provide your public IP/Hostname, client name, and DNS server. Make the selections based on your desired settings. After you have done this and set up your firewall rules, run OpenVPN using this command:
sudo systemctl start [email protected]You can verify that OpenVPN is running by using sudo systemctl status [email protected] (see Figure 6 and Figure 7).
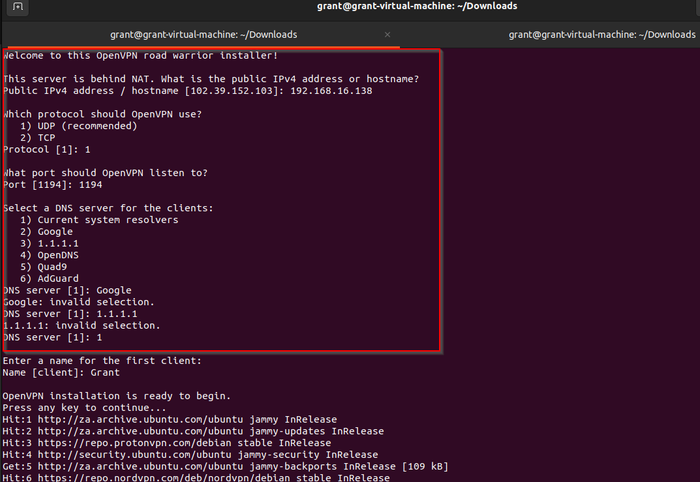
image006_3
Figure 6. The setup steps in the script.
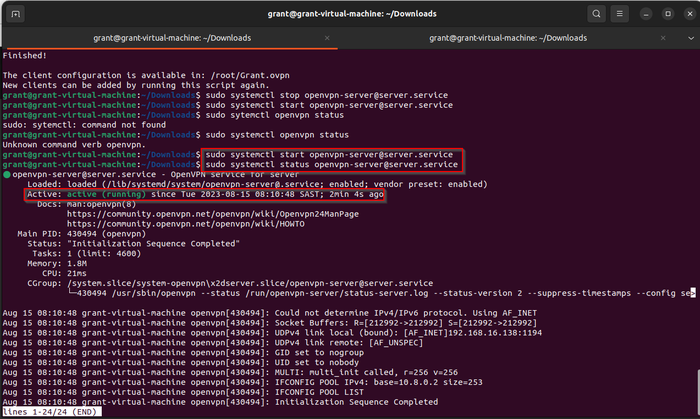
image007_2
Figure 7. The OpenVPN service is running.
What Types of VPNs Are Compatible With Linux
There are several types of VPNs compatible with Linux, with some popular options being:
L2TP/IPsec VPNs – L2TP is a networking protocol used by ISPs for VPN operations, while IPsec encrypts and authenticates each IP packet in a communication session.
OpenVPN – Also available as a paid “Access Server” version for enterprises, OpenVPN is known for simple implementation and post-setup support.
ProtonVPN –ProtonVPN is known as one of the most secure mail services and is used by many sensitive users such as journalists and whistle-blowers. We will cover setting up ProtonVPN, as it’s the easiest way to get one of the best free VPN services running in minutes.
NordVPN – NordVPN meets requirements and is quickly set up, although it is a paid service.
Cisco VPN – A paid version is available.
SoftEther VPN – Available via the University of Tsukuba, SoftEther VPN is an open source and free cross-platform VPN. It is an alternative to OpenVPN and can integrate with it.
SSH VPN – From sshOcean, SSH VPN provides integration with free VPN service.
Setting up ProtonVPN
ProtonVPN is a reputable VPN service offered by Proton, known for its secure mail service, Proton Mail. For more details about ProtonVPN, you can find a link to its website at the end of the article.
In the meantime, let’s go ahead and set up ProtonVPN.
First, launch your favorite browser and navigate to https://protonvpn.com/support/linux-ubuntu-vpn-setup/. On the page, select the DEB package download option for Debian-based systems. While this process can also be applied to other Linux distributions, I will illustrate it using Ubuntu and Kali Linux. Download the .deb file, as seen in Figure 8.
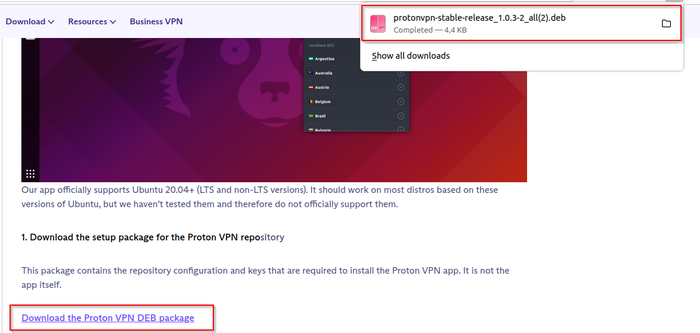
image008_3
Figure 8. The download .deb package option that I have selected for my Ubuntu distro.
Next, you will need to run the following command to extract ProtonVPN (see Figures 9 and 10):
sudo dpkg -i protonvpn-stable-release_1.0.3-2_all.deb
Once you have done this, run this command:
sudo apt-get install protonvpn
image009_1
Figure 9. The sudo dpkg -i protonvpn-stable-release_1.0.3-2_all.deb command to extract and install the ProtonVPN package.
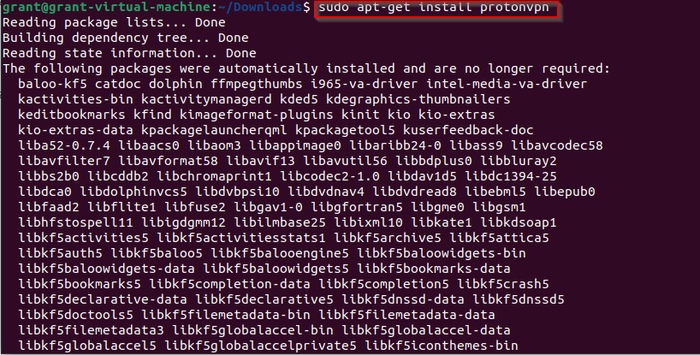
image010_1
Figure 10. The sudo apt-get install protonvpn command to install the GUI application.
To finish, run the protonvpn command in the terminal. This will launch the ProtonVPN application, which should also appear in your system tray at the top right of your desktop, near the setting area (Figure 11).
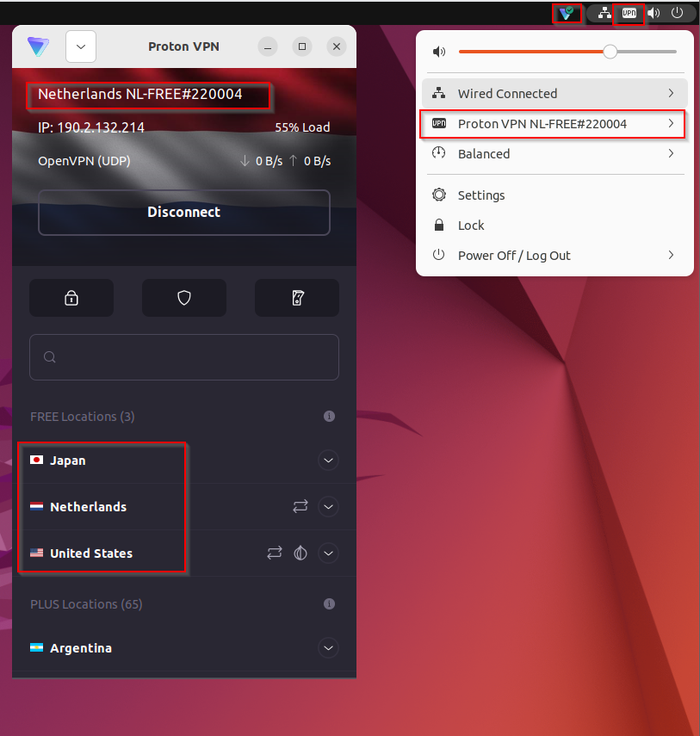
image011_1
Figure 11. The ProtonVPN application in the GUI after installation.
Setting up NordVPN
NordVPN is a popular VPN service that is recognized for its privacy-focused features. Setting up NordVPN in Linux is a straightforward process and allows you to get started quickly.
Start by navigating to the downloads page provided at the end of this article. On the downloads page, find the instructions for installing the NordVPN application from the command line.
The first step is to run this command:
sh <(curl -sSf https://downloads.nordcdn.com/apps/linux/install.sh)Next, run nordvpn login. This will prompt you to enter your account login details. You can either create a new account or use your Google or Apple account to log in.
After you have logged in, run the nordvpn connect command. You will be prompted to buy a package, as NordVPN is a paid service.
While this service isn’t free, I have shown the process here to illustrate how easy it is to search for, download, and quickly set up a VPN in Linux using command-line tools. You can see these steps in Figure 12 and Figure 13.
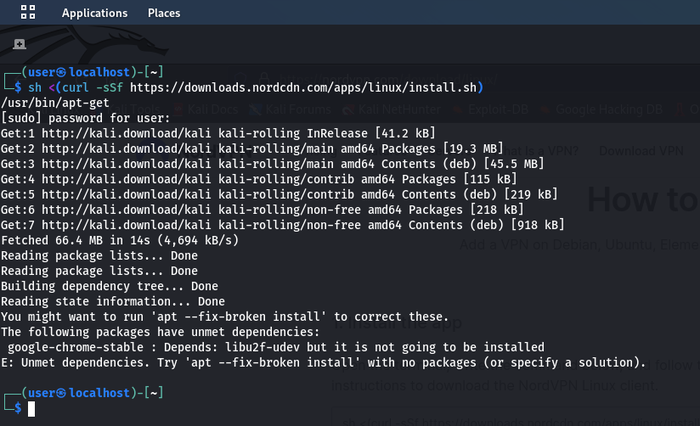
image012_0
Figure 12. The command is taken from the NordVPN website to download the application.

image013
Figure 13. Using the nordvpn login command, you will be given a browser URL to follow to log in.
Once you have followed the provided link, log in using either your created credentials or your Google or Apple account. You can then run the nordvpn connect command in your terminal. This command will establish the VPN connection (Figure 14).

image014
Figure 14. The nordvpn connect command initiates the VPN connection and starts the service.
Troubleshooting Common VPN Setup Issues in Linux
Setting up a VPN on Linux indeed can be complicated at times. If you are stuck, consider the following troubleshooting steps:
Refer to the VPN service provider’s manual setup instructions for guidance.
Ensure required VPN protocols are installed on the system.
Check that the necessary certificates from your VPN service provider are installed.
Confirm that the necessary network ports are available on the firewall.
Make sure your system clock is synchronized.
Remove any conflicting VPN software from your system.
Verify that your VPN client is properly configured on your system.
Check that your system meets resource requirements to run the VPN.
Review and confirm the VPN settings in your software.
Ensure DNS settings are correctly set.
Final Thoughts
There is a wide variety of VPN options available for Linux. The choice of VPN service provider is extremely important. Most VPN providers that offer the service to Linux users will have step-by-step instructions for installation and setup. In the VPN market, the paid versions usually require less work to get up and running.
Whichever VPN you decide to use, it’s important to ensure that it is configured and running properly. One way to verify this is by conducting a DNS leak test.
Frequently Asked Questions (FAQ)
Q: What is a VPN?
A: A VPN (virtual private network) is a type of network that imitates a private network on a public internet connection. It creates a secure connection by masking your IP address and encrypting your internet traffic. VPNs can also help you access content that is restricted based on your geographical location.
Q: Are there free versions of VPNs for Linux?
A: Yes, the OpenVPN standard offers a free version called the Community Edition. While there are other free VPN options available, the paid versions often provide additional features, support, and a simpler setup and user experience.
Q: How do I set up a VPN on Linux?
A: Paid versions of VPNs typically offer easier and more user-friendly setup processes, although they might still involve some command-line work. For setup guidance, follow the specific instructions provided by your chosen VPN service.
Additional Resources and Links
Here are a few links to additional resources to help you on your way.
General documentation
OpenVPN: https://openvpn.net/
ProtonVPN: https://protonvpn.com/
sshOcean: https://sshocean.com/
SoftEtherVPN: https://www.softether.org/3-screens/2.vpnclient
ITPro Today Linux resources
How To Learn Linux: A Comprehensive Guide for Beginners
How To Check Linux Disk Space Usage: Classic Admin Sysadmin Tips and Commands
About the Author
You May Also Like


.jpg?width=700&auto=webp&quality=80&disable=upscale)
