Code for Identifying Cold Data to Reduce Storage CostsCode for Identifying Cold Data to Reduce Storage Costs
Moving cold data to lower-cost storage can reduce storage costs. Here's some code to get you started.
July 10, 2019

I recently ran across a blog post describing a free app from InfiniteIO that allegedly has the potential to reduce storage costs by 80%. According to the blog post, the app is designed to scan enterprise NAS devices in an effort to identify cold data that could be migrated to low-cost cloud storage, thereby reducing overall storage costs. As curious as I was to try out the free app, it runs only on Mac OS, so it wasn’t an option for me. However, a YouTube video illustrates some of the app’s capabilities.
I decided to see if I could create something similar using PowerShell. In the interest of reducing complexity, I opted not to recreate the app’s dashboards (although there is a way to build dashboards in PowerShell). Instead, I set out to build a simple script that examines an on-premise storage location and compiles a list of the files that have not been accessed for a certain length of time. Here is the code that I came up with:
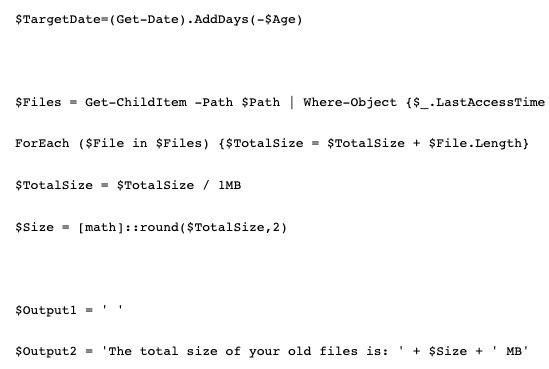
$Path='C:Scripts'$Age = 60$TotalSize = 0$TargetDate=(Get-Date).AddDays(-$Age) $Files = Get-ChildItem -Path $Path | Where-Object {$_.LastAccessTime -LE $TargetDate} | Select-Object Name, LastAccessTime, LengthForEach ($File in $Files) {$TotalSize = $TotalSize + $File.Length}$TotalSize = $TotalSize / 1MB$Size = [math]::round($TotalSize,2) $Output1 = ' '$Output2 = 'The total size of your old files is: ' + $Size + ' MB' $Files$Output1$Output2The first line of code creates a variable called $Path that contains the path to be examined (in this case, C:Scripts). The script currently checks a single folder, but by using the recurse switch, it is possible to check subfolders, as well.
The second line of code defines a variable named $Age. The $Age variable essentially defines what it means for a file to be old. In this case, I set $Age to 60, meaning that any files that had not been accessed in the last 60 days would be considered old files. Obviously, you can adjust this value to meet your own needs.
The $TotalSize variable will be used to store the cumulative total amount of space occupied by the files that have not been accessed recently.
The next line of code defines a target data. If for example, we want to identify the files that haven’t been accessed in 60 days, then we need to know what the date was 60 days ago. This line makes that happen. The Get-Date cmdlet retrieves the current date. The AddDays option allows you to add a specific number of days to the current date. Since we are looking to a past date, I used a negative sign followed by the $Age variable. This causes PowerShell to subtract 60 days from the current date.
The next line of code is the one that finds the old files. Here I am using the Get-ChildItem cmdlet to examine the files in the specified folder. The Where-Object portion of the command retrieves files that are older than the specified date (-LE $TargetDate). The Select-Object portion of this command retrieves the file name, the date and time when the file was last accessed, and the file’s size (length).
The next part of the script sets up a For Each loop. Here I am taking the size of each identified file, and adding it to the $TotalSize variable. When the loop completes, $TotalSize will contain a cumulative total of all the space being consumed by the files that have not been accessed in the last 60 days.
Once the loop completes, I divide the $TotalSize variable by 1MB. That way, the space consumption can be displayed in MB rather than in bytes. It is also possible to divide $TotalSize by 1GB.
The next line creates a variable called $Size. I am using this variable to round the $TotalSize value to two decimal places. This helps to keep the output clean.
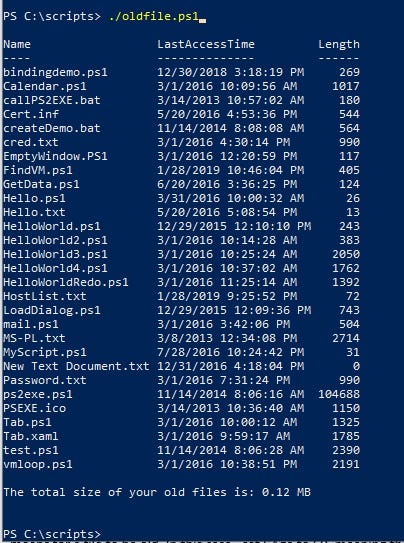
Finally, I created a couple of output variables and then displayed the contents of the $Files variable and the two output variables. This provides a nice, neat output that clearly lists all of the files in the specified location that have not been accessed in the last 60 days, as well as the space consumed by those files. You can see what the output looks like in Figure 1.

2ykxXqdxsq7eRLBEn3fZ77gslhMZ7N3RY9uknQ62e6E8Vy9zZykUvxNA0avJuccC3ep8Zifz1A6BAkbbc9OGz-6aL-BBD16oT88H5jtUDo1LUWcPux3jTkjyjafW8RgGVvT8y_TD
Figure 1
Keep in mind that the script that I have created is really just a first step. It would be relatively easy to expand the script to automatically migrate the files that have been identified. As an alternative, the list of files could be written to a text file or to a CSV file for review.
About the Author
You May Also Like


.jpg?width=700&auto=webp&quality=80&disable=upscale)
