Use PowerShell To Scan Network for Connected DevicesUse PowerShell To Scan Network for Connected Devices
This PowerShell script lets you scan your network for all connected devices. Read on for the script and a breakdown of its methods.
March 8, 2023

Table of Contents
2. Determining the Device Manufacturer in PowerShell
4. How the PowerShell Script Works
A longstanding best practice for security is to identify the devices connected to your network. To that end, many wireless routers will provide a list of connected devices. However, things can become tricky when you have both wired and wireless network segments.
While there are excellent third-party utilities that scan your network for connected devices, you can also accomplish the same thing with PowerShell. In this article, I will show you how.
A Note About Methods
Before we get started, note that there are countless methods for using PowerShell to scan your network. Each method has advantages and disadvantages.
Let’s assume that you have decided to use a ping test to look for connected devices and then dig for details about those detected. This method has an obvious shortcoming: It will only detect devices that are not configured to block ICMP traffic. Even so, I am going to use this method in my script for initial device detection.
Another problem is that there is no single way to get device information. The methods vary depending on the device type and configuration. For example, if all devices on your network run Windows, you could use Windows Management Instrumentation to retrieve all kinds of interesting information about each device. Likewise, if you assume that every device on your network uses your organization’s DNS server, you can perform a DNS query to obtain the identity of each detected device.
These methods can be problematic because there are no such guarantees in the real world. On my network, for example, only about half of the devices use my DNS server. Similarly, I have plenty of non-Windows devices to think about.
Just for the sake of argument, let’s pretend that all my computers are domain-joined Windows devices, meaning that they run known operating systems and are DNS registered. Even in that type of situation, it might be unwise to assume that every detected device runs Windows and can be resolved by your DNS server. That’s because a rogue device that happens to make it onto your network could run almost any operating system. Additionally, such a device would likely not be registered with your DNS server.
That being the case, I built a PowerShell script that could tell me at least something about unknown devices that are detected. While there are quite a few ways to do this, I ultimately decided to use the device’s MAC address as a source of information.
Why examine the MAC address, given all the device characteristics that I could have looked at? It’s because the first eight characters of the MAC address can tell you the device manufacturer. This assumes that you are looking at the MAC address in hexadecimal format and that the MAC address is not being spoofed.
Determining the Device Manufacturer in PowerShell
The next big question is how to derive the device’s manufacturer from its MAC address. The IEEE assigns MAC address prefixes to manufacturers and maintains a lengthy document outlining which manufacturer uses which prefix. You can find that document here.
Unfortunately, the IEEE document is only semi-structured, which makes it unsuitable for use with a PowerShell script. However, I have created a CSV file containing a list of nearly 10,000 MAC address prefixes and the corresponding hardware vendor. Because this list is in CSV format, it is possible to bring it into PowerShell using the Import-CSV cmdlet. You can then search the CSV file for any addresses that you may find on your network.
Let’s look at the portion of the script that determines the device manufacturer.
Here is the code:
$Records=Import-CSV C:ScriptsOui.csv$PCMAC='00-01-C8 'ForEach ($Record in $Records){ If ($Record.MAC -eq $PCMAC){ $Vendor=$Record.Vendor Write-Host $Vendor} } The first line of code imports the CSV file, which is named OUI.csv. Even though the CSV file contains nearly 10,000 lines of data, PowerShell has no trouble handling it.
The next line sets up a variable called $PCMAC. This variable exists only as a temporary means for supplying a device MAC address to the PowerShell script. The full script won’t include this line. In this case, however, I am only supplying an MAC address prefix to the script and searching the vendor list to see which vendor uses that prefix. Notice that there is a space at the end of the MAC address prefix. This space exists to make up for an extra space that exists in the CSV file.
Next, the script sets up a For Each loop in which the contents of the $PCMAC variable are compared against the MAC addresses within the CSV file. When a match is found, the corresponding vendor is listed.
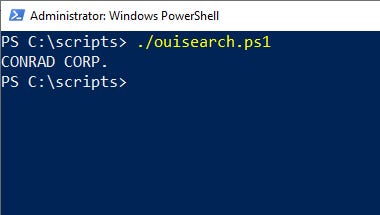
In Figure 1, you can see the sample script’s output.

PowerShell Device 1-1
Figure 1. The script can determine a hardware vendor by MAC address.
The PowerShell Script
Here is the script in its entirety:
#Prepare Script$ErrorActionPreference = "Continue"$Output=@()$Records=Import-CSV C:ScriptsOui.csv# Ping Search$IPs = 1..254 | ForEach -Process {WmiObject -Class Win32_PingStatus -Filter ("Address='192.168.0." + $_ + "'")}$DevicesOnly = $IPs | Where-Object{$_.StatusCode -eq 0}#Extract DataForEach($Device in $DevicesOnly){ $Address = $Device.ProtocolAddress $MAC = arp -a $Address | Select-String '([0-9a-f]{2}-){5}[0-9a-f]{2}' | Select-Object -Expand Matches | Select-Object -Expand Value # https://stackoverflow.com/questions/41632656/getting-the-mac-address-by-arp-a $DNSName = Resolve-DNSName -Name $Address -Server 8.8.8.8 | Select-Object NameHost $HostName=$DNSName.NameHost $PCMAC = $MAC.SubString(0,8)+' ' ForEach ($Record in $Records){ If ($Record.MAC -eq $PCMAC){ $Vendor=$Record.Vendor } } #Write Data to Object$Systems=New-Object -TypeName PSObject$Systems | Add-Member -Type NoteProperty -Name IP -Value $Address$Systems | Add-Member -Type NoteProperty -Name MAC -Value $Mac$Systems | Add-Member -Type NoteProperty -Name Hostname -Value $HostName$Systems | Add-Member -Type NoteProperty -Name Vendor -Value $Vendor$Output += $Systems}#Write Output$Output | Select-Object Hostname, IP, MAC, Vendor | Format-TableHow the PowerShell Script Works
Now let’s look at how the script works.
#Prepare Script$ErrorActionPreference = "Continue"$Output=@()$Records=Import-CSV C:ScriptsOui.csvThe first block of code is meant to initialize the script. It sets the error action preference to continue in case there are any DNS name resolution failures. It also creates an array called $Output that will store the final report of systems on the network. Finally, the initialization portion of the script imports the CSV file that contains the list of hardware vendors.
# Ping Search$IPs = 1..254 | ForEach -Process {WmiObject -Class Win32_PingStatus -Filter ("Address='192.168.0." + $_ + "'")}$DevicesOnly = $IPs | Where-Object{$_.StatusCode -eq 0}The next portion of the script performs a Ping search. You will notice here that the variable $IPs is set to 1..254. This is meant to act as an IP address range. As written, the script will use a loop to ping addresses ranging from 192.168.0.1 to 192.168.0.254. Of course, you will need to change this portion of the script to match your own IP address range. The results of each ping test are stored in a variable called $IPs. Note that pinging 254 addresses can take a considerable amount of time to complete.
The next line of code sets up a variable called $DevicesOnly. Each ping test returns a status code. A status of 0 indicates that a device was found. As such, the $DevicesOnly variable is being used to store a list of IP addresses for which a successful ping has occurred. There is no reason to store unused IP addresses, as they would only slow down an already slow script.
#Extract DataForEach($Device in $DevicesOnly){ $Address = $Device.ProtocolAddress $MAC = arp -a $Address | Select-String '([0-9a-f]{2}-){5}[0-9a-f]{2}' | Select-Object -Expand Matches | Select-Object -Expand Value # https://stackoverflow.com/questions/41632656/getting-the-mac-address-by-arp-a The next portion of the script begins collecting data from the systems that were identified by the ping test. A For Each loop handles each device on the list one at a time. The $Address variable stores the device’s IP address.
Unfortunately, PowerShell does not have a function for acquiring a remote (non-Windows) machine’s MAC address. I found a bit of code on Stack Overflow for using the ARP command to retrieve the MAC address and then use string manipulation to put that address into a usable format.
$DNSName = Resolve-DNSName -Name $Address -Server 8.8.8.8 | Select-Object NameHost $HostName=$DNSName.NameHostThe next line of code retrieves the machine’s DNS name. It uses PowerShell’s Resolve-DNSName cmdlet to perform a DNS query against the machine’s IP address. The -Server parameter is used to specify the IP address of the DNS server that you want to query. Again, you will need to modify this line to reflect your own organization’s DNS server IP address. When the query is complete, the machine’s host name (if one exists) is stored in a variable named $HostName.
$PCMAC = $MAC.SubString(0,8)+' 'The next line of code creates a variable called $PCMAC. This variable’s job is to store the first three characters in the MAC address (plus a space at the end to make up for the extra space in my CSV file). The MAC address prefix is extracted from the MAC address. To do so, I am setting $PCMAC equal to a sub string that consists of the first eight characters of the MAC address, which is stored in the $MAC variable. Again, I append a space to make up for an error in the CSV file.
The next portion of the script performs the vendor lookup. I described this script portion earlier in the article.
#Write Data to Object$Systems=New-Object -TypeName PSObject$Systems | Add-Member -Type NoteProperty -Name IP -Value $Address$Systems | Add-Member -Type NoteProperty -Name MAC -Value $Mac$Systems | Add-Member -Type NoteProperty -Name Hostname -Value $HostName$Systems | Add-Member -Type NoteProperty -Name Vendor -Value $Vendor$Output += $SystemsThe next block of code creates a custom PowerShell object called $Systems. I then add several properties to this object, including the current device’s IP address, MAC address, host name, and vendor. Once the various properties have been added to the object, I added the $Systems object to the $Output variable. Remember, the $Output variable stores the report that is displayed at the end of the script.
#Write Output$Output | Select-Object Hostname, IP, MAC, Vendor | Format-TableThe script’s final line displays the contents of the $Output variable in table form.
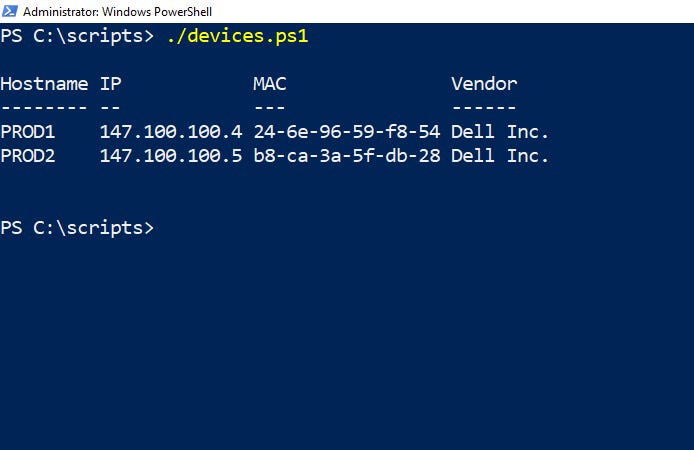
In Figure 2, you can see an example of the script’s output.

PowerShell Device 2-1
Figure 2. This is the output that is produced by the script.
One last thing to note is that the script may not list a vendor if a machine contains a generic or a virtual network adapter.
About the Author
You May Also Like


.jpg?width=700&auto=webp&quality=80&disable=upscale)
