Windows Server Storage: How to Use PowerShell to Track Physical DisksWindows Server Storage: How to Use PowerShell to Track Physical Disks
When it comes to Windows Server storage, assigning disks a new friendly name provides an alternative to using disks’ Device ID.
January 18, 2021

For more technical explainers on PowerShell, read our PowerShell 101: A Technical Explainer for IT Pros report.
Windows Server storage maintenance tasks often are more cumbersome than they need to be. One of the reasons for this is that it can sometimes be difficult to positively identify the disk that you are working on.
This isn’t a big deal if a Windows Server has only a handful of disks. If you look at Figure 1, for example, you can see that entering the Get-PhysicalDisk cmdlet into PowerShell returns a list of the server’s disks. In this case, there are only two disks, and it is really easy to tell one from the other.

Physical Disks 1
Figure 1
It is easy to differentiate between this machine’s disks.
When it comes to production Windows Server storage environments, however, things aren’t always quite so straightforward. To see what I mean, check out figure 2. This particular machine is equipped with 10 disks, and nine of them are identical to one another. The disks have unique device IDs, but, aside from that, it would be tough to tell the disks apart.

Physical Disks 2
Figure 2
This server has nine identical disks.
With that in mind, imagine that you needed to perform a maintenance task on one of the disks in your WIndows Server storage environment. Because the disks are essentially identical, you would have little choice but to reference the disk by its Device ID. It doesn’t have to be that way, though. You can use PowerShell to manually assign a new, friendly name to each disk. This gives you the option of managing disks based on their friendly names rather than being stuck using the disk’s Device ID.
The first step in modifying a disk’s friendly name is to map a variable to the disk that you want to modify. The easiest way to do this is to use the Get-PhysicalDisk cmdlet as was done earlier, but then append the Where-Object cmdlet (which is sometimes expressed simply as Where), followed by a filter referencing the disk’s Device ID number.
For the sake of demonstration, let’s change the friendly name for the first disk on the list in the figure above. Since this disk is the system’s boot disk and system disk, we will change the name from Msft Virtual Disk to System Disk.
It is important to make note of the disk’s Device ID. In this case, the Device ID is 0. Next, we need to use the Where-Object cmdlet to make a direct reference to the disk. Here is a command that can be used to do the job:
$A = Get-PhysicalDisk | Where-Object DeviceID -eq 0This command creates a variable called $A and maps it to a physical disk with a device ID that is equal (-eq) to 0. You can see what the command looks like in Figure 3.

Physical Disks 3
Figure 3
I have mapped the variable $A to the server’s boot disk.
The next step in the process is to set a new name for the disk. You can do this by using the Set-PhysicalDisk command.
Under ideal circumstances, you can use a single command to change a disk’s friendly name. All you have to do is to use the Set-PhysicalDisk cmdlet in a way that references the old name and provides a new friendly name. Suppose, for instance, that I had a physical disk named Old and I wanted to change the friendly name to New. I could accomplish the renaming task by using this command:
Set-PhysicalDisk -FriendlyName “Old” -NewFriendlyName “New”Unfortunately, this technique won’t work in this particular situation because all of the physical disks have the same friendly name. Fortunately, we have already mapped a variable to the disk of interest. As such, we need only use the variable as pipeline input into the Set-PhysicalDisk cmdlet. Here is what the command looks like:
$A | Set-PhysicalDisk -NewFriendlyName “System Disk”You can see the command and its output in Figure 4.

Physical Disks 4
Figure 4
I have changed the friendly name for disk 0.
Incidentally, you can use a similar technique to modify other attributes. The catch, however, is that the column headers shown in the figure above do not always align to the property names.
Here’s how this works.
You might have noticed in the figure above that the system disk’s media type is set to unknown. Let’s change the media type to SSD.
The first step in doing so is to find the name of the property that stores the media type. Since we already have the disk mapped to a variable, we can use this command:
$A | Select-Object *This command outputs a list of all the disk’s properties. In this case, the property is indeed named Media Type, as shown in Figure 5.

Physical Disks 5
Figure 5
The Media Type property is named Media Type.
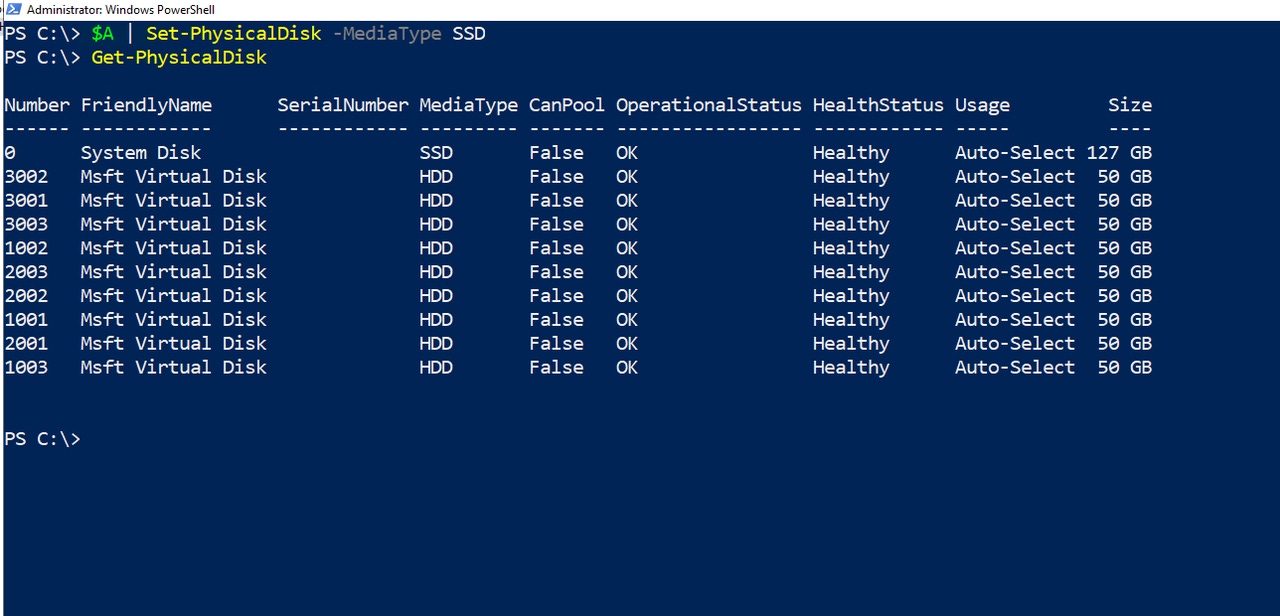
Now that we know the property name, we can change the media type to SSD by using a command that’s really similar to the one that we used earlier:
$A | Set-PhysicalDisk -MediaType SSDYou can see the command and its output in Figure 6.

Physical Disks 6
Figure 6
I have changed the disk’s media type to SSD.
Conclusion
In production Windows Server storage environments, providing more meaningful IDs to disks--especially when they are identical with the exception of their device IDs--can make it easier to positively identify the disks that you are working on, easing some of the administrative burden.
About the Author
You May Also Like


.jpg?width=700&auto=webp&quality=80&disable=upscale)
