Migrating Active Directory Domain Controller from Windows Server 2012 R2 to Windows Server 2016 update from February 2017Migrating Active Directory Domain Controller from Windows Server 2012 R2 to Windows Server 2016 update from February 2017
I have written this article to help you migrate your existing Active Directory Domain Controller which is running on Windows Server 2012 R2 to Windows Server 2016. So, let’s get started!
February 27, 2017

I have written this article to help you migrate your existing Active Directory Domain Controller which is running on Windows Server 2012 R2 to Windows Server 2016. So, let’s get started!
Migrating to Windows Server 2016: Important Notes
In my lab environment, I am using standard edition with desktop experience for both Windows Server 2012 R2 DC and Windows Server 2016. You cannot switch from Server Core installation to a Server with Desktop Experience (and vice versa). Before you move, please see Supported Upgrade Paths for Windows Server 2016 and Windows Server Installation and Upgrade for details, including upgrade path limitations, license conversion and conversion of evaluation edition to retail.
Preparing Windows Server 2016
- Configure the network settings and point to DNS of Windows Server 2012 R2 domain controller. Verify and resolve your domain from command prompt
- Install latest updates from Microsoft
- Turn off windows firewall
Installing Active Directory Domain Services on Windows Server 2016
Step 1: Login to windows Server 2016 machine with local admin credentials
Step 2: Open server manager dashboard, click Add Roles and features
Step 3: Click Next
Step 4: Choose destination server (Windows Server 2016) for Active Directory domain services role from server pool and click Next
Step 5: Choose “Role-based or feature-based installation” radio button and click Next
Step 6: Scroll down and choose Active Directory Domain Services from server roles. When a new window appears, click Add Features
Step 7: Click Next until confirm installation selections page
Step 8: Click Install and wait for an installation to finish
Step 9: When an installation has been completed and server prompts you for further configuration, click Promote this server to a domain controller
Step 10: Choose Add a domain controller to an existing domain radio button. Provide the existing domain name and click Select, when asked supply domain admin credentials
Step 11: Click Next
Step 12: Keep default selections and provide DSRM (Directory Services Restore Mode) password
Step 13: Click Next until prerequisites check window
Step 14: Click Install. When a wizard finishes the installation, the server will be rebooted.
Migrating FSMO (Flexible Single Master Operation) roles to Windows Server 2016
Step 1: Login to Windows Server 2016 machine with domain admin credentials
Step 2: Open active directory users and computers console. Right-click your domain and then click Operations Masters

Step 3: Open RID tab and click Change

Step 4: When you are asked for confirmation, click Yes

Step 5: Click OK

Step 6: Repeat the steps from 3 to 5 for PDC and Infrastructure roles
Step 7: Open Active Directory Domains and Trust. Right-click your domain and then click Operations master
Step 8: Repeat the steps from 3 to 5 for domain naming operations master
Step 9: Open command prompt and execute regsvr32 schmmgmt.dll

Step 10: Click OK when a window appears

Step 11: Open an Active Directory Schema Console in MMC and click File -> Add/Remove Snap-in
Step 12: Select Active Directory Schema from available snap-ins and click Add. Click OK

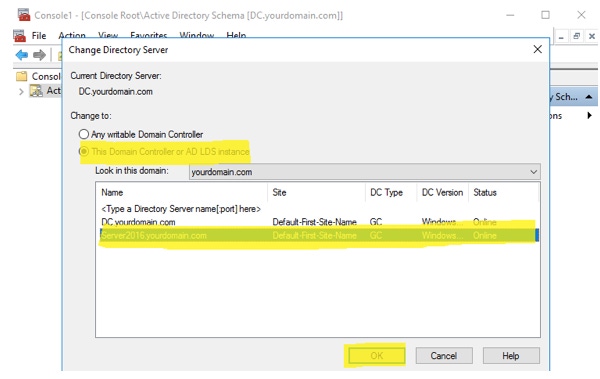
Step 13: Right-click the Active Directory Schema in console and then click Change Active Directory Domain Controller

Step 14: Select Windows Server 2016 machine and click OK

Step 15: Click OK
Step 16: Again right-click Active Directory Schema and click Operations Master
Step 17: Repeat the steps for 3 to 5 for schema master
Step 18: Open Powershell with elevated privileges and execute “netdom query fsmo” command. Check if all the five FSMO roles have been transferred to Active Directory Domain Controller Windows Server 2016

Uninstalling Active Directory Domain Services from Windows Server 2012 R2
Step 1: Login to Windows Server 2012 R2 machine with domain admin credentials
Step 2: Open PowerShell with elevated privileges and execute Uninstall-ADDSDomainController -DemoteOperationMasterRole –RemoveApplicationPartition command

Step 3: Provide the local administrator password and press enter
Step 4: Be patient. The operation will be completed in few minutes and server will be rebooted automatically

Upgrading Forest and Domain Functional Levels to Windows Server 2016
Step 1: Login to Windows Server 2016 domain controller
Step 2: Open PowerShell with elevated privileges
Step 3: Execute Set-ADDomainMode –identity yourdomain.com –DomainMode Windows2016Domain command to change domain functional level

Step 4: Execute Set-ADForestMode –identity yourdomain.com –ForestMode Windows2016Forest command to change forest functional local

Step 5: Last step, confirm if domain and forest functional levels have really been changed. Execute Get-ADDomain | fl Name, DomainMode and Get-ADForest | fl Name, ForestMode

Cleaning Up Active Directory in Windows Server 2016
If there is a data about demoted or failed DCs inside an active directory, it can create troubles especially when you are promoting some server to an additional domain controller. Therefore, you should clean up active directory metadata. You can follow the complete tutorial at this link https://www.petri.com/delete_failed_dcs_from_ad
Step 1: Open Active Directory Users and Computers console. Click Computers container. Select the Windows Server 2012 R2 machine and remove it using Del keyboard icon
Step 2: Open Active Directory Sites and Services console. Fully expand Default-First-Site-Name, right-click your old Windows Server 2012 R2 machine and then click Delete
Step 3: Open DNS Manager console. Delete the CNAME, host and other records of Windows Server 2012 R2 machine
Conclusion
Thank you for following my tutorial. I hope you have enjoyed it. There is another quick and short method with fewer PowerShell commands, try at your own risk. If you are stuck somewhere with an error, please feel free to leave a comment and I’ll help you to resolve.
About the Author
You May Also Like


.jpg?width=700&auto=webp&quality=80&disable=upscale)
