How to Configure Windows 10 Facial RecognitionHow to Configure Windows 10 Facial Recognition
Windows 10 facial recognition is one of the OS’s most convenient yet under-used tools
March 9, 2021

Windows 10 facial recognition is one of the most convenient yet under-used security features in the operating system. This capability, which is part of Windows Hello, allows users to power up their devices and be automatically logged in when the devices recognize their faces.
I have been using Windows 10 facial recognition capabilities on my Microsoft Surface Book 2 device for a couple of years. During this time, I have found facial recognition to work extremely well. The authentication process is both accurate and incredibly fast. On occasion, I have been authenticated before I even realized that the boot process was complete.
So, if Windows 10 facial recognition capabilities work so well, why aren’t more people taking advantage of them? Historically, the No. 1 reason is steep hardware requirements.
Unfortunately, Windows Hello cannot be used with a standard, run-of-the-mill webcam. The basic webcams that are integrated into most Windows 10 devices are unable to differentiate real life from a photograph. If Microsoft had chosen to allow Windows Hello to work with these types of cameras, then it would be possible to fool the authentication process simply by holding up a picture of the person whose identity you want to spoof.
To keep this from happening, Microsoft requires a special infrared camera that is capable of seeing in 3D. More specifically, Microsoft requires an Intel RealSense or 3D camera. These cameras are similar to the ones that allow Microsoft HoloLens to sense the objects in the room where it is being used. A camera that is compatible with Windows Hello is a standard feature on some of the Microsoft Surface devices, but third-party devices tend not to be equipped with such a camera.
Fortunately, this is starting to change. Dell, for example, now offers compatible cameras as an optional feature on some of its laptops. Other manufacturers such as HP, Lenovo, and Samsung have also begun offering Windows Hello-compatible cameras on some of their laptops.
It is worth noting that it is also possible to set up Windows Hello-based facial recognition on desktop computers. The PC that I am using right now to write this article is equipped with a Logitech Brio 4K Ultra HD Webcam. Although this is one of the pricier Webcams on the market, it does provide a way of adding Windows 10 facial recognition capabilities to nearly any PC that has a USB port.
Setting up Windows Hello for facial recognition is a relatively easy process. Before you get started, however, I strongly recommend taking a moment to make sure that you have the latest drivers installed for your webcam. I have seen several instances recently of an outdated driver causing Windows Hello to think that a device’s webcam is incompatible with facial recognition.
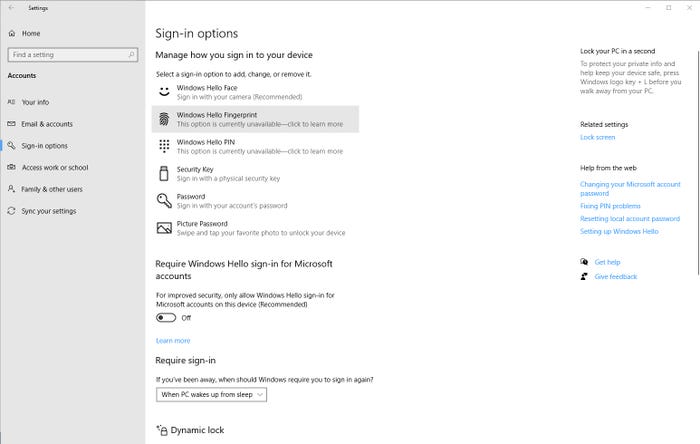
To configure Windows Hello to use facial recognition, log into Windows and then click on Settings, followed by Accounts. When you reach the Accounts screen, click on Sign in Options. As you can see in Figure 1, Windows 10 offers a number of different sign-in options. These include things like facial recognition, fingerprint recognition, a PIN, a security key, a password or a picture password.

Windows Hello 1
Figure 1
Windows 10 gives you lots of different authentication options.
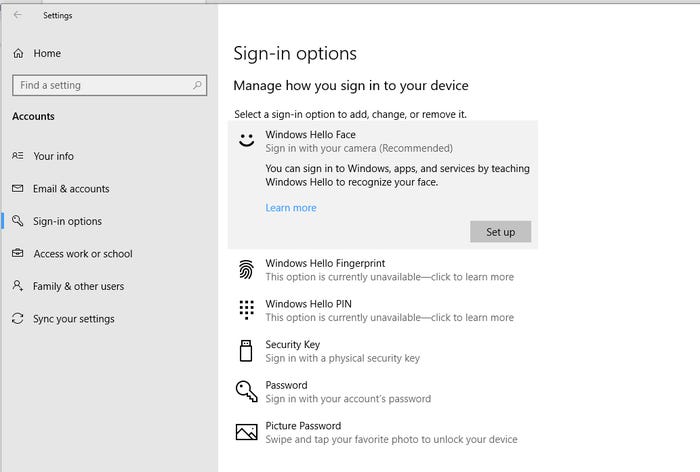
At this point, go ahead and click on Windows Hello Face. Windows will take a moment to make sure that you have a compatible camera and will then expand the Windows Hello Face section. Click on the Setup button shown in Figure 2.

Windows Hello 2
Figure 2
Click on the Setup button.
Windows will now launch the Windows Hello Setup wizard. Click the Get Started button and you will be taken to an authentication screen. You will need to enter your current PIN or password before Windows will allow you to continue. Windows will now power up your camera. Make sure that your face is centered in the camera’s field of view and that you are looking directly at the camera. Windows will tell you what to do, as shown in Figure 3.

Windows Hello 3
Figure 3
Make sure that you are looking at the camera.
Once Windows learns your face, it will prompt you to enter and confirm a PIN (if you haven’t already). The PIN will be used to gain access to the machine if facial recognition fails.
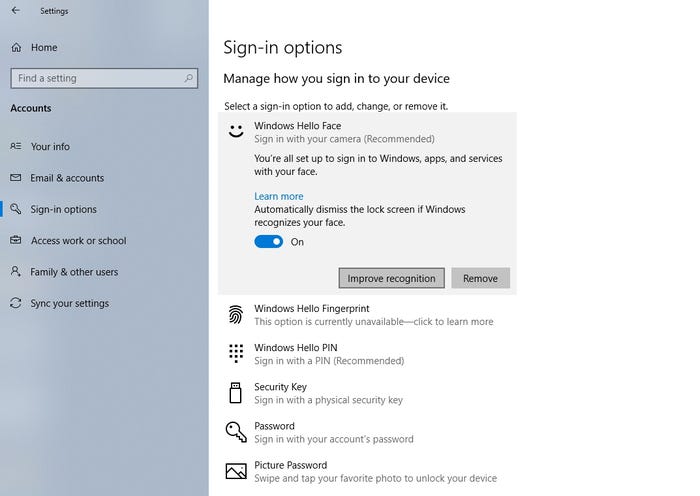
When the entire process completes, you have the option of improving the facial recognition capabilities by clicking on the Improve Recognition button, shown in Figure 4. If you wear glasses, for example, you could use the Improve Recognition button to make it so that Windows recognizes you both with and without your glasses.

Windows Hello 4
Figure 4
You can take steps to improve Windows’ ability to recognize you.
About the Author
You May Also Like


.jpg?width=700&auto=webp&quality=80&disable=upscale)
