After the Windows 10 installation, the clean-up -- here's what to doAfter the Windows 10 installation, the clean-up -- here's what to do
Once you are committed to your upgrade to Windows 10 it is time to recover some space on your hard drive. This will help you free up that space by removing your old Windows installation that was backed up during the upgrade to Windows 10.

Yesterday I shared with you my recommendations for the first five things you should update and customize after installing your upgrade to Windows 10 after tomorrow’s general release.
Once you have settled into your new Windows 10 installation and are satisfied with how everything works, you can do a simple maintenance task that will save you a significant amount of space on your device.
This is not so much of an issue if you are on a desktop or laptop with a large hard drive however, on systems with small storage devices it can recover a few gigabytes of space which can be helpful.
When your Windows 7 or 8.1 machine is upgraded to Windows 10 your Windows folder from the previous OS is stored on your hard drive in a folder named Windows.old. The files in this folder are used to revert back to your old OS if there is any issue in Windows 10 during the upgrade.
If the upgrade goes well the Windows.old folder it is maintained so that you can revert back during the first 30 days after upgrading to Windows 10. I suspect that after the 30 day period this folder will be removed automatically or you could possibly be prompted to delete it. One thing is for sure – there is only a 30 day window to revert back to your previous OS. After that reverting back means reinstallation of your former version of Windows.
So with all that known – once you have decided that your install of Windows 10 is good to go and you are satisfied then you can carry out this clean up task.
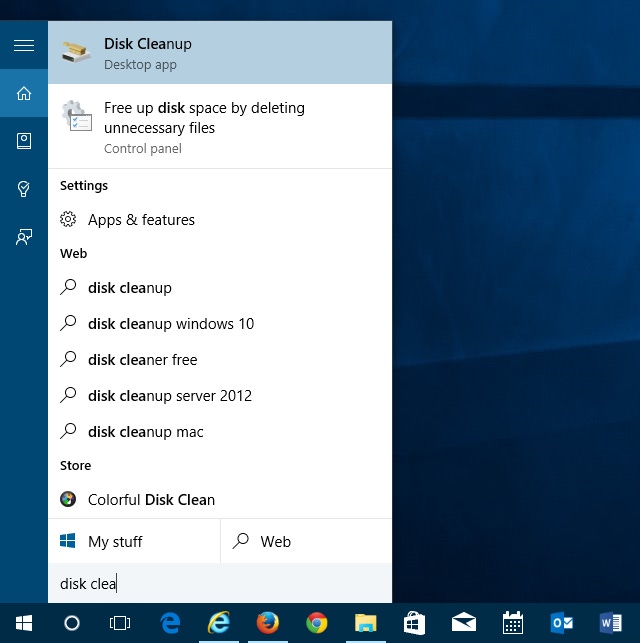
The Windows.old folder cannot be manually deleted as it will result in an error since it is a system level folder. In order to remove it you must use the Disk Cleanup program on Windows 10.
To do this click on the Search icon in the taskbar or tap the Windows key to open the Start Menu and just start typing Disk cleanup (1). You should see the Disk Cleanup program entry at the top of the search results (2). Click or tap the program name to start it.
When the program window opens it defaults to the hard drive where your Windows installation is located. Click OK to begin the initial scan.
After the initial scan is done you must then select the option to Clean up system files (1) and then begin the scan again by clicking OK.
Once the scan is completed there are two main entries to look for. One you can delete the other you should retain.
Let me explain.
In these two screenshots, thanks to @LocalJoost & @jussipalo for the images, you can see an entry labelled Previous Windows installation(s). They are varying sizes because everyone’s install will be different based on software installed and your files.
This is tied to the Windows.old folder I talked about earlier and you can click the box to the left of this entry and then click OK to remove Windows.old and free up all of that disk space.
You will be prompted and warned that there is no turning back but you are ready to commit to Windows 10 anyway so click to confirm that. The system will go through the cleanup process and you will regain that disk space.
The second entry in this list of space consuming files is the Temporary Internet Files. This can also take up varying sizes of disk space depending on the size of your Internet cache.
Something else that is stored under the Temporary Internet Files area are any updates and new builds for Windows 10 that have been downloaded. They are stored there so that you can take advantage of the new Peer to Peer distribution of Windows Updates.
As long as you keep the Temporary Internet Files on your machine those previously downloaded files will be shared amongst the computers on your network instead of each machine downloading them separately.
This should save you a lot of bandwidth in the long run so do not remove these files using the Disk Cleanup tool. If you want to empty your browsers cache then use the tools in your web browser to delete those files and it will not impact the stored update files.
What areas do you cleanup after installing a new operating system?
But, wait...there's probably more so be sure to follow me on Twitter and Google+.
About the Author
You May Also Like
.jpg?width=100&auto=webp&quality=80&disable=upscale)
.jpg?width=400&auto=webp&quality=80&disable=upscale)


.jpg?width=700&auto=webp&quality=80&disable=upscale)
