Q. How can I easily stop and start an Azure VM at certain times?Q. How can I easily stop and start an Azure VM at certain times?
Control VMs using Azure Automation easily.
July 14, 2015

Q. How can I easily stop and start an Azure VM at certain times?
A. Azure Automation provides an easy way to run PowerShell workflows in Azure and with the Azure AD integration, this is now easier than ever to use.
In this walkthrough a new Azure Automation account will be created, a securely stored Azure AD credential created, two runbooks (PowerShell workflows) authored to stop/start your VM, and then assigning a schedule to run them at required times. I'm going to do this in the new Azure portal, https://portal.azure.com.
First: create a new Azure Automation account and this will be done as part of the first actual runbook creation.
From the New menu select Management - Runbook.
Click Automation account and select New Account.
As shown below enter a name for the automation account, select a Resource Group (or create a new one) along with the region. The region does not have to match the region of the actual VM(s) you wish to manage. Click OK to create the account.
The Automation Account is now created.
In the Runbook name type Start-VM (or whatever name you wish to use for the start) and set the Runbook type to Textual, not Graphical.
Unselect the "Pin to Startboard" option at the bottom of the blade and click Create.
Now click the Browse All button in the hub menu and select Automation Accounts. Your new automation account will be displayed. Click it.
The next step is to create the credential that will be used by the runbooks to authenticate to our Azure subscription.
Click the Assets tile then click the Credentials tile in the Assets blade.
Click the Add a credential button.
Give the credential a name then type in the username and password as shown.
The two runbooks can now be created.
Navigate back to the Azure Automation account blade you created and click the Runbooks tile.
Select the runbook created earlier which was the Start runbook. This will open the runbooks blade and click the Edit button.
Paste in the code below replacing the workflow name with that of your runbook (that is already populated), the name of your credential, the name of your subscription and the VMs name and cloud service.
workflow Start-MineVM{ $Cred = Get-AutomationPSCredential -Name 'MyCred'Add-AzureAccount -Credential $CredSelect-AzureSubscription -SubscriptionName 'Windows Azure Internal Consumption'Start-AzureVM -ServiceName 'Minecraft-Savill' -Name 'Minecraft'}Below is an example.
Click Save once the code is saved. Note that if you forget the name of the credential you can expand Assets - Credentials, right click on the credential and select the Add to canvas action which will place code in your script to fetch the credential. If you are unsure of your VM name and cloud service select the Browse all hub menu tile, select Virtual machines (classic) then select your VM. The Essentials section of the VMs blade shows its name and cloud service (the first part of the DNS name). Remember you can click the Active tile on the hub menu to quickly jump back to your runbook editing.
Once the runbook is saved you can click the Test pane button which allows you to try running the runbook and ensure it works by clicking the Start button.
Once this is done and you are happy with the runbook click the Publish button and click Yes to the confirmation.
Then close the blades until you are back at the Runbooks blade.
Click the Add a runbook button to create the new runbook to stop the VM.
Select the Quick Create option and enter a name and again set the type to Textual.
Once it is created the edit window will open. The same code is being pasted except this time the action is Stop-AzureVM and the -Force parameter is added to avoid user input being required.
workflow Minecraft-Stop{ $Cred = Get-AutomationPSCredential -Name 'MyCred'Add-AzureAccount -Credential $CredSelect-AzureSubscription -SubscriptionName 'Windows Azure Internal Consumption'Stop-AzureVM -ServiceName 'Minecraft-Savill' -Name 'Minecraft' -Force}Once again test the script and make sure you select the Publish option. You now have a runbook to start and stop your Azure VM.
The final step is to assign a schedule to these runbooks.
Select a runbook (this will be repeated for the other) which will open the runbooks blade.
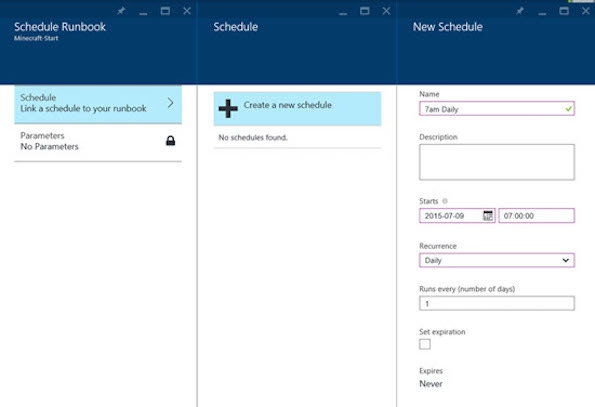
Click the Schedules tile and click Add a schedule. If the Add a schedule button is not available it means you forgot to publish the runbook so go back and do that from the edit blade of the runbook.
Select the Schedule option, select Create a new schedule then give the schedule a name (remember these schedules can be assigned to multiple runbooks so try to avoid naming specific to the runbook, rather name it based on its time and recurrence), a start time and a recurrence. For example for the Start maybe it should start at 7am every day and click Create.
Now repeat for the other runbook with its desired time.
Your runbooks will now automatically run at the required times to control your VM(s). Remember that if you need to cleanly stop applications running in the VM make sure you have some process to do this (maybe a scheduled task inside the OS that triggers shortly before it will be shutdown or maybe just a manual action like getting your kids to run /stop in their Minecraft game before they go to bed :-) ).
If you want a more advanced schedule then use Azure Scheduler to call the Azure Automation runbook. I cover this at http://windowsitpro.com/azure/call-azure-automation-azure-scheduler and http://windowsitpro.com/azure/easily-call-azure-automations-azure-scheduler.
About the Author
You May Also Like
.png?width=100&auto=webp&quality=80&disable=upscale)
.png?width=400&auto=webp&quality=80&disable=upscale)


.jpg?width=700&auto=webp&quality=80&disable=upscale)
