How to Classify Files with File Server Resource ManagerHow to Classify Files with File Server Resource Manager
Windows Server’s native File Server Resource Manager allows administrators to classify files in order to simplify management.
December 29, 2018

One of the most underrated of Windows Server’s native tools is the File Server Resource Manager, which allows administrators to classify the files residing on file servers in order to simplify the management of those files. Here's how to get started.
The File Server Resource Manager is not installed by default. You can install it through the Server Manager’s Add Roles and Features Wizard. The list of server roles includes an entry for File and Storage Services. If you expand the File and Storage Services container, you will find a File and iSCSI Services container beneath it. Expand this container, and you will see an option for the File Server Resource Manager, as shown in Figure 1.

Figure 1
You will need to install the File Server Resource Manager before using it.
The first step in using classifications is to create a classification property. A classification property is used to assign a tag to the files within a folder or a volume. For example, you might tag a group of files by applying a string value to those files.
To create a classification property, open the File Server Resource Manager and navigate through the console tree to Classification Management | Classification Properties. Right click on the Classification properties container, and choose the Create Local Property command from the shortcut menu. You will then be taken to the Create Local Classification Property dialog box shown in Figure 2.

Figure 2
The first step in the process is to create a local classification property.
As you can see in the figure, a classification property is really just a named container that is bound to a property type. The property type might be Yes / No, String, Number or any of several other data types.
When you create a classification property, you need only provide a name and optional description for the property, and then select a property type. You are not actually assigning property values in this step.
The second step in the process is to create a classification rule. A classification rule determines the value that gets assigned to a property.
To create a classification rule, right click on the Classification Rules container, and then select the Create Classification Rule command from the shortcut menu. When you do, you will be taken to the Create Classification Rule properties sheet. This properties sheet contains several tabs, and the General tab is selected by default.
Just as classification properties had to be named, classification rules also have to be named. The General tab allows you to enter a name and an optional description for the rule that you are creating. This tab also contains a checkbox that you can use to enable or disable the rule. Newly created rules are enabled by default.
The Scope tab, which you can see in Figure 3, is where we really get into the inner workings of the rule. As you can see in the figure, the Scope tab allows you to choose which types of files the rule will be applied to. For example, you might choose to apply the rule to user files, but not to application files.

Figure 3
The scope tab allows you to choose the file types and folders to which the rule will be applied.
The Scope tab also allows you to choose the folders to which the rule will be applied. Just click the Add button and make your selection.
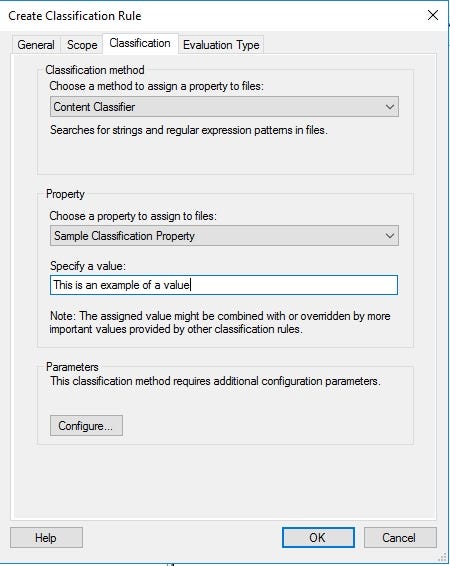
The next tab that you will need to visit is the Classification tab. This tab requires you to select the classification method that you wish to use. You can choose among the Content Classifier, the Folder Classifier and the Windows PowerShell classifier. You should choose a classifier based on the types of data that you expect to be classifying.
Next, you will have to select a property to assign to the files that meet the classification criteria. Remember that classification type that I mentioned earlier? This is where you select it. Finally, you will need to provide a value to apply to the selected property for the files to which the rule applies. You can see what this tab looks like in Figure 4.

Figure 4
This is what the Classification tab looks like.
Finally, we have the Evaluation tab, which allows you to set the rules for the classification. For example, if a file already has a classification, should the classifier overwrite the value or ignore it?
It is worth noting that the classification process is normally a one-time operation. If you do need to periodically rerun a classification rule, however, you can right click on the Classification Rules container and select the scheduling option.
About the Author
You May Also Like


.jpg?width=700&auto=webp&quality=80&disable=upscale)
