SharePoint How-To Series: PowerShell PrimerSharePoint How-To Series: PowerShell Primer
Most elements within SharePoint can be configured, queried or updated using PowerShell.
October 13, 2015

In our last post we walked through the use of basic PowerShell as part of the administration toolkit. In addition to using PowerShell for administration, there are times where it needs to be used for setup, configuration and just general maintenance of the SharePoint environment.
Most elements within SharePoint can be configured, queried or updated using PowerShell. There may be times where you need to export all the SharePoint Site Lists out for some kind of process.
To begin with we need to set some property values that we will use later in the code.
$versions = [Microsoft.SharePoint.Deployment.SPIncludeVersions]::All$exportObject = New-Object Microsoft.SharePoint.Deployment.SPExportObject$exportObject.Type = [Microsoft.SharePoint.Deployment.SPDeploymentObjectType]::List$exportObject.IncludeDescendants = [Microsoft.SharePoint.Deployment.SPIncludeDescendants]::All$settings = New-Object Microsoft.SharePoint.Deployment.SPExportSettings$settings.ExportMethod = [Microsoft.SharePoint.Deployment.SPExportMethodType]::ExportAll$settings.IncludeVersions = $versions$settings.IncludeSecurity = [Microsoft.SharePoint.Deployment.SPIncludeSecurity]::All$settings.OverwriteExistingDataFile = 1$settings.ExcludeDependencies = $truesharepointpsscripts.codeplex.com
Once we have the properties set in the code, we simply drop into a loop that is defined as a “ForEach” loop. This type of coding is not SharePoint-specific but PowerShell-native. However, in order for everything to work we do need to load the SharePoint PowerShell Snap-in. This can be achieved in two ways, depending on what you are trying to do.
Option 1
[System.Reflection.Assembly]::LoadWithPartialName
("Microsoft.SharePoint")
[System.Reflection.Assembly]::LoadWithPartialName
("Microsoft.SharePoint.Deployment")
Option 2
Add-PSSnapin "Microsoft.SharePoint.PowerShell"
Once the Snap-in is loaded, we can build out the loop to iterate through the sites.
$SharePointSite = new-object Microsoft.SharePoint.SPSite(“SharePoint URL”)$web = $site.OpenWeb() foreach($list in $web.lists) { // Code here for actual export } $web.Dispose() $site.Dispose()So now that we have the main loop of code, we can really add whatever code we need to export, import, add, update or delete the items. For this example, we will create the export.
$settings.SiteUrl = $web.Url$exportObject.Id = $list.ID$newFolderPath = $ExportRootPath + $list.TitleNew-Item $newFolderPath -type directory -force$settings.FileLocation = $newFolderPath$settings.BaseFileName = $list.ID.ToString() + “_Extracted” +".bak"$settings.FileCompression = 1$settings.ExportObjects.Add($exportObject)$export = New-Object Microsoft.SharePoint.Deployment.SPExport($settings)$export.Run()The PowerShell above simply accesses the site, grabs the list and then, using the inbuilt “Export” capability of SharePoint, exports it out to a “bak” file. Now, you may not have that requirement, but you may want to add users to groups, single or multiple. To achieve this, we could use the User Interface; however, when you complete this task on an almost hourly basis, PowerShell scripts come in very handy indeed. To add users to SharePoint Site Groups in PowerShell we first need to decide whether we are going to perform single users or multiple. For this example, we will ad bulk users to SharePoint.
To start we would have loaded the SharePoint PowerShell Snap-in; we could then define the variables we need.
$SiteUrl = “SharePoint URL”$SiteGroup = “Site Group”$UserList = Get-Content “PathUserAccounts.txt”Once we have the values set, we create a loop based on the site URL we are using to read through the content. It then makes a call to “EnsureUser,” which will create the user if it does not exist. The loop then calls an out-of-the-box function called “Set-SPUser” to set properties as needed.
$web = Get-SPWeb – Identity $SiteUrlforeach($NewUser in $AllNewUsers) { $web.EnsureUser($NewUser)Set-SPUser –Identity $NewUser –Web $SiteUrl –Group $SiteGroup}Now you have the ability to not only export all lists but also bulk-add users. This is great, but being able to use PowerShell to diagnose SharePoint issues and problems would be better. If, like me, you have spent hours, days or what feels like weeks looking at ULS logs just to find the Correlation ID, then let me save you some time.
First off, download ULS Viewer if you have not used it yet. There is no explanation needed for it right now except to say that you should connect it to your log files location.
http://www.microsoft.com/en-us/download/details.aspx?id=44020
Simply launch it after downloading to the SharePoint Server, and select the “File” menu.

Choose the “ULS” option from the sub menu. This will then show you (for you to check) the ULS log location.

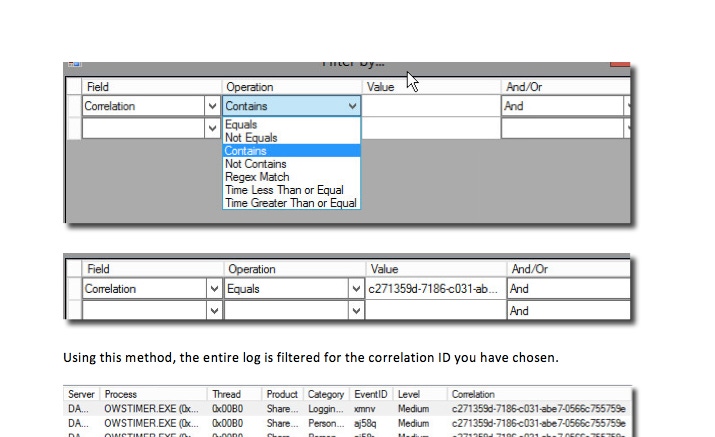
Once you have checked this, you press the “OK” button and it should load directly from the ULS logs. Once it loads, you can use the filtering options to look for a correlation ID or some other value or property.


Using this method, the entire log is filtered for the correlation ID you have chosen.

Now, to make this happen we had to download ULS Viewer and then open the log files and assign the filter. If we didn’t want to do that, or if we had limitations on what we could install or run from the servers, we could use trusty PowerShell.
For this we will use the “Merge-SPLogFile” command, passing in the same Correlation ID we had before. The PowerShell is a simple one-line command that will look in the log files for us, looking for the specific ID. After that, we will output just the specific entries to a log file on the server.
Merge-SPLogFile -Path -Correlation “Correlation ID”
Merge-SPlogfile –Path “Pathlog.log” –Correlation c271359d-7186-c031-abe7-0566c-755759e
As you can see, this is a short and simple way of getting to the information you need quickly without the need to install an application on a server that in reality does not need it to be there.
PowerShell is such a great tool that can be used for all administration elements of SharePoint. In the next post, we will discuss core administration of SharePoint.
This article is part of a series of blog posts and webinars we are developing to help you get your hands around (or more fully around) SharePoint. So let’s get ready for some great content, great discussions and great presentations to help you further your knowledge and even your career. The list below outlines the next four months of blog posts and webinars.
October Blog Series: SharePoint Administration (to register, click here)
October Webinar: SharePoint End User Security
November Blog Series: SharePoint for Beginners
November Webinar: SharePoint Administration
December Blog Series: SharePoint Business Intelligence
January Blog Series: Building SharePoint Add-ins
January Webinar: SharePoint Business Intelligence
About the Author
You May Also Like


.jpg?width=700&auto=webp&quality=80&disable=upscale)
