PowerShell and AI: Create a Microsoft Word CopilotPowerShell and AI: Create a Microsoft Word Copilot
Explore a PowerShell script that allows users to interact with a Word document using natural language queries, inspired by Microsoft’s Copilot.
August 16, 2024

Inspired by Microsoft Copilot’s popularity, I wondered if something similar could be built using PowerShell. Specifically, could PowerShell open a Word document and allow users to ask questions about it using natural language?
This article will demonstrate a proof of concept for this idea rather than a full-blown application. While it is technically feasible to build a PowerShell script with a GUI for editing Word documents – manually or with a Copilot-like assistant – such a project would require extensive coding. To keep things simple, I have created a basic prototype. However, if there is enough interest, I may develop a full PowerShell-based editor in the future.
Two steps go into using a Large Language Model to query a Word document. First, extract the text from the Word document into a format PowerShell can use. Second, link your PowerShell script to ChatGPT to analyze the document.
Bringing a Word Document Into PowerShell
It is relatively easy to read a Word document into PowerShell. However, there is one important requirement: You must have Microsoft Word installed on your system for the script to work. The script opens Microsoft Word, though Word remains hidden from view.
Here is the code:
#Prepare Microsoft WordAdd-Type -AssemblyName "Microsoft.Office.Interop.Word"$Word = New-Object -ComObject Word.Application$Word.Visible = $false# Open the Word Document$MyDocument = "C:\Scripts\Sample Document.docx"$Doc = $Word.Documents.Open($MyDocument)# Read the entire content of the document$DocumentText = $Doc.Content.Text# Display the content in the PowerShell consoleWrite-Host $DocumentText# Close the document and clean up$Doc.Close([ref]$False)$Word.Quit()[System.Runtime.Interopservices.Marshal]::ReleaseComObject($Doc) | Out-Null[System.Runtime.Interopservices.Marshal]::ReleaseComObject($Word) | Out-Null[GC]::Collect()[GC]::WaitForPendingFinalizers()The script begins by opening the Microsoft.Office.Interop.Word assembly and creating an object called $Word, which represents the Microsoft Word application. That is why I could use the $Word.Visible=$False command to hide Word from view.
Next, the script opens a Microsoft Word document. I have used one of my old articles and saved it as C:\Scripts\Sample Document.txt for this demonstration. The document’s path and filename are stored in a PowerShell variable called $MyDocument. Even though I have hardcoded the document name, you could easily add a function to select the document you want to open.
The script then opens the document within the hidden instance of Word. Since $Word represents the Microsoft Word application, the command $Doc=$Word.Documents.Open($MyDocument) opens the specified document.
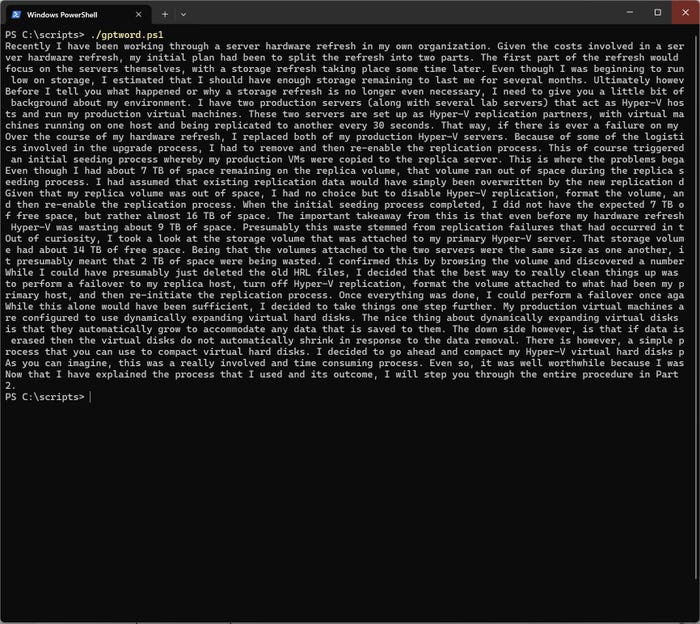
Once the document is open, we must extract its text into a format that PowerShell can use. Since the goal is to analyze the document’s contents using AI, we don’t have to worry about anything cosmetic. The important thing is to extract the document’s raw text. The script does this by creating a variable called $DocumentText and setting it to $Doc.Content.Text. A Write-Host statement displays this variable’s contents, verifying that we have extracted the text. You can see what this looks like in Figure 1.

Figure 1. I have extracted the document’s text.
The remaining code closes Microsoft Word and performs cleanup. The $Doc.Close([ref]$False) command closes the document without saving any changes (as the script doesn’t modify the document). The $Word.Quit command then closes Microsoft Word. Finally, the script releases the COM objects created at the beginning and performs garbage collection. While the script might work without these steps, skipping them could eventually cause PowerShell to run out of memory if the script is run repeatedly.
Analyze the Word Document’s Contents
Now that I have demonstrated how to extract a Word document’s contents into a PowerShell variable, let’s discuss how to use AI to analyze the document.
I will provide the script upfront and then explain what it does and how it works.
$APIKey = Get-Content C:\Scripts\GPTKey.txt$ApiEndpoint = "https://api.openai.com/v1/chat/completions"$AiSystemMessage = "You are a helpful assistant"[System.Collections.Generic.List[Hashtable]]$MessageHistory = @()# Extract Word Document#Prepare Microsoft WordAdd-Type -AssemblyName "Microsoft.Office.Interop.Word"$Word = New-Object -ComObject Word.Application$Word.Visible = $false# Open the Word Document$MyDocument = "C:\Scripts\Sample Document.docx"$Doc = $Word.Documents.Open($MyDocument)# Read the entire content of the document$DocumentText = $Doc.Content.Text# Close the document and clean up$Doc.Close([ref]$False)$Word.Quit()[System.Runtime.Interopservices.Marshal]::ReleaseComObject($Doc) | Out-Null[System.Runtime.Interopservices.Marshal]::ReleaseComObject($Word) | Out-Null[GC]::Collect()[GC]::WaitForPendingFinalizers()Function Initialize-MessageHistory ($message){ $script:MessageHistory.Clear() $script:MessageHistory.Add(@{"role" = "system"; "content" = $message}) | Out-Null}function Invoke-ChatGPT ($MessageHistory) { # Set the request headers $headers = @{ "Content-Type" = "application/json" "Authorization" = "Bearer $APIKey" } # Form the Request $requestBody = @{ "model" = "gpt-3.5-turbo" "messages" = $MessageHistory "max_tokens" = 1000 # Max amount of tokens the AI will respond with "temperature" = 0.7 # Lower is more coherent, higher is more creative. } # Send the request $response = Invoke-RestMethod -Method POST -Uri $ApiEndpoint -Headers $headers -Body (ConvertTo-Json $requestBody) # Return the message content return $response.choices[0].message.content}#Main BodyInitialize-MessageHistory $AISystemMessage# Show startup textClear-HostWrite-Host "Enter your questions about the Sample Document.docx file. (type 'exit' to quit)" -ForegroundColor Yellow$UserMessage = "I am going to send you the raw text from a document. All of the queries within this conversation pertain to the document. Here is the document's text: " + $DocumentText$MessageHistory.Add(@{"role"="user"; "content"=$UserMessage})# Query ChatGPT$AIResponse = Invoke-ChatGPT $MessageHistory# Main loopwhile ($true) { # Capture user input $UserMessage = Read-Host "`nYou" # Check if user wants to exit or reset if ($UserMessage -eq "exit") { break } # Add new user prompt to list of messages $MessageHistory.Add(@{"role"="user"; "content"=$UserMessage}) # Query ChatGPT $AIResponse = Invoke-ChatGPT $MessageHistory # Show response Write-Host "AI: $AIResponse" -ForegroundColor Yellow # Add ChatGPT response to list of messages $MessageHistory.Add(@{"role"="assistant"; "content"=$AIResponse})}As I explained earlier, this script is a proof of concept rather than a fully-fledged Copilot editor. The current limitations of the script are:
It points to a single Word document instead of allowing you to select one.
It does not provide a window for viewing or editing the document
The interface is text-based rather than featuring GUI.
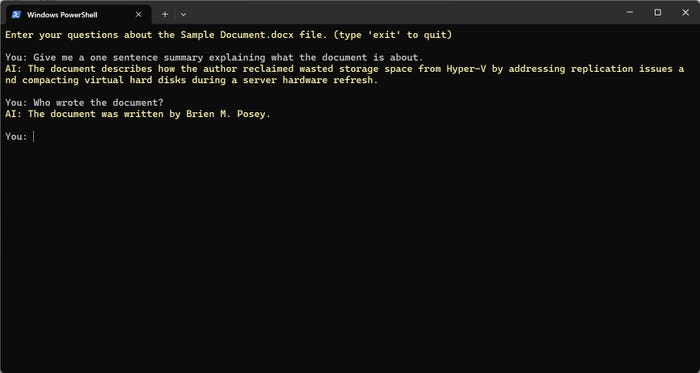
The script works by analyzing a document and allowing you to ask questions about it. You can see what the script does in Figure 2.

Figure 2. This screenshot shows what the script does.
The first few lines of code initialize some necessary values for ChatGPT. The very first line of code defines a variable called $APIKey. When interacting with ChatGPT programmatically, you must use an API key, which can be obtained from OpenAI (note there is a small cost associated with using the key). To keep my API key private, I read it from a text file rather than hardcoding it into the script.
These initial lines also define an API endpoint (the URL used to interact with ChatGPT) and a hash table to store the message history. The message history consists of prompts sent to ChatGPT and the responses received.
Additionally, the script sets a system message stating, “you are a helpful assistant,” to define ChatGPT’s behavior.
The next section includes the code necessary to open the Word document, extract its contents, and clean up unused objects – as I detailed earlier in this article.
Although the script contains several functions after the Microsoft Word section, I want to skip ahead to the main body and return to the functions after.
The main script body initializes the message history and displays a prompt for the user to enter questions about the sample document file. This is the yellow visible in the Figure 2 screenshot.
Next, the script generates a user message for ChatGPT. While most user messages consist of whatever the user types, this particular message is provided by the script and invisible to the user. It tells ChatGPT that the script is sending text from a document and that all queries in the conversation should pertain to the document. The $DocumentText variable contains the full text of the document.
The script adds these instructions and the document’s text to the message history and calls Invoke-ChatGPT.
The Invoke-ChatGPT function sends the text to ChatGPT for processing. It sets up several parameters to control ChatGPT’s behavior and makes an API call to pass the message and receive a response.
After ChatGPT receives the script’s instructions and the document’s text, the script enters a loop. The loop maintains an ongoing conversation with ChatGPT, ending only when the user types “Exit.”
The loop checks if the user has typed Exit. If so, the script terminates. Otherwise, it prompts the user to enter a question or comment. The user’s input is added to the message history, which is then sent to the Invoke-ChatGPT function for processing. When the function returns a response, the script displays the response and adds it to the message history. The loop then waits for more user input.
About the Author
You May Also Like


.jpg?width=700&auto=webp&quality=80&disable=upscale)
