How To Optimize PowerShell ZIP Handling With the 7-Zip ModuleHow To Optimize PowerShell ZIP Handling With the 7-Zip Module
The 7-Zip module can be used to overcome the limitations of PowerShell’s built-in ZIP file support. Here’s how to work with the 7-Zip module effectively.
April 25, 2024
PowerShell has had the ability to both create and extract contents from ZIP files for quite some time. Even so, PowerShell’s native support for handling ZIP files is somewhat limited. Fortunately, we have a workaround to overcome these limitations.
PowerShell's Native Zip File Support
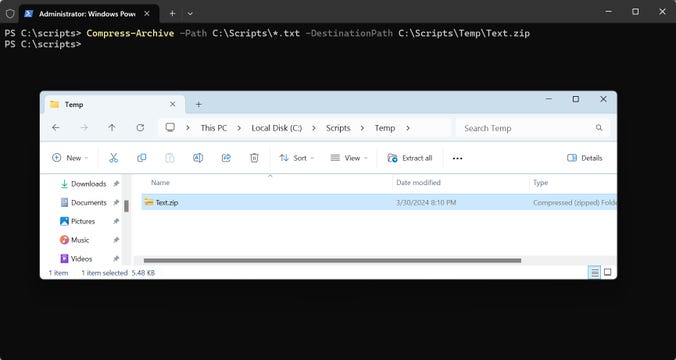
Before examining the workaround, let’s discuss PowerShell's built-in support for ZIP files. The PowerShell cmdlet used to create ZIP files is Compress-Archive. Its syntax is really simple: At a minimum, you need only to specify the source path and the destination path. For instance, if I wanted to create a ZIP archive containing all my .TXT files from my C:\Scripts folder, name it Text.zip, and store it in C:\Scripts\Temp, the command would be as follows:
Compress-Archive -Path C:\Scripts\*.txt -DestinationPath C:\Scripts\Temp\Text.zipYou can see the command and the resulting ZIP file in Figure 1.

Figure 1. This is how you create a ZIP file in PowerShell.
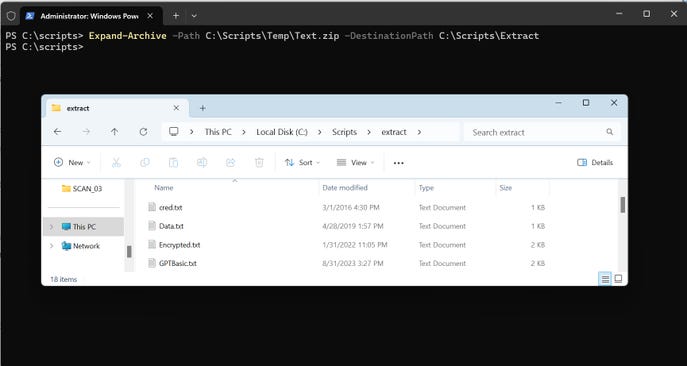
Extracting a ZIP file’s contents is just as easy. You would use a cmdlet named Expand-Archive, requiring both the source and destination paths. For example, if you wanted to extract the contents of the recently created ZIP file and place its contents in the C:\Scripts\Extract folder, this would be the command:
Expand-Archive -Path C:\Scripts\Temp\Text.zip -DestinationPath C:\Scripts\ExtractYou can see the command and the extracted files in Figure 2.

Figure 2. PowerShell can extract a ZIP file’s contents.
What’s Missing?
As you can see, the Compress-Archive and Expand-Archive cmdlets are simple to use. Nevertheless, they come with certain limitations.
Firstly, native cmdlets use UTF-8 encoding. If you open a ZIP file created by another utility that uses a different encoding, the filenames may be incorrect.
Secondly, there is a size cap of 2 GB for compressed archives. The Compress-Archive cmdlet also ignores hidden files and folders.
However, the most notable constraint is the absence of password support. As a result, you cannot create or access a password-protected ZIP using Compress-Archive and Expand-Archive cmdlets.
An Alternative Solution
The best workaround I have found involves using the 7-Zip PowerShell module. For those unfamiliar, 7-Zip is a freely available open-source tool for creating and extracting archive files. The PowerShell module named 7Zip4PowerShell enables you to access 7-Zip functionality directly from the command line.
Here is the command used to install the 7-Zip PowerShell module:
Install-Module -Name 7Zip4PowerShellYou can see what the installation process looks like in Figure 3.

Figure 3. This is how you install the 7Zip4PowerShell module.
Creating a ZIP archive using 7Zip4PowerShell is just as easy as it is with native PowerShell. The cmdlet you use is Compress-7Zip.
By the way, if you are curious about the list of the cmdlets included in the 7Zip4PowerShell module, you can use this command:
Get-Command -Module 7Zip4PowerShellTo view the syntax for a particular cmdlet, just use the Get-Help cmdlet followed by the name of the cmdlet you are interested in. Both commands are demonstrated in Figure 4.

Figure 4. You can use the Get-Command and Get-Help cmdlets to familiarize yourself with the 7Zip4PowerShell module’s cmdlets.
At any rate, if you wanted to create a ZIP file called C:\Scripts\Temp\Text.zip containing all the text files located in the C:\Scripts folder, you would use this command:
Get-ChildItem C:\Scripts\*.txt | Compress-7Zip -ArchiveFileName C:\Scripts\Temp\Text.zip -Format Zip
Figure 5. This is how you create a compressed archive using 7-Zip.
The Compress-7Zip cmdlet does indeed support a path parameter to specify what you want to include in the archive. In all honesty, though, I encountered some difficulties in getting the cmdlet to do what I wanted (it’s been a long day, maybe I’m just tired). So, I devised a workaround using the Get-ChildItem cmdlet to compile a list of files to include in the archive, which I then passed to the Compress-7Zip cmdlet via a pipeline operation. I used the -ArchiveFileName and the -Format parameters with the Compress-7Zip cmdlet. Technically, the -Format parameter isn’t required, but I included it to illustrate that 7-Zip supports various archive types beyond ZIP files.
Incidentally, if you wish to password-protect the archive, you can do so by appending the -Password parameter followed by your desired password. For instance, if you wanted to use ABC as the password, the command would be:
Get-ChildItem C:\Scripts\*.txt | Compress-7Zip -ArchiveFileName C:\Scripts\Temp\Text.zip -Format Zip -Password ‘ABC’Opening an archive created with 7-Zip follows a similar process. If you want to open the password-protected archive created by the previous command, you could use this command:
Expand-7Zip -ArchiveFileName C:\Scripts\Temp\Text.zip -TargetPath C:\Scripts\Extract -Password ‘ABC’You can this in action in Figure 6.

Figure 6. This is how you create and open a password-protected archive.
About the Author
You May Also Like


.jpg?width=700&auto=webp&quality=80&disable=upscale)
