How To Import the PowerShell Active Directory ModuleHow To Import the PowerShell Active Directory Module
Learn how to import the Active Directory module in Windows Server and Windows.
May 2, 2023

Table of Contents
Microsoft made PowerShell extensible through the use of modules that consist of non-native cmdlets. An example of a module is the Microsoft Active Directory module, which helps with Active Directory management. To use a module, you must import it using the Get-Module and Import-Module cmdlets, which is usually a straightforward process. However, the importing method for the Active Directory module varies widely across Windows versions.
Install the Active Directory Module on Windows Server
If you are running Windows Server, the Get-Module command will not find the Active Directory module. In fact, if you try to use the Get-Module and Import-Module commands, you will receive an error message, as shown in Figure 1.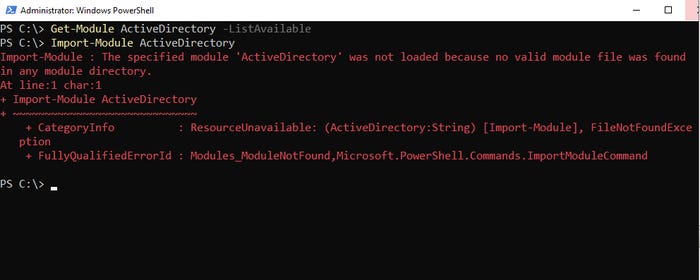
PowerShell AD 1_0
Figure 1. The Active Directory module does not exist.
Add Active Directory Domain Services
You can fix this problem by opening an elevated PowerShell session and then entering the following command:
Add-WindowsFeature AD-Domain-ServicesThis command causes Windows to install the Active Directory Domain Services. It doesn’t mean that the server will become a domain controller (although you could make it a domain controller if you want). It only means that Windows will install the various Active Directory-related binaries, including the management tools.
Import the AD module
With the required Windows Server feature installed, use these commands to import the Active Directory module:
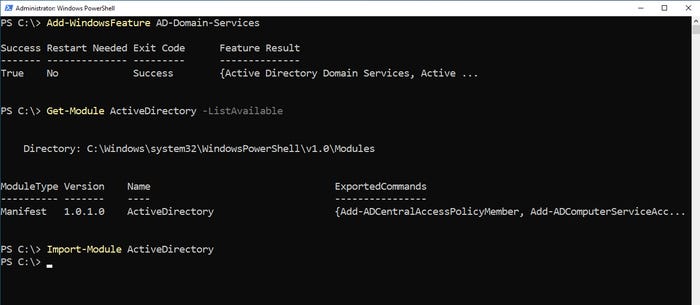
Get-Module ActiveDirectory -ListAvailableImport-Module ActiveDirectoryThe full process is shown in Figure 2.
PowerShell AD 2
Figure 2. This is how you import the Active Directory module in Windows Server.
Incidentally, if you already have the Active Directory module installed but need to upgrade to a newer module version, you can do so by appending the -Force parameter to the end of the Import-Module command.
Install the Active Directory Module on Windows 10 and 11
Like Windows Server, Windows 10 and 11 do not install the Active Directory module by default. Instead, the module files are included in the Remote Server Administration Tools (RSAT). It is worth noting, however, older versions of Windows 10 (before version 1809) required a different method from what I demonstrate here.
Install Remote Server Administration Tools
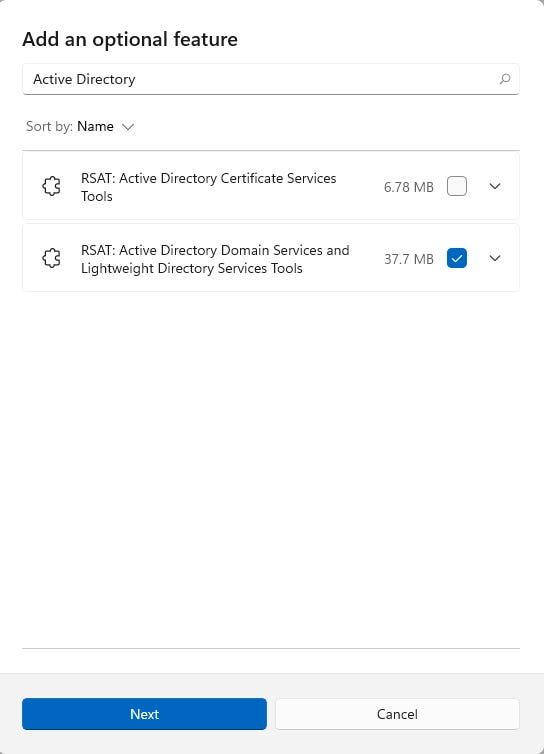
You can install the Remote Server Administration Tools through the GUI. Go to Settings, click on Apps, and then click Optional Features. When you see the Optional Features screen, simply perform a search for “Active Directory.” You will need to select and install the RSAT: Active Directory Domain Services and Lightweight Directory Services Tools, shown in Figure 3.
PowerShell AD 3
Figure 3. The Active Directory module is a part of the Remote Server Administration Tools.
PowerShell method for installing the AD module
If you would prefer to use PowerShell to install the Active Directory module, you can certainly do so, but the method is slightly tricky.
Begin by opening an elevated PowerShell session. With PowerShell open, get the names of the available Remote Server Administrative Tools using this command:
Get-WindowsCapability -Name RSAT* -Online | Select-Object Name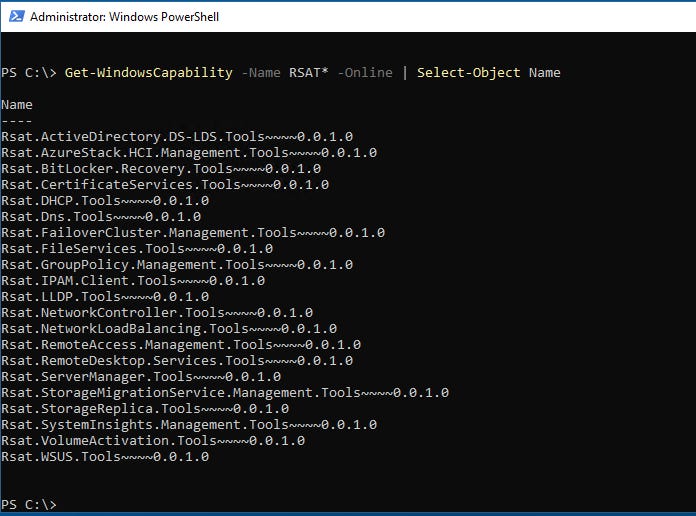
PowerShell AD 4
Figure 4. These are the available Remote Server Administrative Tools.
Copy the RSAT tool name to the Windows clipboard
As you can see, the tool names use multiple ~ symbols. I find it difficult to type the tool names correctly, but maybe you won’t. What I like to do instead of typing the tool name is copy the filename to the Windows clipboard.
Here are the steps for doing that:
Select the Rsat.ActiveDirectory.DS-LDS.Tools~~~~0.0.1.0 tool.
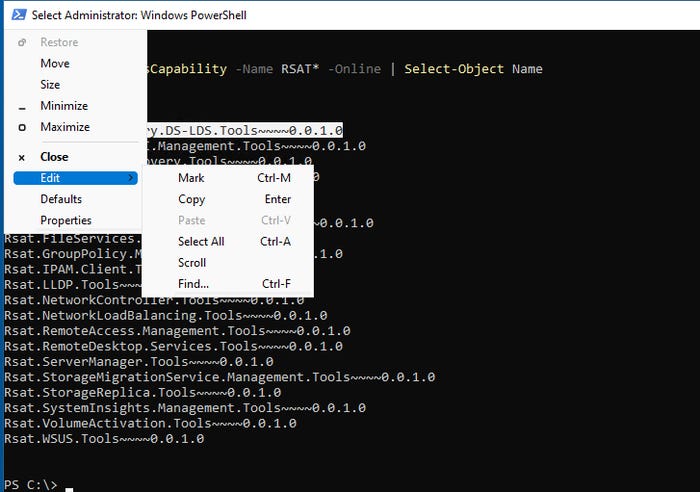
Click on the PowerShell logo in the upper-left corner of the PowerShell window. PowerShell will open a menu.
On the menu, click Edit, followed by Copy to copy the filename to the Windows clipboard.
You can see what this looks like in Figure 5.
PowerShell AD 5
Figure 5. You can copy the tool name to the Windows clipboard to avoid having to type it.
Install the RSAT tool
After you have copied the RSAT tool name, you can install the tool with the command below. When you get to the part of the command where you would type the tool name, just press Ctrl+V to paste it from the Windows clipboard.
Add-WindowsCapability -Name Rsat.ActiveDirectory.DS-LDS.Tools~~~~0.0.1.0 -OnlineImport the AD module
With the RSAT tool now installed, you need only to use the same commands that we used earlier to import the Active Directory module.
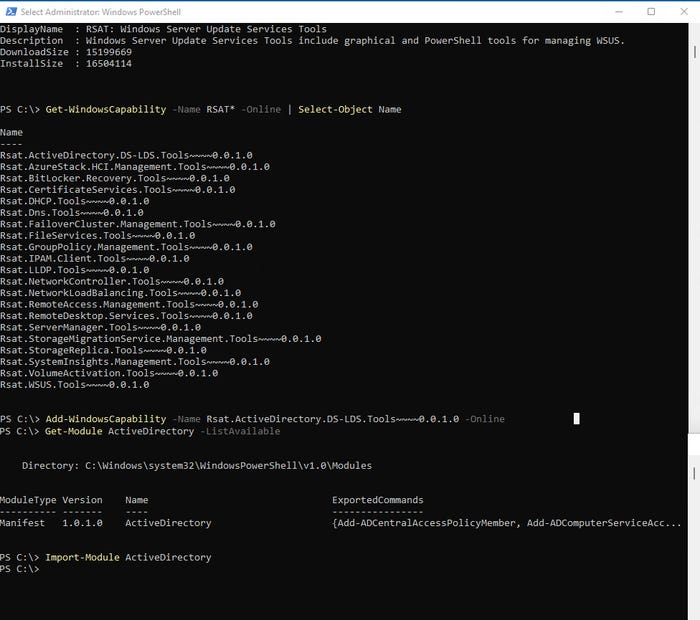
Get-Module ActiveDirectory -ListAvailableImport-Module ActiveDirectoryFigure 6 shows the completed process.
PowerShell AD 6
Figure 6. The Active Directory module has been imported.
About the Author
You May Also Like


.jpg?width=700&auto=webp&quality=80&disable=upscale)
