Gather SQL Server Instance Information with PowerShellGather SQL Server Instance Information with PowerShell
Get started with some basics
November 19, 2013

I've used PowerShell to manage SQL Server since PowerShell was first introduced in 2006. I'm pretty comfortable with it, but everyone has to start somewhere—so I'd like to share some basics with you. Hopefully, you'll be as comfortable with PowerShell as I am in no time.
Getting started managing SQL Server with PowerShell isn't hard, but it does require some fundamentals. In SQL Server 2008 (and SQL Server 2008 R2), Microsoft provided a mini-shell called SQLPS.exe, which was PowerShell 1.0 with the SQL Server snap-ins already loaded. Michiel Wories discussed this in his June 2008 blog post "SQL Server Powershell is here!"
Related: Using SQL Server Management Objects with PowerShell
Wories' blog post includes a script called Initialize-SqlpsEnvironment.ps1 that loads the SQL Server snap-ins into your existing PowerShell environment, giving you the same resources as in SQLPS.exe. I still use this script today. Simply use the Set-Location (cd) command to navigate to the script's location, then run
./Initialize-SqlpsEnvironment.ps1After SQL Server 2008 R2 was released, PowerShell 2.0 introduced the concept of modules. The PowerShell team noted that add-ons to server environments should be released as modules rather than snap-ins, and the next release of SQL Server—2012—replaced SQLPS.exe with a module called SQLPS.
SQLPS Quirks
The SQLPS module has a couple of quirks that you should keep in mind. The PowerShell team introduced a list of approved verbs for cmdlet- and function-naming purposes (e.g., to avoid having kill, stop, and end as synonymous verbs) but didn't include backup or restore on the list. These verbs, of course, are rather important to DBAs, so the SQL Server team decided to use them anyway. Thus, when you import the SQLPS module, you get a warning that indicates non-approved verbs were used. You can avoid this warning by adding the -DisableNameChecking parameter to the Import-Module command.
Another SQLPS quirk is that when you load the module, it changes your current location to the SQL Server provider location (i.e., the SQLServer: drive). To get around this, I test and optionally load the SQLPS module as follows:
# Test to see if the SQLPS module is loaded, and if not, load itif (-not(Get-Module -name 'SQLPS')) { if (Get-Module -ListAvailable | Where-Object {$_.Name -eq 'SQLPS' }) { Push-Location # The SQLPS module load changes location to the Provider, so save the current locationImport-Module -Name 'SQLPS' -DisableNameCheckingPop-Location # Now go back to the original location } }After you load the SQL Server environment, you have access to the Server Management Objects (SMO) API, and you can really take of advantage of the wealth of information there. SMO was introduced in SQL Server 2005 and supports all versions of SQL Server, from SQL Server 2000 on.
Use SMO to Gather Information about the SQL Server Environment
As a consultant, the first thing I always do with a new client is gather as much information as I can about the server environment. SQL Server makes this fairly easy to do via SMO. Connecting to a SQL Server instance via the SMO Server object lets you easily view the properties to determine what version of SQL Server is running, what edition, how much memory exists, and so on. Let's take a closer look:
$svr = new-object ('Microsoft.SqlServer.Management.Smo.Server') localhostThis command creates a variable containing an SMO Server object connected to the default instance of SQL Server running on the system where you run the command. You can choose any SQL Server instance by replacing localhost with the server name or instance name of the instance you want to explore. Note that this method requires you to have sysadmin privileges to the named instance via your Windows login. Since we're just exploring, we'll stick with this approach.
PowerShell Is an Object-Based Language
PowerShell isn't an object-oriented language, but it is an object-based language—so all variables are objects, consisting of properties and methods. Properties have values that define the object (such as its name). Methods are actions you can perform with that object.
For now, let's discuss properties. You can always pipe a variable to the Get-Member cmdlet to see what type of object it is, as well as all the methods and properties associated with the object:
$svr | Get-MemberThe Server object has several properties that provide basic useful information. For example, if I run the following command on my demo virtual machine (VM)
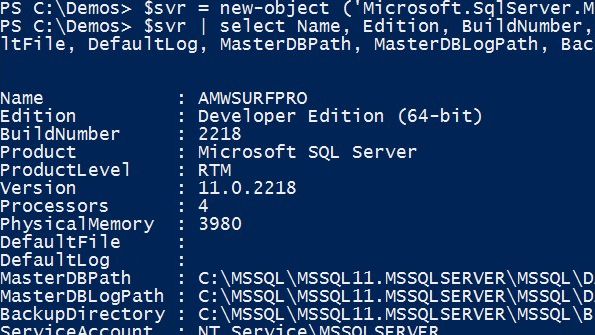
$svr | select Name, Edition, BuildNumber, Product, ProductLevel, Version, Processors, PhysicalMemory, DefaultFile, DefaultLog, MasterDBPath, MasterDBLogPath, BackupDirectory, ServiceAccountI get the results in Figure 1.
Figure 1: Examining Server Object Properties
It's worth noting that if the default location for the SQL Server data files is the same as the location for the system database files, DefaultFile is left empty (and likewise for the log location).
More on Server Object
The Server object also has several other objects—such as the JobServer object, which defines Alerts and SQL Server Agent jobs and schedules—and collections of objects, such as Logins and Databases. I'll discuss these in more detail in a future article.
Having access to this basic information on all my servers allows me to keep an inventory of my servers, and it's helpful in the event that I find myself subject to a license audit. In addition, the information is quite easy to gather.
Related: 4 Essential PowerShell Provider Commands for SQL Server
About the Author
You May Also Like


.jpg?width=700&auto=webp&quality=80&disable=upscale)
