SharePoint How-To: Use Visual Studio to Construct an Add-inSharePoint How-To: Use Visual Studio to Construct an Add-in
An out-of-the-box project creates a core set of components, and deploying it is very simple.
February 2, 2016

In my last post, "On-Premise Add-In Development Primer," we focused on the basics. Now that you know the fundamentals and what options are available, this post will focus on understanding how to use Visual Studio and construct an Add-in.
To create an Add-in we need to use Visual Studio 2013 or 2015, and be sure that the SharePoint elements are available.

Visual Studio contains a section for both Office and SharePoint Add-ins. The SharePoint Solutions project templates are for creating full trust code, and, of course, the Office Add-ins option is purely for creating Microsoft Add-ins solutions. The Apps option displays two simple projects--one for Office and one for SharePoint.

For our solution, we choose App for SharePoint. Once you choose a project, a wizard launches that allows certain properties to be set--namely, the type of Add-in and the SharePoint URL of the site it should be built against. When developing, it is best to use a SharePoint Site based on the Development Site template.

With our site created, we then completed the wizard using the URL to our Development Site. We also had to choose the type of Add-in--either SharePoint Hosted or Provider Hosted. We chose SharePoint Hosted, as it does not require any extra configuration within the SharePoint On-Premises Environment. If we had chosen a Provider Hosted Add-in, we would have had to configure extra components for it to work.

Next we had to set the version of SharePoint we wanted to use for our Add-in. This step ensures that the right references are added to the code solution. For this Add-in we chose SharePoint 2013.
The wizard then provisioned the core project files and solution.

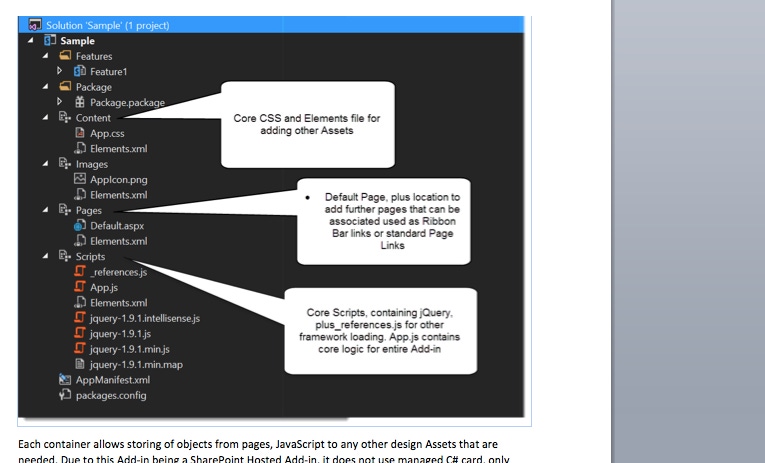
Once the entire solution loaded, it displayed the following structure:

Each container allows storing of objects from pages and JavaScript to any other design assets that are needed. Becasue this Add-in is a SharePoint Hosted Add-in, it does not use managed C# card--only client-side code such as JavaScript or jQuery. SharePoint can be connected for use with the JavaScript Object Model or straight REST API Calls.
Right clicking on the overall project allowed us to add other components.

These components can be added and can utilize their own wizard-type setup, rather than having to declare everything the old way, into XML definitions files. The wizards take care of adding the items to the Elements.xml files for the specific containers in the solution.
It is very important to become familiar with the base code. The App.js file is the brains of the whole solution, as it outlines the code that needs to be called, when the Add-in is loaded or default.aspx is accessed.

The core code, after the document is loaded and ready, grabs the username of the currently logged on user, which is retrieved from the current context.

This code is all called from the default.aspx page of the main add-in. The output simply renders this into the placeholder of the page, and into the HTML DIV tag with the ID message.

Once we made changes to the solution as needed, we had to modify our feature code and core solution properties.
First, we needed to assign permissions. This is done by double clicking and opening the“AppManifest.xml file, which launches a custom panel that allows for various settings to be set.
The main tab allows for setting the name, version, icon, start page, any query strings and also the type of SharePoint Add-in.

In the second tab users can set a type and permissions.


Not every permission is needed, and all most definitely should not be used.
Once permissions have been set up, the feature that is used to activate everything can be modified and the solution can be built. The final step is to publish the Add-in, an act that will generate the following items.

The package App button will then generate the .app file, within the Visual Studio output folder.
{Code Path}SamplebinDebugapp.publish1.0.0.0
After we generated the App file, we could use the F5 deploy approach or side load the file, which means we could just upload the file into the Development site in SharePoint. This is done by opening the App Packages library and uploading the app file.
At this point, we could access the “New App to Display” link on the homepage. This will then list the Add-ins that are uploaded and ready.

Part of the deployment cycle is to ask whomever installs the Add-in to trust the Add-in and approve the Permissions.

The Add-in then deploys, with a link displayed on the left.
This is where the Add-in is deployed--a separate domain URL. Launching the Add-in will load the default.aspx page and display the initializing message, which is then changed to display the user's name from the context code.

As you can see, the out-of-the-box project creates a core set of components needed, and deploying it is very simple.
If you want to learn more about SharePoint Add-in Development, then join me for three webinars on Feb. 24.
About the Author
You May Also Like


.jpg?width=700&auto=webp&quality=80&disable=upscale)
