How to Setup Windows Server 2016 Nano on Hyper-V VM
In this post, I’ll show you to set up Windows Server 2016 Nano on Hyper-V VM which is running on Windows 10 Pro. Downloading and Preparing Nano Virtual Hard Disk (VHD) 1. Download pre-built Nano VHD file from TechNet Evaluation Center .
June 12, 2017

In this post, I’ll show you to set up Windows Server 2016 Nano on Hyper-V VM which is running on Windows 10 Pro.
Downloading and Preparing Nano Virtual Hard Disk (VHD)
1. Download pre-built Nano VHD file from TechNet Evaluation Center.

2. Double-click the NanoServerDatacenter.vhd.exe you just downloaded
3. During security check, click Yes
4. On welcome screen, click Next

5. Click ‘I accept the agreement’

6. Note down the folder path and click Next

7. Click Extract

8. Wait while wizard extract the files

9. When done, click Finish

Creating a New VM in Hyper-V
10. In Hyper-V Manager console, click New located in right-most corner of Actions window
11. Click Next
12. Provide a name of this newly created virtual machine
13. Choose Generation 1 and click Next
14. Keep default size for startup memory (at least 512 MB) and click Next
15. Choose a virtual switch for the network adapter of this new virtual machine
16. Choose ‘Use an existing virtual hard disk’ and provide the path of VHD of nano server you downloaded and prepared above. Click Next

17. Click Finish
Configuring Nano Server
18. Start the new VM
19. Once you are in nano server recovery console, press F11 from the keyboard to set an administrator password

20. Provide username, password and press Enter from the keyboard

21. With the help of scroll bar, choose Networking and press Enter from the keyboard

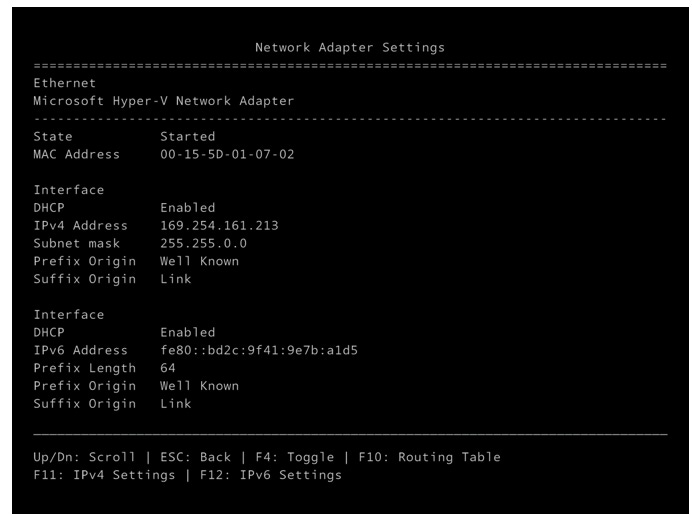
22. With the help of scroll bar, choose desired ethernet card and press Enter from the keyboard

23. Press F11 from keyboard to change IPv4 settings

24. Press F4 from the keyboard. Provide an IP address and subnet mask. Press Enter from the keyboard twice to save the settings

25. Press Enter and then Esc twice from the keyboard to return to nano server recovery console
Accessing the Nano Server Remotely
26. Open PowerShell with elevated privileges. Execute the following commands on the host server from which you want to access nano server remotely to test the connectivity.
Set-Item -Path WSMan:localhostClientTrustedHosts -Value
This will enable your host to establish WinRM connection to the nano server.
Enter-PSSession -ComputerName -Credential (Get-Credential)
This will establish a remote session so you can execute commands on nano server.

Thank you for stopping by and reading this informative post.
About the Author
You May Also Like


.jpg?width=700&auto=webp&quality=80&disable=upscale)
