How to Map a Different Listening Port for Remote Desktop ProtocolHow to Map a Different Listening Port for Remote Desktop Protocol
Mapping a different port for Remote Desktop Protocol can add another security layer to Windows versions as old as Windows XP.
November 22, 2019

The Remote Desktop Protocol (RDP) is commonly used to manage Windows machines. One way that administrators can make the remote management of Windows computers more secure is to configure a non-standard port for Remote Desktop Protocol. By default, RDP uses TCP port 3389, but Windows makes it possible to remap RDP to another port number. (The screen captures shown in this article were based on Windows 10 and Windows Server 2016, but this technique works with Windows versions as old as Windows XP.
Before I show you how to reconfigure RDP, I want to stress the importance of making a full system backup before you try it yourself. The procedure for reconfiguring RDP requires you to edit the registry. Modifying the registry incorrectly can cause irreparable harm, which is why it is so important to make a backup.
With that said, the registry remapping process is actually quite simple. Begin by logging on to the target computer with an administrative account. Next, enter the REGEDIT command either at the Run prompt or inside of a command prompt window. This will open the Windows registry editor. Now, navigate through the registry tree to HKLMSYSTEMCurrentControlSetControlTerminal ServerWinStationsRDP-Tcp.
At this point, you will need to locate a registry key named PortNumber. This key has a default value of 0x00000d3d (3389). Double click on the PortNumber registry key. When the Edit DWORD dialog box opens, you will see that the key’s current value is listed in hexadecimal format, as shown in Figure 1.

RDP Reconfigure 1
Figure 1
The port number is currently displayed in hexadecimal format.
Now, click on the Decimal option, and you will see the registry key’s value change to 3389, which is the default port number. You can see what this looks like in Figure 2.

RDP Reconfigure 2
Figure 2
RDP uses port number 3389 by default.
Now, enter a new port number for the RDP protocol. The port number that you choose must correspond to a TCP port (not a UDP port), and you must select a port that is not currently in use. After entering a new port number, click on the Hexadecimal option to convert the port number into hexadecimal format. In my case, for example, I entered 65000 as the port number. Clicking on the Hexadecimal button changed the port number to FDE8, as shown in Figure 3. When you are done, click OK.

RDP Reconfigure 3_0
Figure 3
I have changed my port number.
The new RDP port number will not take effect until the next time that you reboot the machine. Although reboots can be a pain, the fact that the port number does not change immediately is actually a good thing. The reason for this is that if the port number change were to go into effect immediately, then you would be effectively locked out of the machine (at least from an RDP standpoint).
To avoid being locked out of the computer, you will need to reconfigure its firewall rules before rebooting. The exact steps for reconfiguring the firewall vary based on the version of Windows that you are using. Typically, though, reconfiguring the firewall requires you to go to the Control Panel (enter the Control command at the Run prompt), and to then click on System and Security, followed by Windows Firewall. When the firewall interface opens, click on the Advanced option, and then click on Inbound Rules. You will be taken to an interface similar to what you see in Figure 4.

RDP Reconfigure 4
Figure 4
These are the inbound firewall rules.
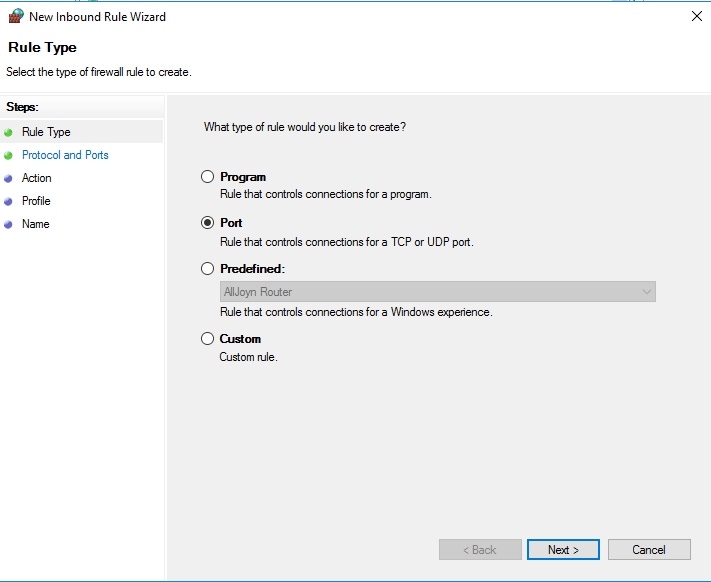
Now, click on the New Rule link. When the New Inbound Rule Wizard opens, click on the Port option, shown in Figure 5. Click Next, and then enter the port number that you assigned to the RDP protocol. Click Next again, and choose the Allow the Connection option. Click Next once more, and you will be prompted to choose the profiles that should include your new rule. Finally, click Next, and you will be prompted to enter a name for your new rule. When you are done, click Finish.

RDP Reconfigure 5
Figure 5
Select the wizard’s Port option.
Once you have created the necessary firewall, it is a good idea to delete or to disable the existing Remote Desktop rules. Otherwise, you will leave Port 3389 open unnecessarily.
When you finish reconfiguring the firewall rules, reboot the computer and your changes will take effect. To attach to the machine from an RDP client, simply append a colon and the port number to the computer’s name or IP address from within the RDP client. If, for example, you are trying to connect to 192.168.0.1 over port 65,000, you would enter 192.168.0.1:65000, as shown in Figure 6.

RDP Reconfigure 6
Figure 6
This is an example of using an RDP client to connect to a remote computer over port 65000.
About the Author
You May Also Like


.jpg?width=700&auto=webp&quality=80&disable=upscale)
