How to Salvage Data from a Badly Damaged ReFS VolumeHow to Salvage Data from a Badly Damaged ReFS Volume
If an ReFS volume becomes corrupted, ReFSUtil is a last-ditch way to recover some of your data.
May 3, 2021

As its name implies, the Microsoft “resilient file system” (ReFS) features a number of different mechanisms that are designed to protect the integrity of your data. Even so, the ReFS file system is not invulnerable. It is possible for file system corruption to occur, particularly if the volume is not built on redundant storage.
If an ReFS volume becomes severely corrupted, the best course of action is usually to delete and recreate the volume and then restore a backup. However, we have probably all seen situations in which a backup is outdated or non-existent. And because storage corruption tends to start slowly and get progressively worse over time, it is always possible that you have been backing up corrupt data without realizing it.
If you find that you have important data residing on a corrupt ReFS volume and do not have a backup that you can restore, there is a tool built into Windows that you can use as a last-resort effort to recover some of your data. The ReFSUtil tool is designed to either repair the corrupt volume or to locate any remaining good data, and then copy that data to another location. As with any other tool that is designed for use on a corrupt disk, however, the ReFSUtil tool does not come with any guarantees of success.
The ReFSUtil tool is a command-line tool, but, unlike a lot of other Microsoft command-line tools, it is relatively easy to use. There are, however, some parameters that you need to know about.
The first of these parameters is the mode that the ReFSUtil tool will operate in. For the purposes of this article, I will be focusing on Salvage mode, which searches the volume for any recoverable data and moves it to another location. In addition to Salvage mode, the ReFSUtil tool supports three additional modes:
FixBoot – FixBoot is used to repair a damaged boot sector.
Leak – Leak mode is used to detect and repair leaks.
Triage – Triage mode is used to handle corruption.
You can see all four modes in Figure 1.

ReFSUtil 1
Figure 1
These are the four modes supported by ReFSUtil.
Assuming that your goal is indeed to salvage any recoverable data from a corrupt ReFS volume, then you will need to follow the ReFSUtil command with the word Salvage, along with a few additional parameters.
In most cases, you are going to need to specify the source volume, a working directory and a target directory. The source volume is simply the corrupt ReFS volume that you are trying to extract data from. You can reference the source volume by its drive letter.
The working directory is a folder that ReFSUtil can use to store log files and temporary files that it creates as a part of the extraction process. The only real requirement for the working directory is that it cannot be located on the source volume.
The target directory is a folder that will act as a repository for the files that are recovered. As was the case for the working directory, the target directory cannot be on the source volume.
You will also need an additional parameter to tell ReFSUtil what type of recovery you want to perform. Your selection should be based on the extent of the damage to the volume.
If the volume is slightly damaged, but the folder structure is more or less intact, you will probably want to use the -QA, or Quick Automatic, parameter. If a volume is more heavily corrupted, then you will probably need to use the -FA parameter, which stands for Full Automatic. The Full Automatic parameter tells the tool to perform a deep scan and recover anything possible. This option generally does a good job but tends to be time consuming since it searches the entire volume.
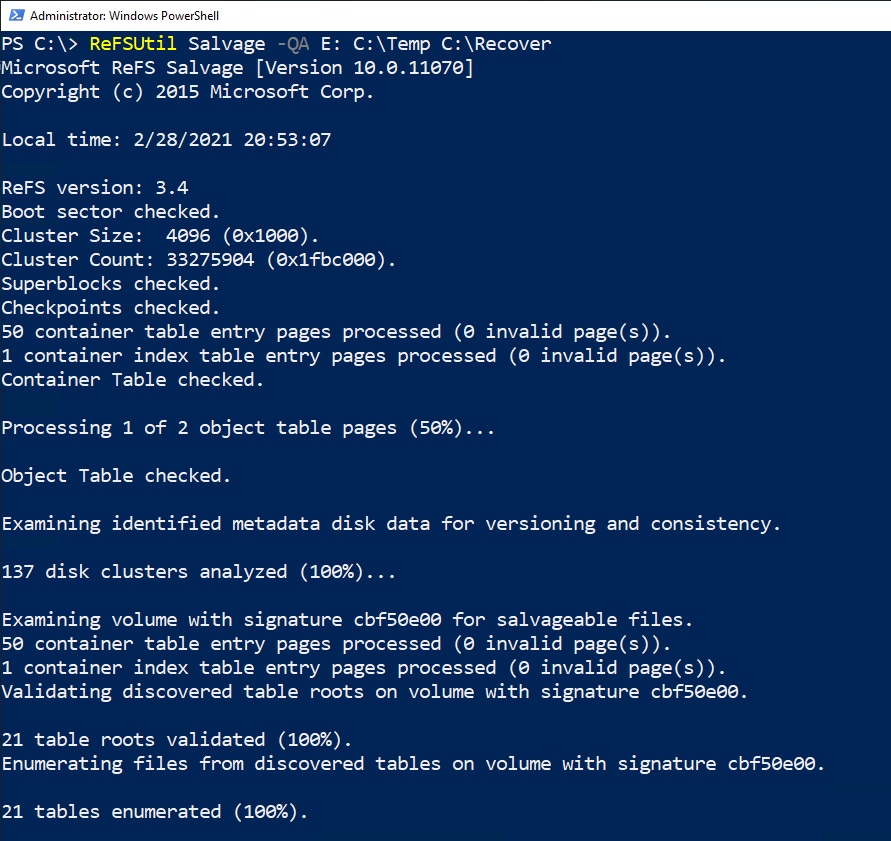
Now that you know about the automatic recovery options, let’s perform a sample recovery. In doing so, we will use E: as the corrupted volume, C:Temp as the working directory and C:Recover as the target directory. Here is what the command looks like (assuming that a Quick Automatic scan is being performed):
ReFSUtil Salvage -QA E: C:Temp C:RecoverYou can see what this command looks like in Figure 2. Figure 3 shows the remainder of the command’s output, including the portion that shows which files were recovered.

ReFSUtil 2
Figure 2
This is the command used to perform a quick recovery.

ReFSUtil 3
Figure 3
This is the remainder of the command’s output.
As you can see, the ReFSUtil tool is relatively easy to use in Automatic mode. However, the tool also supports a manual recovery. If you get desperate, you can attempt a manual recovery and include the -M parameter. Microsoft discourages the use of this particular parameter because it takes a long time and produces unpredictable results, but it can sometimes recover data that cannot be recovered by an automatic scan.
About the Author
You May Also Like


.jpg?width=700&auto=webp&quality=80&disable=upscale)
