How to put Windows 10 on a MacBookHow to put Windows 10 on a MacBook
There's no need to choose between Windows and OS X -- you can boot into Windows and run a complete alternative setup on your MacBook. Here’s what you need to do in order to get Windows going on your Mac with a minimal amount of laborious detail.
October 27, 2015

For many, putting Windows on a Mac is the ultimate violation of all that is good and pure in the world. For others, it's the only way to get your computer to run a real operating system. And for still others, it's the Reese's Peanut Butter Cup of personal computing -- you get two great flavors on one machine.
Whatever your stance, know that it's easy to boot into Windows and run a complete alternative setup on your MacBook. Here’s what you need to do in order to get Windows going on your Mac with a minimal amount of laborious detail.
Do the right prep work
The method we will be covering here is how to install Windows using Apple’s Boot Camp software. Yes, there are various solutions that allow you to run a virtual machine on your Mac, such as Parallels, VMWare, or the relatively decent (and free) VirtualBox from Oracle. If you have a powerful enough machine, this method can work. But I’ve found that for most MacBook set-ups, if you want the best experience using Windows for both work and play, you want to go with a full installation through Boot Camp.
Boot Camp is already on your Mac. Step one is to check the system requirements to ensure that your Mac can handle Windows. If it’s a newer model there shouldn’t be any issues. Apple has a pretty decent walkthrough, but we’ve tried to tackle some of the nuance here you should know about.
Next, you should do a backup, whether through Time Machine or another method. I’ve run Windows on multiple MacBooks and never had a problem, but it’s a good practice to avoid a tragedy. Time Machine is an easy and built-in tool to ensure that you have a complete copy of your computer in case bad things go down.
Sign up for Boot Camp
Next, the Boot Camp process is pretty smooth. First, it’s all about ticking the right boxes. Launch Boot Camp and you’ll see the following screen:
Make sure that you select the top and bottom options, which will automatically tell Boot Camp to download software from Apple. Then, go make yourself coffee, finish War and Peace, or do something else that takes a lot of time. The software download is rather lengthy.
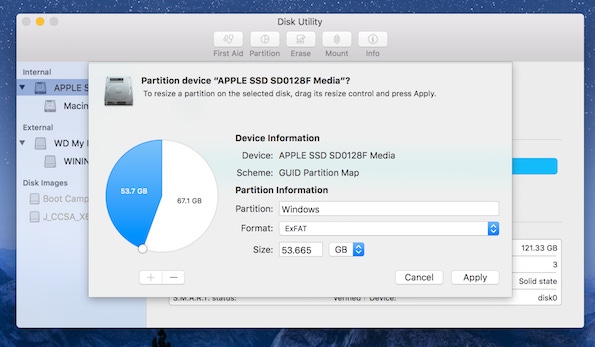
Next is another critical decision. You have to choose how much space to allot to Windows. Once you make this choice, there’s no going back - you’d have to wipe that partition and start again. About 30GB should be fine if you’re only going to dabble. But if you want to use Office, sync cloud storage, or play some games you’ll want to set aside more space.
After you hit Install, you’ll need another session of patience. Your Mac will restart a few times and then take you to a screen that asks which partition to install Windows 10 on. Select the one labeled Boot Camp and then click “Format” and choose NTFS. Then continue on to the Microsoft setup wizard. Windows will ask you for your product key (you did buy one, right?) and then you’ll be ushered into the wonderful world of Windows 10.
In my experience Windows runs rather smoothly. I’ve had some wonkiness with different mouse brands, as it’s always going to depend upon how drivers interact. But by and large you’ll find most MacBooks run Windows really well.
Apple can take you back to safety
You’ll notice a Boot Camp application in the Windows taskbar. This software keeps you up to date with the latest drivers. This way the two-finger scroll on the trackpad works and the Command key functions like a Windows button.
Also, you can hop into this tool to reboot back into the safe and loving arms of OS X if you want. Just right click (if all goes well, still two fingers on the trackpad) and select the option to boot back into Windows.
Finally, getting rid of Windows is just as easy. In OS X, just launch Boot Camp and select “Remove Windows or later version”
Then Boot Camp will wipe away all that Microsoftiness and restore the entirety of your drive to OS X.
If you’re tech savvy the process is pretty easy. Even if you have some doubts, with perseverance it’s something that just about anyone should be able to try out. With both operating systems, you really can have both peanut butter and chocolate in one great machine.
About the Author
You May Also Like


.jpg?width=700&auto=webp&quality=80&disable=upscale)
