How to Screen Windows File Servers for Unapproved ContentHow to Screen Windows File Servers for Unapproved Content
Windows Server provides a mechanism for screening file servers to ensure that only approved data types are being stored. Here's what you need to know.
January 28, 2019

One of a storage administrator’s responsibilities is making sure that the organization’s file storage is being used for the purpose that it is intended. We’ve all probably heard stories of users who have copied their entire music collection to a corporate file server, or users who have uploaded infected executable files to an organization’s servers. Thankfully, Windows Server provides a mechanism for screening file servers to make sure that only approved data types are stored on those servers.
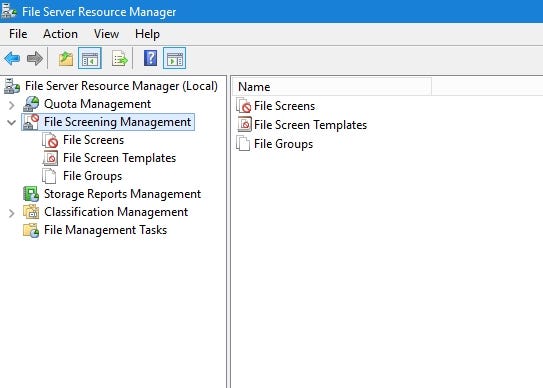
This functionality is exposed through the File Server Resource Manager console, which you can access through the Server Manager’s Tools menu. As you can see in Figure 1, the console includes a File Screening Management container. There are also three sub-containers beneath this container.

Figure 1: File screening is exposed through the File Server Resource Manager console.
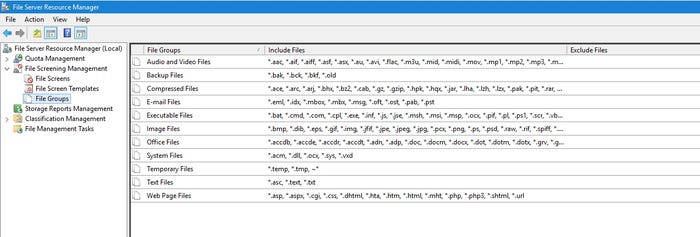
The first container that I want to talk about is the File Groups container. If you look at Figure 2, you can see that this container is used to define several different categories of files. For example, compressed files might include any file with an ARJ, CAB or ZIP extension (as well as several other extensions). Similarly, temp files are defined as any file with an extension of Temp or TMP, as well as filenames that start with a tilde symbol. You can, of course, edit these file groups to fit your own needs, and you can create custom file groups. For example, if you were worried about users filling up your storage array with video files, then you might create a Video Files group. Such a group might contain files with extensions such as MP4, MOV, or AVI.

Figure 2: The File Groups container is used to define various file classifications.
The next container that I want to show you is the File Screen Templates container. This container defines behaviors that can be applied for files that match the criteria set forth by file groups. If you look at Figure 3, for example, you can see that one of the templates is called Block Executable Files. This template defines an action that pertains directly to the file types listed within the Executable Files group.

Figure 3: File screen templates map actions to file groups.
As you would probably expect, Windows allows you to modify these file screen templates, and you can also create your own templates. It is also worth noting that the templates do not do anything by themselves. It is the file screens that actually scan the file system, not the file screen templates. File screens, however, reference file screen templates.
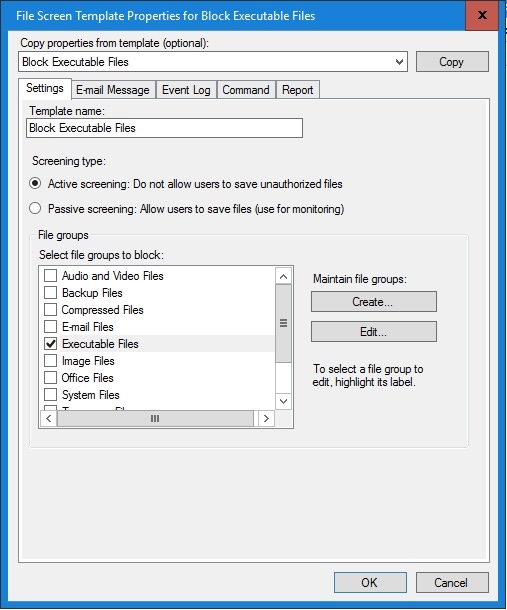
To get a better feel for the anatomy of a file screen template, right click on a template and choose the Edit Template Properties command from the resulting shortcut menu. When you do, Windows will display a dialog box that is similar to the one that is shown in Figure 4.

Figure 4: This is what a file screen template looks like.
At the most basic level, a file screen template maps one or more file groups to a behavior; in this case either active screening or passive screening. Active screening prohibits users from saving unauthorized file types, while passive screening is used purely for monitoring purposes. Again, though, the mere existence of an active screening template does not cause any files to be screened. For that you will need to create a File Screen object.
Before I move on, I want to quickly point out that file screen templates can do more than just define the types of files that should be screened. If unauthorized file types are detected, a file screen template can be configured to take actions such as sending an E-mail message, creating an event log entry, executing a command or creating a report.
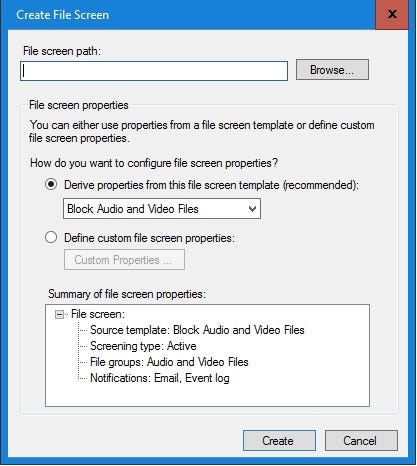
As previously noted, it is the file screen object that performs the actual screening. You can create a file screen by right clicking on the File Screens container and choosing the Create File Screen command from the shortcut menu. This causes Windows to display the Create File Screen dialog box, which you can see in Figure 5.

Figure 5: This is how you create a file screen.
As you can see in the figure, setting up a file screen is a simple process. All you have to do is select a file screen path and then apply a file screen template to that path. Once you have done that, it’s a good idea to check the summary at the bottom of the window to make sure that the screen is going to do what you are expecting it to do. When you are done, click the Create button to create the file screen.
About the Author
You May Also Like


.jpg?width=700&auto=webp&quality=80&disable=upscale)
