Getting Started With Microsoft PowerToysGetting Started With Microsoft PowerToys
Microsoft PowerToys offers a practical set of tools for customizing your Windows experience. Here’s how to install them.
February 5, 2024

Microsoft PowerToys is a collection of tools that allows you to customize the behavior of Windows. Some of these tools are incredibly useful, while others might leave you scratching your head. Nevertheless, the good news is that PowerToys is designed to let you pick and choose which tools you want to use.
What Is PowerToys?
While the list of Microsoft PowerToys is always growing, here is a brief overview of the various PowerToys and their functions:
Always On Top: Ensures that a window of your choosing remains on top of other windows.
PowerToys Awake: Forces your computer to stay awake, overriding system power and sleep settings.
Color Picker: Allows you to capture a color sample from any part of the screen.
Command Not Found: A PowerShell 7 utility suggesting a WinGet package for installation when encountering a “Command Not Found” error.
Crop and Lock: Enables cropping of a chosen window, maintaining it as a separate window rather than just a cropped screen capture.
Environment Variables: A tool for managing system environment variables.
Fancy Zones: Defines how Windows should be arranged on your screen.
File Explorer Add-Ons: Enables file preview within File Explorer.
File Locksmith: Identifies the process using a file, treating the file as locked.
Hosts File Editor: A tool for conveniently editing a system’s Hosts file.
Image Resizer: Makes it easy to resize one or multiple images.
Keyboard Manager: Allows remapping of keys or defining keyboard shortcuts.
Mouse Utilities: A collection of mouse-related tools that can help in locating a lost pointer, visualizing button presses, or displaying crosshairs.
Mouse Without Borders: Allows you to move the mouse pointer between two PCs as if they were a single system with multiple monitors.
Paste as Plain Text: Offers the option to paste Windows Clipboard contents as plain text.
Peek: Allows previewing a file without opening it or its associated application.
PowerRename: A tool for renaming files in bulk.
PowerToys Run: Locates and launches applications efficiently.
Quick Accent: Enables typing accented characters even if the keyboard lacks the necessary keys.
Registry Preview: Allows examination and editing of registry files.
Screen Ruler: Measures pixels on your screen.
Shortcut Guide: Displays available keyboard shortcuts.
Text Extractor: Copies text from anywhere on the screen.
Video Conference Mute: Quickly mutes your microphone and disables your camera in any video conferencing app.
How To Install PowerToys
There are several methods to install Microsoft PowerToys, all of which install the complete collection. You can then choose which PowerToys you want to use.
Windows Store
The easiest method is to install PowerToys from the Windows Store. Just open the Windows Store app, search for “Microsoft PowerToys,” and install it. Alternatively, you can use your browser to go here and click Install.
Windows Command Prompt
Another option is to install PowerToys from the command line. Open a Windows Command Prompt window and enter the following command:
winget install Microsoft.PowerToys --source wingetIf you opt for the command-line method, it’s important to make sure you have version 3 of the WiX Toolset installed beforehand. Additionally, you will need to use these commands to extract the MSI file:
cd $Env:WIX\"bin"

# dark.exe -x OUTPUT_FOLDER INSTALLER_PATH
.\dark.exe -x ${Env:\USERPROFILE}"\Desktop\extractedPath" ${Env:\USERPROFILE}"\Desktop\PowerToysSetup-0.53.0-x64.exe"
You can find the full documentation for the installation process on this Microsoft page.
GitHub
Yet another option for deploying PowerToys is to simply download them from GitHub. Visit the download page here. After downloading the file, launch the executable and follow the prompts to install Microsoft PowerToys.
The PowerToys Interface
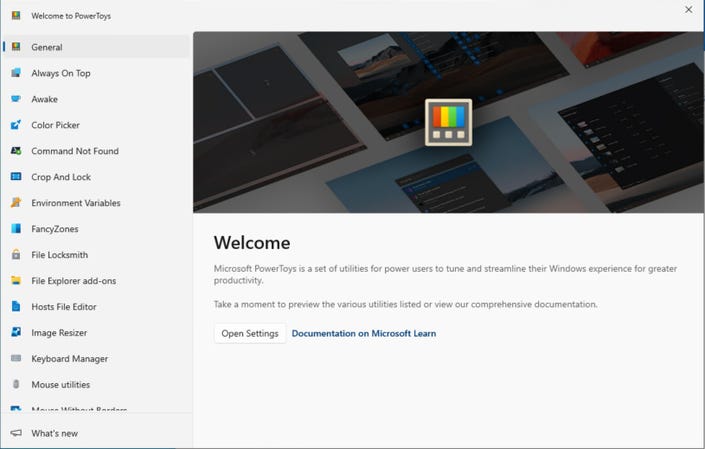
When you launch PoweToys for the first time, you will see a screen resembling the one in Figure 1. The interface features several tabs on the left side, each dedicated to an individual PowerToy. Clicking these tabs reveals a brief description of the selected PowerToy.

PowerToys Intro 1
Figure 1. This is the screen that you will see when you launch PowerToys for the first time.
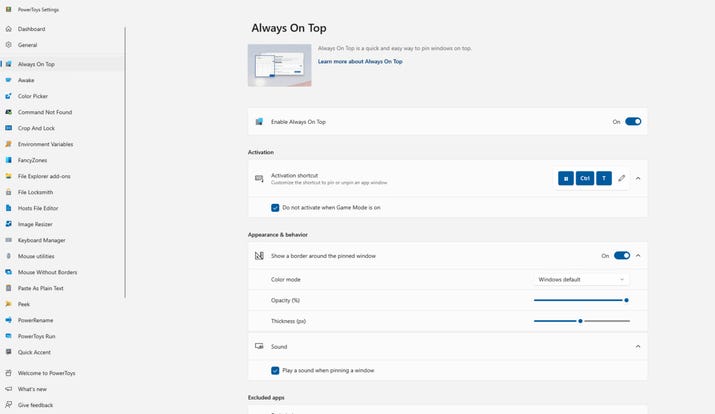
Additionally, you will also see a concise description of how to use the PowerToy, as shown in Figure 2.

PowerToys Intro 2
Figure 2. The interface describes each PowerToy.
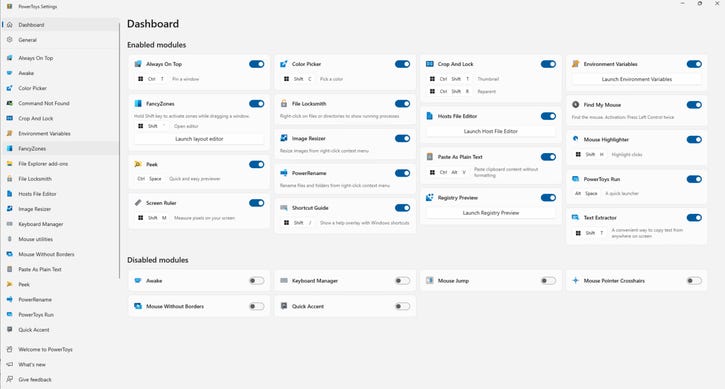
After familiarizing yourself with the different PowerToys, I recommend navigating to the General tab and clicking the “Open Settings” button. This takes you to a screen where you can enable or disable specific PowerToys (referred to as Modules by Microsoft on this screen). You can see what this screen looks like in Figure 3.

PowerToys Intro 3
Figure 3. You can enable or disable various PowerToys.
It is worth noting that although most PowerToys are enabled by default, there are some initially disabled ones. You can see which PowerToys are disabled by scrolling to the bottom of the screen. When you disable a module, it is moved to the Disabled Modules section; conversely, enabling a module moves it to the Enabled Modules section.
About the Author
You May Also Like


.jpg?width=700&auto=webp&quality=80&disable=upscale)
