How to Install Remote Server Administration Tools (RSAT) on Windows 10How to Install Remote Server Administration Tools (RSAT) on Windows 10
Remote Server Administration Tools (RSAT) is used to remotely manage Windows Servers (such as Server 2008/2012/2016) from client machines (such as Windows 7/8/10). In this article, we will look into installation method of RSAT version 1.2 on Windows 10. The RSAT for Windows 10 include the following: 1. Server manager 2. Microsoft Management Console (MMC) snap-ins
May 23, 2017

Remote Server Administration Tools (RSAT) is used to remotely manage Windows Servers (such as Server 2008/2012/2016) from client machines (such as Windows 7/8/10). In this article, we will look into installation method of RSAT version 1.2 on Windows 10.
The RSAT for Windows 10 include the following:
1. Server manager
2. Microsoft Management Console (MMC) snap-ins
3. Windows PowerShell cmdlets
4. Various command-line tools (such as Ntdsutil.exe, Repadmin.exe, and Dcdiag.exe etc) for managing roles and features on remote windows server
Supported Versions
RSAT supports the following Windows 10 versions:
Professional
Enterprise
Education
With RSAT, you can add or remove roles, manage existing roles (such as AD, DNS, DHCP etc ). So, let’s get started.
How to Install RSAT on Windows 10

2. Read the license terms and click ‘I Accept’

3. Wait for the installation to finish

4. When an installation completes, click Close

By default, all tools in RSAT are enabled in windows 10. However, you can turn off some of the tools. Go to Control Panel -> Programs -> Turn Windows features on or off. Locate Remote Server Administration Tools and uncheck the corresponding boxes.

Your installation of RSAT on Windows 10 is complete. You can open server manager, add a remote server and start managing it.
Adding a Remote Server in Server Manager
1. Open server manager
2. On server manager dashboard, click Add other servers to manage
3. On active directory tab (I assume your windows 10 is already domain joined), search the name of server you want to remotely manage
4. Click the arrow button and add the new server to selected computers. Click OK
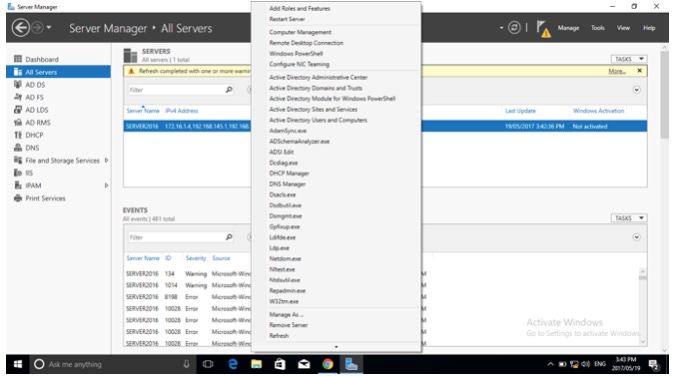
5. In server manager dashboard, go to All Servers. Right-click the newly added server and start managing it

At this point we can be sure that the installation is successful and remote server management is working. Let me know if you have any issue. I wish you good luck.
About the Author
You May Also Like


.jpg?width=700&auto=webp&quality=80&disable=upscale)
