How Using Windows Forms Changes PowerShell Script Logic (With Sample Script)How Using Windows Forms Changes PowerShell Script Logic (With Sample Script)
PowerShell scripts are typically linear in execution, but the use of Windows forms can introduce aspects of parallel execution. This allows for the creation of graphical PowerShell scripts without the need for a central loop.
October 17, 2023

Even though PowerShell is designed primarily to act as a text-based environment, you can attach a GUI interface to your PowerShell scripts using Windows forms. Interestingly, the one thing that I never hear anyone talk about is how using forms changes the overall logic of PowerShell scripts.
In many ways, these changes simplify the scripting process. At the same time, when you are used to the normal PowerShell way of doing things, it can be a bit tough to wrap your head around why that is.
Linear Execution vs. Parallel Execution in PowerShell Scripts
As I’m sure you know, a basic PowerShell script is linear in its execution. This means that each line of code executes sequentially, one after the other, starting from the first and progressing to the last line of the script.
Of course, not all PowerShell scripts are linear. In more advanced PowerShell scripts, you may encounter functions and other logic branching mechanisms. Even in these cases, the script still executes serially, where each instruction is carried out one at a time.
Graphical PowerShell scripts that have Windows forms use serial execution just like any other PowerShell script. However, certain elements running behind the scenes are using parallel execution. The distinction is important because when you are creating a graphical PowerShell script, you will typically refrain from creating a main script loop.
Practical Example: A PowerShell Calculator App
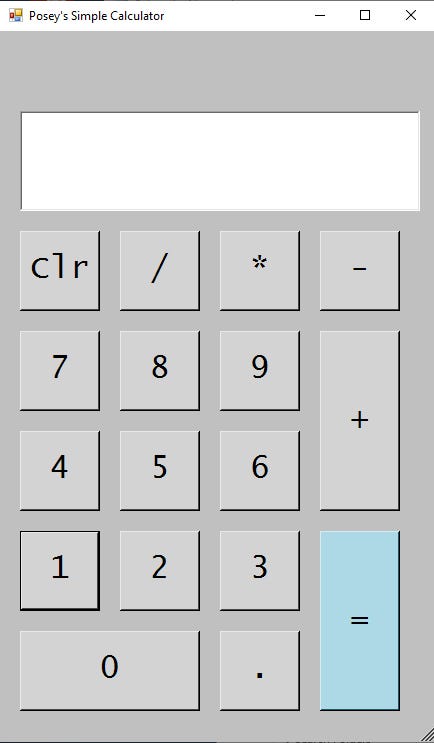
To illustrate this point, I have created a PowerShell calculator that closely resembles the calculator app that comes with Windows. You can see what the app looks like in Figure 1.

GUI Logic 1
Figure 1. This is my PowerShell calculator.
The use of forms changes the way you think about PowerShell script logic. Before explaining why that is, however, it’s important to offer a high-level overview of how part of the script works.
When the user interacts with the calculator by clicking on its keys, the value of each key is added to a string. For example, if the user presses the “1” key, the number 1 is added to the string. Similarly, if the user then presses the “plus” key, the plus sign is added to the string. When the “equals” key is pressed, the string is evaluated. When the “Clr” key is pressed, the string is flushed.
So, with that in mind, let’s pretend that we had to construct a script like this using conventional PowerShell logic. The script would need a loop to monitor and record the user’s input. In PowerShell, you can use ReadKey to make PowerShell pause and wait for a keypress, but in a calculator application, you need to accept multiple keypresses.
As such, you would need something like this:
$Expression=’’$KeyPress=’’$Key=''Write-Host "Press any desired keys. Press X to exit."While($Key -ne ‘X’) {$KeyPress=[Console]::ReadKey($True)$Key=$KeyPress.KeyChar$Expression=$Expression+$Key}$Expression=$Expression.Substring(0,$Expression.Length-1)$ExpressionThis block of code does the following:
It initializes three variables.
It displays a message instructing the user to “press any desired keys" and "press X to exit.”
At that point, it sets up a While loop. This while loop repeats every time the user presses a key. It continues looping until the user presses the “X” key.
For each keypress ($KeyPress), the associated keyboard character (KeyChar) is written to a variable called $Key. This is the same variable used by the loop to check if the user has pressed the X key.
The $Key variable’s contents (the most recently pressed key) are also added to a string called $Expression. This string, $Expression, keeps track of all the user’s keypresses.
After the user does eventually press the X key, the loop exits.
At that point, the script executes a command to remove the last character from the $Expression string. This ensures that the string doesn’t include the letter X, as the user pressed X to exit the script.
The last line of code displays all the keys the user has pressed.
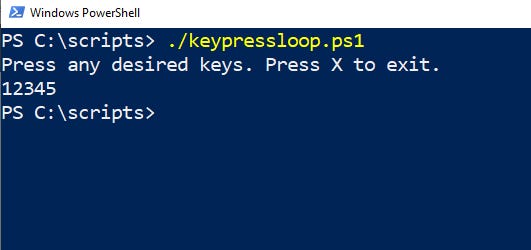
You can see what the code block does in Figure 2.

GUI Logic 2
Figure 2. This is what the script shown above does.
The point behind all of this is that if you built a calculator app using conventional PowerShell scripting techniques, you would need a loop like the one demonstrated. However, as weird as it may sound, a forms-based script does not need such a loop.
Parallel Processing in Forms-Based Scripts
This is where the previously mentioned concept of parallel processing comes into play. When you create a script that uses forms, you begin by creating the form itself. You then create any required GUI-based controls and then add them to the form. For example, in the case of my calculator app, each button is a separate object that has been added to the form. The calculator’s display is also an object that has been added to the form.
These GUI objects function independently of the PowerShell script. My calculator app does not contain a loop that monitors for button presses. Instead, when you create a button object and add it to the form, PowerShell will continuously check if that button has been clicked. This behavior happens automatically without requiring you to do anything.
Associating Actions With GUI Objects
What you do need to do, however, is associate a click action with the button. In other words, you need to instruct PowerShell on what should happen when a button is clicked. Normally, this means calling a function, although you can also associate a script block directly with a button. To provide you with an example of what this looks like, check out this excerpt from my calculator app:
$Button0.Add_Click({ $Global:Queue=$Global:Queue+'0' $OutputBox.Text= $Queue })In this code, we are defining a click action for the calculator’s “0” button. The script contains a global variable called $Queue that records all the keys the user clicks. Hence, when a user clicks the 0 key, the number 0 is added to the $Queue variable. Additionally, the output box (the calculator’s display) is updated to reflect the contents of the queue.
All of this is to say that the calculator app records key presses, updates the display, and performs math operations without requiring a central loop. Each button object contains a built-in looping mechanism (which is invisible to PowerShell) that continually checks for keypresses, eliminating the need to build the loop yourself.
Full Source Code of PowerShell Calculator App
So, with all that said, here is the full source code for my PowerShell calculator app:
Add-Type -AssemblyName System.Windows.FormsAdd-Type -AssemblyName System.Drawing$Global:Queue=''[String]$Global:OperationalString=''$OutputBox = New-Object System.Windows.Forms.textbox$OutputBox.Text = ""$OutputBox.Multiline = $True$OutputBox.Size = New-Object System.Drawing.Size(400,100)$OutputBox.Location = new-object System.Drawing.Size(20,80)$OutputBox.Font=New-Object System.Drawing.Font("Lucida Console",40,[System.Drawing.FontStyle]::Regular)$Button1 = New-Object System.Windows.Forms.Button$Button1.Location = New-Object System.Drawing.Size (20,500)$Button1.Size = New-Object System.Drawing.Size(80,80)$Button1.Font=New-Object System.Drawing.Font("Lucida Console",24,[System.Drawing.FontStyle]::Regular)$Button1.BackColor = "LightGray"$Button1.Text = "1"$Button1.Add_Click({ $Global:Queue=$Global:Queue+'1' $OutputBox.Text= $Queue })$Button2 = New-Object System.Windows.Forms.Button$Button2.Location = New-Object System.Drawing.Size (120,500)$Button2.Size = New-Object System.Drawing.Size(80,80)$Button2.Font=New-Object System.Drawing.Font("Lucida Console",24,[System.Drawing.FontStyle]::Regular)$Button2.BackColor = "LightGray"$Button2.Text = "2"$Num='2'$Button2.Add_Click({ $Global:Queue=$Global:Queue+'2' $OutputBox.Text= $Queue })$Button3 = New-Object System.Windows.Forms.Button$Button3.Location = New-Object System.Drawing.Size (220,500)$Button3.Size = New-Object System.Drawing.Size(80,80)$Button3.Font=New-Object System.Drawing.Font("Lucida Console",24,[System.Drawing.FontStyle]::Regular)$Button3.BackColor = "LightGray"$Button3.Text = "3"$Button3.Add_Click({ $Global:Queue=$Global:Queue+'3' $OutputBox.Text= $Queue })$Button4 = New-Object System.Windows.Forms.Button$Button4.Location = New-Object System.Drawing.Size (20,400)$Button4.Size = New-Object System.Drawing.Size(80,80)$Button4.Font=New-Object System.Drawing.Font("Lucida Console",24,[System.Drawing.FontStyle]::Regular)$Button4.BackColor = "LightGray"$Button4.Text = "4"$Button4.Add_Click({ $Global:Queue=$Global:Queue+'4' $OutputBox.Text= $Queue })$Button5 = New-Object System.Windows.Forms.Button$Button5.Location = New-Object System.Drawing.Size (120,400)$Button5.Size = New-Object System.Drawing.Size(80,80)$Button5.Font=New-Object System.Drawing.Font("Lucida Console",24,[System.Drawing.FontStyle]::Regular)$Button5.BackColor = "LightGray"$Button5.Text = "5"$Button5.Add_Click({ $Global:Queue=$Global:Queue+'5' $OutputBox.Text= $Queue })$Button6 = New-Object System.Windows.Forms.Button$Button6.Location = New-Object System.Drawing.Size (220,400)$Button6.Size = New-Object System.Drawing.Size(80,80)$Button6.Font=New-Object System.Drawing.Font("Lucida Console",24,[System.Drawing.FontStyle]::Regular)$Button6.BackColor = "LightGray"$Button6.Text = "6"$Button6.Add_Click({ $Global:Queue=$Global:Queue+'6' $OutputBox.Text= $Queue })$Button7 = New-Object System.Windows.Forms.Button$Button7.Location = New-Object System.Drawing.Size (20,300)$Button7.Size = New-Object System.Drawing.Size(80,80)$Button7.Font=New-Object System.Drawing.Font("Lucida Console",24,[System.Drawing.FontStyle]::Regular)$Button7.BackColor = "LightGray"$Button7.Text = "7"$Button7.Add_Click({ $Global:Queue=$Global:Queue+'7' $OutputBox.Text= $Queue })$Button8 = New-Object System.Windows.Forms.Button$Button8.Location = New-Object System.Drawing.Size (120,300)$Button8.Size = New-Object System.Drawing.Size(80,80)$Button8.Font=New-Object System.Drawing.Font("Lucida Console",24,[System.Drawing.FontStyle]::Regular)$Button8.BackColor = "LightGray"$Button8.Text = "8"$Button8.Add_Click({ $Global:Queue=$Global:Queue+'8' $OutputBox.Text= $Queue })$Button9 = New-Object System.Windows.Forms.Button$Button9.Location = New-Object System.Drawing.Size (220,300)$Button9.Size = New-Object System.Drawing.Size(80,80)$Button9.Font=New-Object System.Drawing.Font("Lucida Console",24,[System.Drawing.FontStyle]::Regular)$Button9.BackColor = "LightGray"$Button9.Text = "9"$Button9.Add_Click({ $Global:Queue=$Global:Queue+'9' $OutputBox.Text= $Queue })$ButtonPeriod = New-Object System.Windows.Forms.Button$ButtonPeriod.Location = New-Object System.Drawing.Size (220,600)$ButtonPeriod.Size = New-Object System.Drawing.Size(80,80)$ButtonPeriod.Font=New-Object System.Drawing.Font("Lucida Console",24,[System.Drawing.FontStyle]::Regular)$ButtonPeriod.BackColor = "LightGray"$ButtonPeriod.Text = "."$ButtonPeriod.Add_Click({ $Global:Queue=$Global:Queue+'.' $OutputBox.Text= $Queue })$Button0 = New-Object System.Windows.Forms.Button$Button0.Location = New-Object System.Drawing.Size (20,600)$Button0.Size = New-Object System.Drawing.Size(180,80)$Button0.Font=New-Object System.Drawing.Font("Lucida Console",24,[System.Drawing.FontStyle]::Regular)$Button0.BackColor = "LightGray"$Button0.Text = "0"$Button0.Add_Click({ $Global:Queue=$Global:Queue+'0' $OutputBox.Text= $Queue })$ButtonPlus = New-Object System.Windows.Forms.Button$ButtonPlus.Location = New-Object System.Drawing.Size (320,300)$ButtonPlus.Size = New-Object System.Drawing.Size(80,180)$ButtonPlus.Font=New-Object System.Drawing.Font("Lucida Console",24,[System.Drawing.FontStyle]::Regular)$ButtonPlus.BackColor = "LightGray"$ButtonPlus.Text = "+"$ButtonPlus.Add_Click({ $Global:OperationalString = $Global:OperationalString+$Global:Queue $Global:OperationalString = $Global:OperationalString + '+' $Global:Queue='' $OutputBox.Text = '+' })$ButtonMinus = New-Object System.Windows.Forms.Button$ButtonMinus.Location = New-Object System.Drawing.Size (320,200)$ButtonMinus.Size = New-Object System.Drawing.Size(80,80)$ButtonMinus.Font=New-Object System.Drawing.Font("Lucida Console",24,[System.Drawing.FontStyle]::Regular)$ButtonMinus.BackColor = "LightGray"$ButtonMinus.Text = "-"$ButtonMinus.Add_Click({ $Global:OperationalString = $Global:OperationalString+$Global:Queue $Global:OperationalString = $Global:OperationalString + '-' $Global:Queue='' $OutputBox.Text = '-' })$ButtonMult = New-Object System.Windows.Forms.Button$ButtonMult.Location = New-Object System.Drawing.Size (220,200)$ButtonMult.Size = New-Object System.Drawing.Size(80,80)$ButtonMult.Font=New-Object System.Drawing.Font("Lucida Console",24,[System.Drawing.FontStyle]::Regular)$ButtonMult.BackColor = "LightGray"$ButtonMult.Text = "*"$ButtonMult.Add_Click({ $Global:OperationalString = $Global:OperationalString+$Global:Queue $Global:OperationalString = $Global:OperationalString + '*' $Global:Queue='' $OutputBox.Text = '*' })$ButtonDiv = New-Object System.Windows.Forms.Button$ButtonDiv.Location = New-Object System.Drawing.Size (120,200)$ButtonDiv.Size = New-Object System.Drawing.Size(80,80)$ButtonDIV.Font=New-Object System.Drawing.Font("Lucida Console",24,[System.Drawing.FontStyle]::Regular)$ButtonDIV.BackColor = "LightGray"$ButtonDiv.Text = "/"$ButtonDiv.Add_Click({ $Global:OperationalString = $Global:OperationalString+$Global:Queue $Global:OperationalString = $Global:OperationalString + '/' $Global:Queue='' $OutputBox.Text = '/' })$ButtonEq = New-Object System.Windows.Forms.Button$ButtonEq.Location = New-Object System.Drawing.Size (320,500)$ButtonEq.Size = New-Object System.Drawing.Size(80,180)$ButtonEQ.Font=New-Object System.Drawing.Font("Lucida Console",24,[System.Drawing.FontStyle]::Regular)$ButtonEQ.Text = "="$ButtonEQ.BackColor = "LightBlue"$ButtonEq.Add_Click({ $Global:OperationalString = $Global:OperationalString+$Global:Queue $Answer=Invoke-Expression $Global:OperationalString $Global:OperationalString='' $Global:Queue='' $OutputBox.Text=$Answer $Answer='' })$ButtonClear = New-Object System.Windows.Forms.Button$ButtonClear.Location = New-Object System.Drawing.Size (20,200)$ButtonClear.Size = New-Object System.Drawing.Size(80,80)$ButtonClear.BackColor = "LightGray"$ButtonClear.Font=New-Object System.Drawing.Font("Lucida Console",24,[System.Drawing.FontStyle]::Regular)$ButtonClear.Text = "Clr"$ButtonClear.Add_Click({ $Global:Queue='' $OutputBox.Text= $Queue })$Form = New-Object Windows.Forms.Form$Form.Text = "Posey's Simple Calculator"$Form.Width = 450$Form.Height = 750$Form.BackColor="Silver"$Form.controls.add($Button1)$Form.controls.add($Button2)$Form.controls.add($Button3)$Form.controls.add($Button4)$Form.controls.add($Button5)$Form.controls.add($Button6)$Form.controls.add($Button7)$Form.controls.add($Button8)$Form.controls.add($Button9)$Form.controls.add($Button0)$Form.controls.add($ButtonPeriod)$Form.controls.add($ButtonClear)$Form.controls.add($ButtonDIV)$Form.controls.add($ButtonMult)$Form.controls.add($ButtonMinus)$Form.controls.add($ButtonPlus)$Form.controls.add($ButtonEQ)$Form.Controls.add($OutputBox)$Form.Add_Shown({$Form.Activate()})$Form.ShowDialog()About the Author
You May Also Like


.jpg?width=700&auto=webp&quality=80&disable=upscale)
