How To Create Responsive Dialog Boxes in PowerShell
This article concludes our PowerShell series on using Microsoft's premade dialog boxes, showing how to create boxes that respond to user input.
November 25, 2024
In the first two articles of this series, I demonstrated several ways to use PowerShell to open a dialog box programmatically. While these methods are handy, the scripts I have so far shared do nothing beyond displaying a dialog box. In this article, I will build on what we have covered by showing you how to create code that interacts with a dialog box.
Using Premade Dialog Boxes in Your PowerShell Scripts
How to Create Responsive Dialog Boxes
Since we have been working with the Color dialog box, I will modify the script we used in Part 2. This time, when you select a color, PowerShell will change the GUI’s color to match your selection. Here is the updated code:
# Load the necessary assemblies
Add-Type -AssemblyName System.Windows.Forms
Add-Type -AssemblyName System.Drawing

# Create the form
$Form = New-Object Windows.Forms.Form
$Form.Text = "Dialog Box Demo"
$Form.Size = New-Object Drawing.Size(1024, 768)
$Form.StartPosition = [System.Windows.Forms.FormStartPosition]::CenterScreen

# Create the menu strip
$MenuStrip = New-Object System.Windows.Forms.MenuStrip

# Create the "Options" menu item
$FormatMenu = New-Object System.Windows.Forms.ToolStripMenuItem("Format")

# Create the "Color" menu item under "Options"
$MenuItemColor = New-Object System.Windows.Forms.ToolStripMenuItem("Color")

# Add the "Color" item to the "Options" menu
$FormatMenu.DropDownItems.Add($MenuItemColor)

# Add the "Format" menu to the menu strip
$MenuStrip.Items.Add($FormatMenu)

# Add the menu strip to the form
$Form.Controls.Add($MenuStrip)
$Form.MainMenuStrip = $MenuStrip

# Create the ColorDialog
$ColorDialog = New-Object System.Windows.Forms.ColorDialog

# Event handler for the Color menu item
$MenuItemColor.Add_Click({
   if ($ColorDialog.ShowDialog() -eq [System.Windows.Forms.DialogResult]::OK) {
   $Form.BackColor = $ColorDialog.Color
    }
    })

# Display the form
$Form.ShowDialog()
This time, I added an If statement before the $ColorDialog.ShowDialog() command. As you will remember, the $ColorDialog.ShowDialog() command displays the dialog box. The If statement ensures that the dialog box gets shown, but it also checks whether the user has clicked the OK button within the dialog box. If the user clicks OK, the $Form.BackColor=$ColorDialog.Color command changes the GUI’s background color to match the one the user selected before clicking OK.
While the code itself is pretty simple, the goal of this article isn’t so much to explain how to use the Color dialog box (although this can be useful). The aim is to show you how to work with any dialog box. So, with that in mind, the main questions are:
How did I know to reference “OK” in the If statement?
How did I know that $ColorDialog.Color would represent the color the user has selected?
In Part 1 of this series, I mentioned that Microsoft maintains a reference page for the System.Windows.Forms namespace (visit it here). Each of the namespace’s classes has a reference page, including the ColorDialog class (see the ColorDialog’s reference page). These reference pages contain all the information you need to interact with a dialog box.
The line that references the OK button actually uses a different class. Rather than referencing System.Windows.Forms.ColorDialog, I am using System.Windows.Forms.DialogResult. The reference page for this class (see it here) lists the fields you can reference, such as OK, Cancel, Abort, Yes, No, and Continue.
In Figure 1, you will see that the Colors dialog box has three buttons: OK, Cancel, and Define Custom Colors. The OK and Cancel buttons are included within the Fields definition on the DialogResult page, as shown in Figure 2. This means you can use an If statement to test whether $ColorDialog.ShowDialog() equals one of these button results (in other words, whether a button has been clicked). Here is that line of code again:
if ($ColorDialog.ShowDialog() -eq [System.Windows.Forms.DialogResult]::OK) {What about the Define Custom Colors button? It is not among the fields. The reason is that the Define Custom Colors button is local to the dialog box itself. When you click it, the dialog box expands to reveal additional colors, as shown in Figure 3. Since clicking the Define Custom Colors button doesn’t trigger anything that gets passed back to the script, its definition is unnecessary in the list of DialogResult fields.
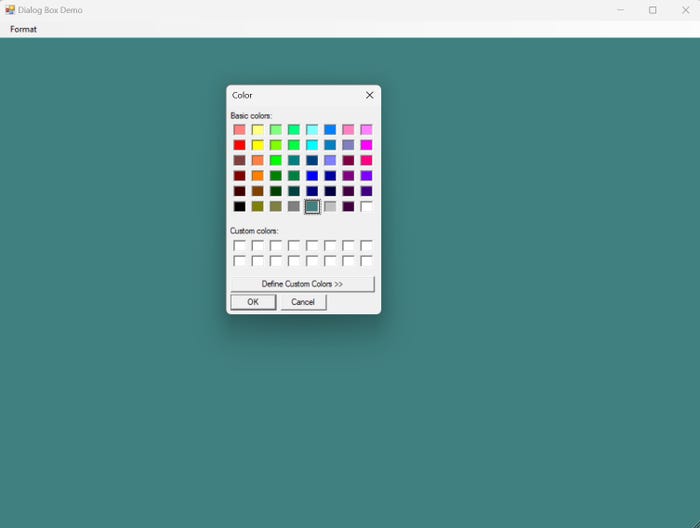
Figure 1. The Colors dialog box contains three buttons.
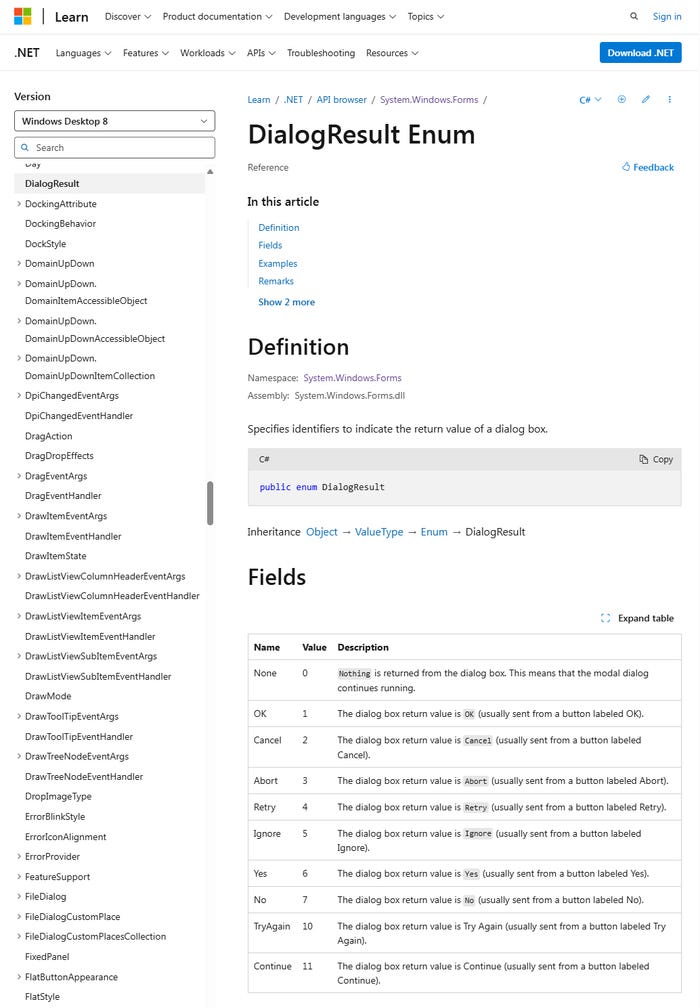
Figure 2. The DialogResults reference page lists the various button fields.
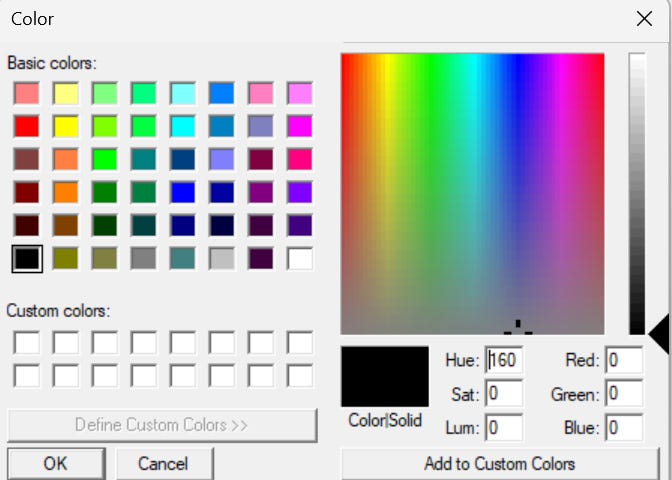
Figure 3. Clicking the Define Custom Colors button causes the dialog box to expand.
Now let’s address the other question: How do we know that $ColorDialog.Color represents the color the user selected before clicking OK? As you may remember from Part 1, the $ColorDialog variable represents the Color dialog box, which is defined by a .NET class. The ColorDialog class has several properties. The corresponding reference page details the properties (see the reference page). These properties, as shown in Figure 4, include things like Color, Instance, Options, and DesignMode. According to the reference page, the Color property “gets or sets the color selected by the user.” That’s how I knew that $ColorDialog.Color contains the color chosen by the user.
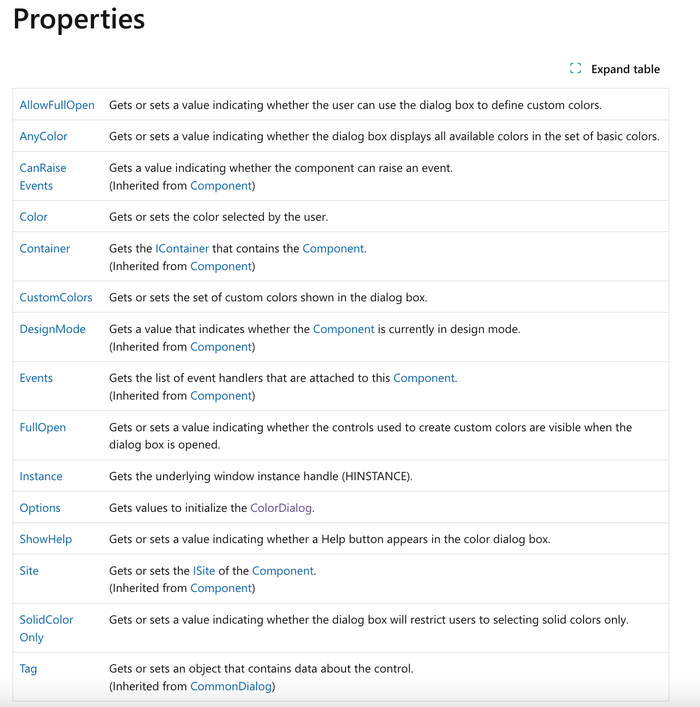
Figure 4. The ColorDialog reference page lists the available properties.
Incidentally, each property also has a reference page. For example, the reference page for the Color property is found here. This page can be valuable if you have questions about working with specific properties.
About the Author
You May Also Like


.jpg?width=700&auto=webp&quality=80&disable=upscale)
