How to Create Users in Bulk in Office 365How to Create Users in Bulk in Office 365
If you have a large number of users, it is more efficient to create their accounts from CSV file or Excel spreadsheet. Here's how you do it.
June 22, 2017

In one of earlier posts, I showed you how to create user accounts in Office 365. That method is suitable when you have few users to add. If you have a large number of users, it is more efficient to create their accounts from CSV file or Excel spreadsheet.
How to Add Users in CSV File
Open notepad or any other editor
Enter the information of each user on separate row strictly in order with respect to column headings. The column headings are; User Name,First Name,Last Name,Display Name,Job Title,Department,Office Number,Office Phone,Mobile Phone,Fax,Address,City,State or Province,ZIP or Postal Code,Country or Region
Save the file with .csv extension

How to Create Users in Bulk with CSV File
Open portal.office.com in your web browser
Sign In with work or school account
Go to admin center
Expand Users. Click ‘Active users’ and then again click ‘More’ button. Click Import multiple users.

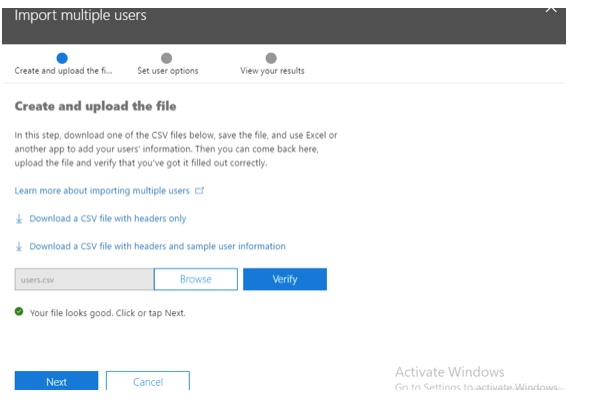
5. Click Browse and provide the path of CSV file on your computer and click verify to make sure there is no error in the file. If there are any errors, they will be visible in the panel and you can download the log file to view detail.

6. Click Next
7. Choose the Sign-in status, appropriate license, location, and click Next

8. Check ‘Email the results files to these people’ and provide an email address if you would like to email the results. The results file contain user ID and password. You can also download the results in CSV file by clicking on ‘Download results’. Click ‘Send and close’

About the Author
You May Also Like


.jpg?width=700&auto=webp&quality=80&disable=upscale)
