Configuring DHCP Failover in Windows Server 2016Configuring DHCP Failover in Windows Server 2016
In this guide, Karim Buzdar illustrates how the configuration of DHCP failover in a test environment with two Windows 2016 servers and one Windows 10 client.
March 29, 2017

DHCP failover is a new feature (available in Server 2012 and later versions) for ensuring high availability of DHCP server on an enterprise network. The two servers in a failover relationship share lease information including reservations, scope options, exclusion, policies, and filters. They know their existence by exchanging heart beat messages. When one DHCP server is unavailable, other takes responsibility of assigning IP address configuration to client computers.
In this guide, I have tried to illustrate the configuration of DHCP failover in a test environment with two Windows 2016 servers and one Windows 10 client.
DHCP Failover Architecture Overview
DHCP failover relationship is created in one of the following two modes.
Hot standby mode
Load sharing mode
In hot standby mode, primary and secondary DHCP servers in a failover relationship work in active – passive modes. Primary DHCP server is used to be an active DHCP server and it has the responsibility of leasing out IP address configuration to client computers while secondary DHCP server is used to be passive server. It takes the responsibility of leasing out IP address configuration only when an active DHCP server is down or unavailable.

In load sharing mode, both primary DHCP server and secondary DHCP server work in active-active mode and provide an IP address configuration to client computers simultaneously. The client requests are load balanced and shared among two DHCP servers.

In this guide, I have configured the DHCP failover in hot standby mode.
Limitations
The implementation of DHCP failover in Windows Server 2016 has following two limitations.
It can support only two DHCP servers in failover relationship
The failover relationship doesn’t support IPv6 scope
Prerequisites
You need to meet the following two minimum requirements for this guide to work.
An active scope on primary DHCP server
An already configured DHCP on secondary or partner server
Configuring DHCP Failover Using Server Manager
Step 1. Open DHCP console of your primary server, right-click the scope you want to configure for failover and then click Configure Failover…

Step 2. Click Next

Step 3. Type the host name or IP address of the partner server and click Next

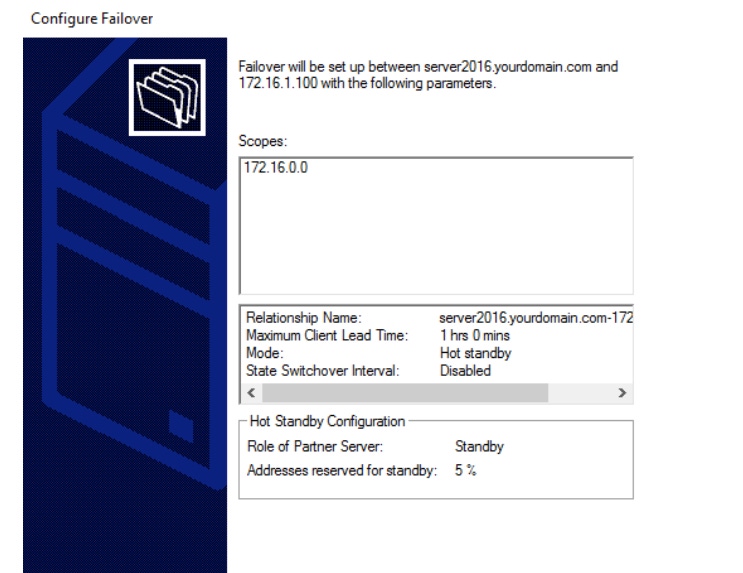
Step 4. Choose Hot standby mode, leave other options as default and click Next

Step 5. Click Finish

Step 6. Click Close

Configuring DHCP Failover Using PowerShell
Step 1. In your primary DHCP server, open PowerShell with elevated privileges
Step 2. Execute the following command. Make sure to replace the values of -ComputerName, -PartnerServer and -ScopeID
Add-DhcpServerv4Failover –ComputerName dhcp1.contoso.com –PartnerServer dhcp2.contoso.com –Name server2016.yourdomain.com-172.16.1.100-2 –ScopeID 172.16.0.0 –ServerRole Active -Force
Testing the Configuration
There are few work around you can perform to test your DHCP failover configuration.
Step 1. Open DHCP console of primary or active server and expand IPv4 node. Right-click the scope you configured for failover and then click Properties. Open the failover tab, verify the IP address and state of partner server

Step 2. Open DHCP console of secondary or partner server and expand IPv4 node. You should see the same scope (including reservations, options etc.) you configured for failover from primary server

Step 3. On Windows 10 client, open network adapter (TCP/IPv4 Properties) settings and set it to obtain an IP address automatically. Execute the ipconfig/all on command prompt. Note down the DHCP server IP address. It should be an IP address of active DHCP server.

Step 4. Open DHCP console of primary or active DHCP server and stop the DHCP service. Right-click your server name -> All Tasks -> click Stop

Step 5. Open command prompt of Windows 10 client and execute the following two commands. Note down the DHCP server IP address. It should be an IP address of standby DHCP server
Ipconfig /release
Ipconfig /renew

References Used:
https://technet.microsoft.com/en-us/library/dn338975(v=ws.11).aspx
https://technet.microsoft.com/en-us/library/hh831385(v=ws.11).aspx
https://technet.microsoft.com/en-us/library/dn338983(v=ws.11).aspx
http://techgenix.com/implementing-dhcp-server-failover/
About the Author
You May Also Like


.jpg?width=700&auto=webp&quality=80&disable=upscale)
