
In a previous article, I explored techniques for using PowerShell to access data in SQL Server. I covered topics like reading data from a SQL Server table and inserting data into a table. Of course, there are plenty of ways to access SQL Server data without using PowerShell.
The rationale behind using PowerShell lies in its capabilities for advanced scripted data analytics. It can also be used as an automation engine, taking actions based on data. For example, PowerShell could monitor an organization’s HR database for the addition of new employees and, if any are found, automatically set up their user accounts.
Whether you are interested in data analytics or data-driven orchestrations, you will need to know how to filter data to give PowerShell what it needs. Filtering can be done either at the SQL Server level or within PowerShell itself. However, for handling large datasets, it’s usually best to filter at the SQL level. In this article, I will demonstrate both techniques.
PowerShell Filtering
In Figure 1, you can see that I have used a simple PowerShell command to read data from a table in a SQL Server database. I added that data to a PowerShell variable named $Data and then outputted the contents by typing the variable name.
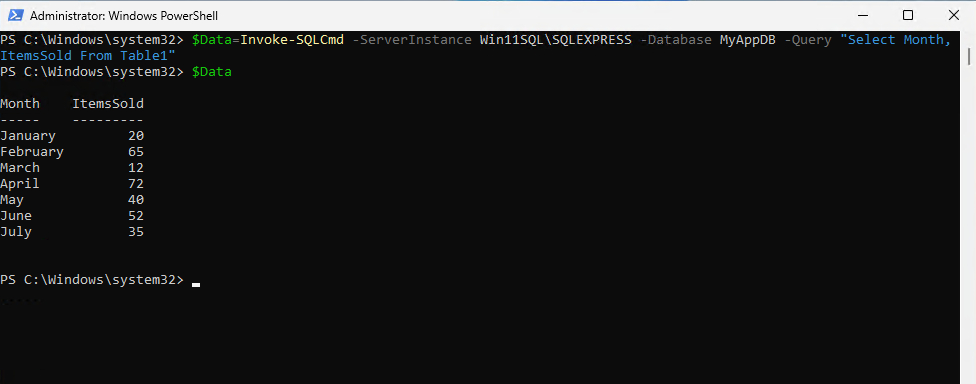
Figure 1. I have copied data from a SQL Server table into a PowerShell variable.
Since we now have this data in a PowerShell variable, we can apply all the usual techniques to access the specific data we need.
In the figure above, the quantity of items sold in July is 35. Let’s suppose that, for whatever reason, we need to isolate this quantity so that we can take action on it.
To do so, we could use a command like this:
$Data | Where-Object {$_.Month -eq ‘July’}
Although this command returns both the month (July) and the quantity of items sold (35), our goal is to isolate just the quantity. One way to accomplish this is to map the command to another variable, which I will name $RawData. By doing this, we can access the desired data by calling $RawData.ItemsSold. An example can be seen in Figure 2.
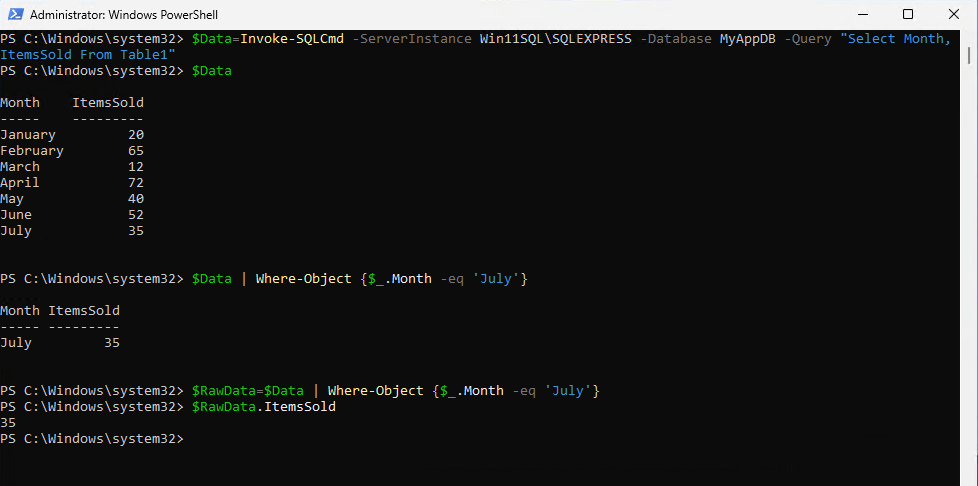
Figure 2. I have referenced a single data point from a SQL Server database.
Of course, PowerShell also makes it possible to perform more advanced filtering. For example, if you only wanted to see data from the database table where the month starts with the letter “J,” you could type the following:
$RawData = $Data | Where-Object {$_.Month -Like ‘J*’}

$RawData
Notice that I had to change the operator from -eq to -like. You can see what this looks like in Figure 3.
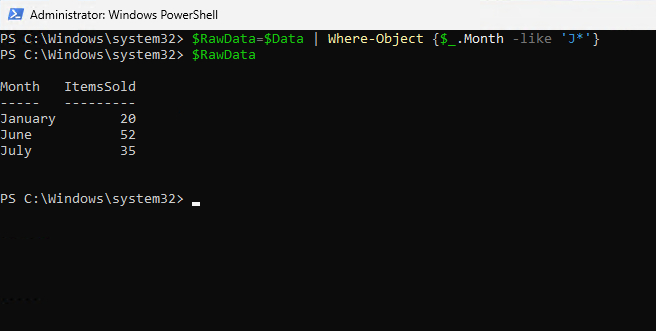
Figure 3. You can filter the data based on any criteria that you choose.
SQL Server Filtering
The filtering techniques that I have demonstrated so far work well when dealing with small datasets. However, what if you need to interact with a table containing millions of rows? Depending on the volume of data, it may exceed PowerShell’s capacity. Even if PowerShell handles such volumes, filtering the data could strain your system. As such, it is often more practical to let SQL Server handle the filtering task.
Countless techniques exist for filtering SQL Server data. In fact, entire books have been written on the subject. Even so, I want to illustrate how we can perform some basic SQL Server filtering by simply modifying our query.
As you may recall from my original article on SQL Server and PowerShell, I initially instructed PowerShell to read all the data from a SQL Server table using the following command:
$Data=Invoke-SQLCmd -ServerInstance Win11SQL\SQLEXPRESS -Database MyAppDB -Query “Select Month, ItemsSold From Table1”
In this command, the Query portion specifies the data to retrieve. Therefore, if we want to give PowerShell a smaller dataset to work with, we can simply modify the Query statement to include a filter. This can be done using a Where statement.
Suppose that I want to repeat the earlier task of isolating the number 35, which represents the items sold in July. On the surface, it seems that the query statement should be something like this: Select ItemsSold From Table1 Where Month = ‘July’. However, things aren’t quite so simple.
There are two problems with the above Select statement. The first problem is that the Where statement uses the Month column as a filter. Even though we are only interested in returning the ItemsSold data, we must include the Month column in the Select portion of the statement (as opposed to only including the ItemsSold column). Otherwise, SQL can’t filter the data based on the month.
The other problem with the statement is that, as you may recall from my original article, the Month column in the table is a text data type. If you try to perform a comparison operation on a text column, you will receive an error message stating, “The data types text and varchar are incompatible in the equal to operator.” In other words, the filter (July) is being treated as VARCHAR data, while the data in the table’s Month column is text data, and you can’t compare the two.
To resolve this problem, we can convert the text data into VARCHAR data. Thankfully, this is easy to do and doesn’t require any modifications to the database table. We only need to add a convert command to the Select statement.
Hence the final Query statement is:
Select Month, ItemsSold From Table1 Where Convert(VARCHAR,Month) = ‘July’;
In Figure 4, you can see the original command that produced the error and the correct command. As shown, accessing the number 35 is simply a matter of typing $Data.ItemsSold.
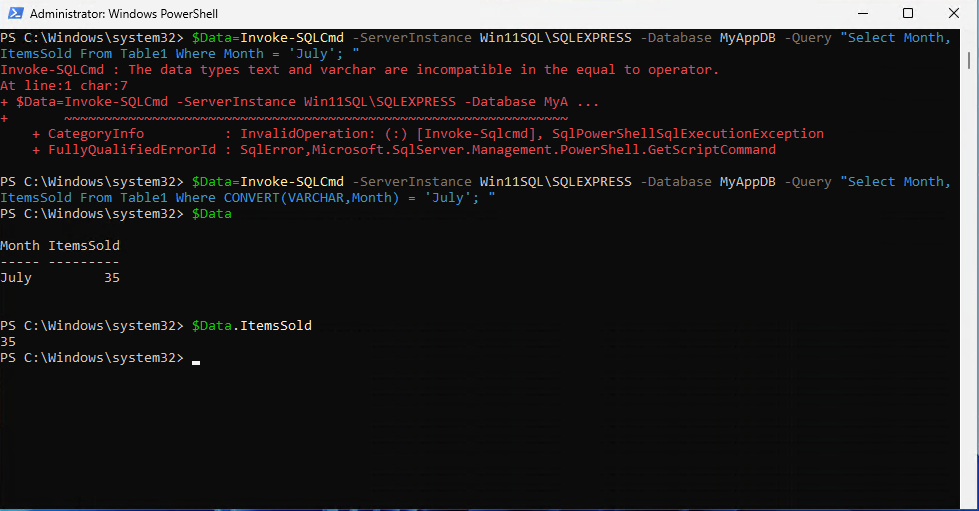
Figure 4. This is how you filter the data within the SQL Select statement.
As a final example, we can modify the SQL Select statement to return only the months that begin with the letter “J.” The command is like the one used previously, but we must use the Like operator instead of =. Additionally, unlike PowerShell, we can’t reference J*; instead, we must use J%. The J% tells SQL that we are searching for results starting with the letter J followed by any number of other characters. Hence, the query statement becomes:
Select Month, ItemsSold From Table1 Where Convert(VARCHAR,Month Like ‘J%’;
You can see the full command in Figure 5.
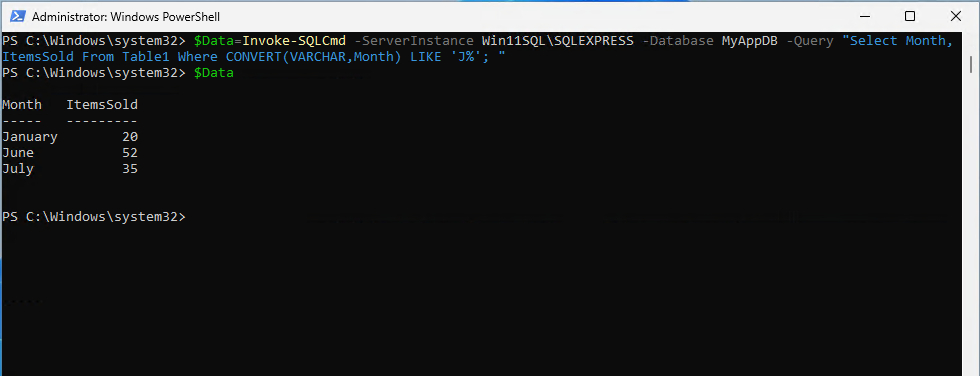
Figure 5. SQL Server has filtered the results to only include months beginning with the letter J.
About the author
 Brien Posey is a bestselling technology author, speaker, and 21x Microsoft MVP. In addition to his ongoing work in IT, Posey has trained as a commercial astronaut candidate in preparation to fly on a mission to study polar mesospheric clouds from space.em>


