Tracking Down Lost Disk Space: A PowerShell Solution
In Part 1 of this article series, we will begin to build a PowerShell tool that visualizes disk space.
December 10, 2024

In a recent ITPro Today [Root] Access column, a reader reached out for help with a common issue: their system was running out of disk space, and they couldn’t figure out where the available storage had gone. While I did share some suggestions with them, I wanted to revisit this topic because missing disk space is a frequent challenge I’ve encountered throughout my career.
To help others facing this problem, I built a PowerShell tool to visualize disk space so you can see how it is used.
The script I created has a folder tree that reflects the disk’s contents, making it easy to pinpoint which folders consume the most space. When you click on a folder within the tree, it updates a dynamic pie chart that displays the storage used by that folder and its subfolders. The pie chart also shows the system’s total storage capacity and the remaining space. Additionally, the script generates a list of the 10 largest files on the disk.
Since this script was relatively complicated to build, I will explain how the folder tree works first. In Parts 2 and 3, I will cover the rest of the script.
Part 1: Track Disk Space With a PowerShell Folder Tree
Part 2: Identify the 10 Largest Files on Your Disk (publishing Dec. 16)
Part 3: Building a Disk Space Pie Chart // Complete Script (publishing Dec. 20)
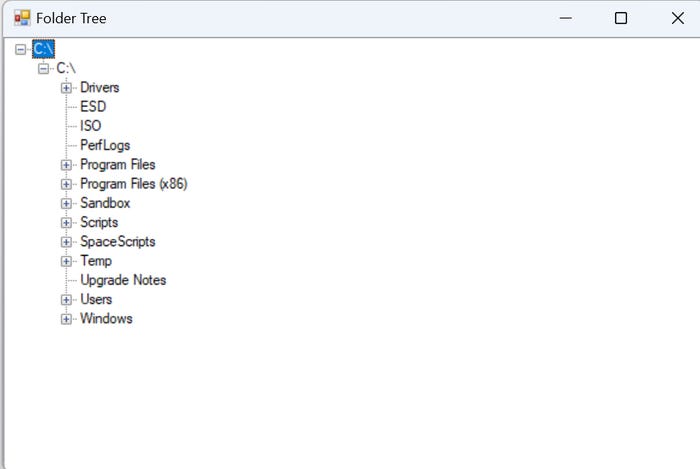
You can see an example of the folder tree in Figure 1.

Figure 1. Here is what the folder tree looks like.
The Code for the Folder Tree
The script below creates a folder tree like the one shown above. Here is the code:
    # Load the necessary .NET assemblies for Windows Forms
Add-Type -AssemblyName System.Windows.Forms
Add-Type -AssemblyName System.Drawing

# Create the Form
$Form = New-Object System.Windows.Forms.Form
$Form.Height = 600
$Form.Width = 800

# Create the TreeView control
$FolderTree = New-Object System.Windows.Forms.TreeView
$FolderTree.Dock = [System.Windows.Forms.DockStyle]::Fill
$Form.Controls.Add($FolderTree)

# Function to load folders into the TreeView recursively
Function Load-FolderTree {
    Param (
        [System.Windows.Forms.TreeNode]$ParentNode,
        [string]$Path
    )

    $Node = New-Object System.Windows.Forms.TreeNode -ArgumentList (Get-Item $Path).Name
    $Node.Tag = $Path

    $ParentNode.Nodes.Add($Node)

    # Display the name of the folder that is being added to the tree
    Write-Host "Processing folder: $Path"

    # Try to access subfolders and handle errors
    Try {
        $Subfolders = Get-ChildItem -Path $Path -Directory -ErrorAction SilentlyContinue
        ForEach ($Folder in $Subfolders) {
            # Recursively load subfolders
            Load-FolderTree -ParentNode $Node -path $Folder.FullName
        }
    } catch {
        Write-Host "Error accessing folder: $Path"
    }
}

# The Root Path references the root directory
$RootPath = "C:\"


$RootNode = New-Object System.Windows.Forms.TreeNode -ArgumentList (Get-Item $RootPath).Name
$RootNode.Tag = $RootPath
$FolderTree.Nodes.Add($RootNode)

Load-FolderTree -ParentNode $RootNode -path $RootPath

# Suppress unwanted console output
[System.Windows.Forms.Application]::EnableVisualStyles()

# Ensure the form runs and appears
[System.Windows.Forms.Application]::Run($Form)
How the Folder Tree Script Works
The script above differs slightly from the code used in my tool for finding lost disk space, as it demonstrates a subset of the tool’s functionality. I simplified the code to make the folder tree feature a standalone script. It is similar to other Tree View scripts that you can find online.
The script begins by loading the required assemblies and creating a Windows form that acts as the GUI window.
Next, the script creates a tree view object and adds it to the form. A tree view object visually depicts a hierarchical tree structure, as was shown in Figure 1.
If you skip past the function, the script then defines the root path. The root path is currently set to C:\, though you can change this to any path you need.
Once the root path is defined, the script creates a root node. The root node serves as the starting point that will appear at the top of the tree. In this case, the root node is C:\.
The script then calls the Load-FolderTree function. This function populates the tree with the folder names. The last two lines of the script hide some unwanted output in the PowerShell console and display the GUI.
The function parses the folder structure and adds each folder to the tree. Although not technically necessary, I included the Write-Host command to display the name of each folder as it is added. This is helpful when dealing with large or complex folder structures, as it can take time to parse all the folders. Displaying the folder name currently being added confirms the script is still running.
It's also worth noting that some folders may be inaccessible due to permission restrictions. The Get-ChildItem statement that retrieves the folder names is set with ErrorAction to continue silently, so no error messages will appear if such folders are encountered. The statement is embedded in a Try block, and any errors are caught and handled by displaying a message indicating the user doesn’t have access to a particular folder.
Now that I have explained how the folder tree works, I will continue the discussion on how to visualize disk space in Part 2.
About the Author
You May Also Like


.jpg?width=700&auto=webp&quality=80&disable=upscale)
