How To Build Your First ROS ApplicationHow To Build Your First ROS Application
In this tutorial to deploying ROS, you will learn how to build a sample application to test your ROS 2 setup on Ubuntu 22.04.
August 20, 2024
In a recent article, I walked readers through deploying the Robotics Operating System (ROS). In this follow-up tutorial, I will guide you through building a sample application to verify that your ROS setup works correctly.
For the tutorial, I will work with ROS 2 and Ubuntu 22.04. Please note that these procedures may require adjustments if you use ROS 1.
Our sample application will focus on testing the ROS environment and illustrating a few essential concepts. Future articles will explore more practical robotics applications.
Provisioning a Workspace
The first step in building any ROS application is to set up a workspace where your application will run. This step involves creating a folder for the workspace, initializing the workspace, and then sourcing the workspace to ensure any environment changes are retained.
Sourcing is the process of applying environment changes permanently. In Linux, when you run a script, it typically executes within a subshell. Any environment changes made within this subshell (such as updating an environment variable) are lost when the script exits. By sourcing the script, you ensure changes persist beyond the subshell.
Follow these steps to provision your workspace:
1. Create a folder: While many ROS tutorials use the path /ros2_ws/src, I recommend using a custom path to help manage multiple projects. For this tutorial, I will use /demo_ws as our folder name. The src folder is commonly used to store source files.
Run these commands to create and navigate to the /demo_ws/src folder:
mkdir -p ~/demo_ws/srccd ~/demo_ws2. Initialize the workspace: Initialize the workspace with the following command:
colcon buildNote that this command is exclusive to ROS 2. In ROS 1, you would use catkin_make instead.
Sourcing Your Files
Source your shell startup script to make your workspace environment persistent. Remember to perform this step each time you open a new terminal window.
Begin by running the following command:
source /opt/ros/humble/setup.bashHere are two key points to keep in mind:
Location: This command must execute within the /demo_ws/src folder.
ROS Version: The term humble refers to a specific ROS version. Replace humble with the version you are using.
Sourcing this script configures critical environment variables required for ROS applications. To verify that these variables are set correctly, use the following command:
printenv | grep -i ROSCheck the output to ensure that ROS_Distro is set to humble and ROS_Version is set to 2. See Figure 1 for an example of what the output should look like.

Figure 1. Verify you have correctly set your environment variables.
Setting a Domain ID
Next, you must set a domain ID for ROS. ROS uses the DDS protocol for node communication. By default, nodes use a domain ID of 0. If other computers on the same network use domain ID 0, they might discover each other and cause interference.
For this tutorial, we will use the default domain ID of 0. If you need to specify a custom domain ID, use the following command:
export ROS_DOMAIN_ID=<your_domain_id>Creating a Package
The next step is to create a package. Packages organize all the files required for your ROS application. Each package must have a name. In this tutorial, I will use my_package as an example. In practice, you should choose a more descriptive name for your package.
To create a package, navigate to the \demo_ws\src folder and run:
ros2 pkg create --build-type ament_python my_packageYou can see what this process looks like in Figure 2.
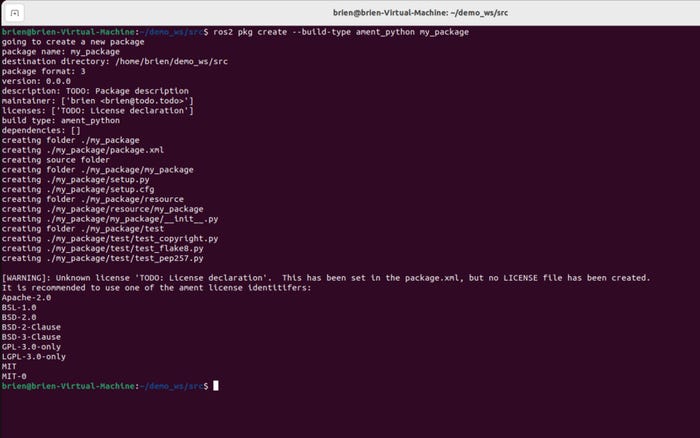
Figure 2. The new package has been created.
Adding Python Scripts
We will now create two simple Python scripts: Talk and Listen. The Talk script will produce a line of text, while the Listen script will display that text.
Before creating the scripts, let’s discuss what is happening here: Each script in ROS operates as a node. Nodes communicate by passing messages across a topic, which acts as named communication channels between nodes. In this case, the Listen script will subscribe to the Talk script. The Talk script will publish a text string to a topic, which the Listen script will then receive and display.
To begin, navigate to the folder where the publisher node will be created:
cd ~\demo_ws/src/my_package/my_packageInstead of writing these scripts from scratch, you can use premade demo scripts. Download the publisher node (named “talker”) with the following command:
wget <a href="https://raw.githubusercontent.com/ros2/examples/eloquent/rclpy/topics/minimal_publisher/examples_rclpy_minimal_publisher/publisher_member_function.py">https://raw.githubusercontent.com/ros2/examples/eloquent/rclpy/topics/minimal_publisher/examples_rclpy_minimal_publisher/publisher_member_function.py</a>Next, download the subscriber node (named “listener”) with this command:
wget <a href="https://raw.githubusercontent.com/ros2/examples/eloquent/rclpy/topics/minimal_subscriber/examples_rclpy_minimal_subscriber/subscriber_member_function.py">https://raw.githubusercontent.com/ros2/examples/eloquent/rclpy/topics/minimal_subscriber/examples_rclpy_minimal_subscriber/subscriber_member_function.py</a>Addressing Dependencies
In the publisher_member_function.py script, shown in Figure 3, the first few lines are:
import rclpyfrom rclpy.node import Nodefrom std_msgs.msg import String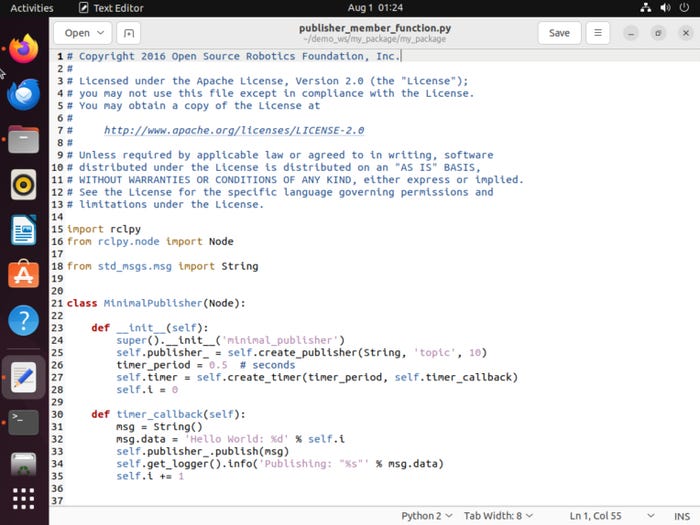
Figure 3. There are some dependencies listed within the publisher_member_function.py script.
These lines define the script’s dependencies, which you must specify in the package.xml file.
Here is how to update this file:
1. Navigate to my_package file: Go to the \demo_ws\src\my_package folder and open the package.xml file.
2. Update package information: Replace the default values for the name, email address, and description with accurate information. On line 8, update the license to “Apache License 2.0” if the package is for lab purposes.
3. Add dependencies: Scroll to the line that reads <build_type>ament_python</build_type>. Add a blank line after it, then insert the following dependencies:
<exec_depend>rclpy</exec_depend><exec_depend>std_msgs</exec_depend>You can see the modified file in Figure 4.
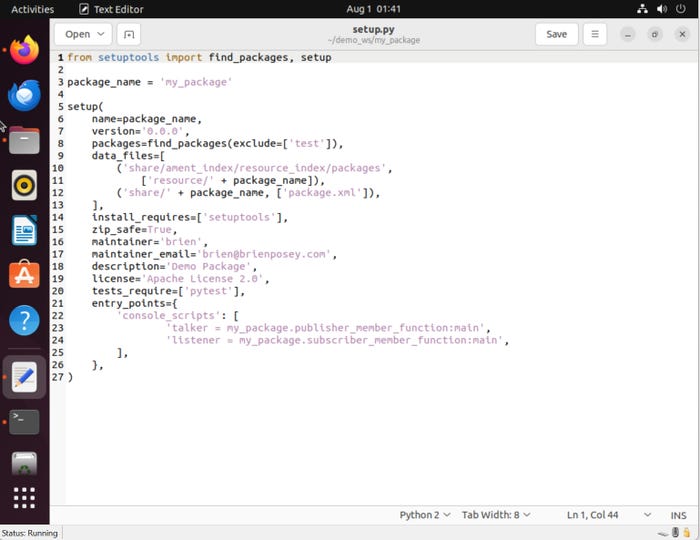
Figure 4. Here is the modified package.xml file.
Creating Entry Points
You need to create entry points for the two nodes. Otherwise, when you launch a node, you will receive an error message about a missing executable.
1. Open the setup.py file: Start by modifying the name, email address, description, and license in the setup.py file. Ensure these details match with those in the package.xml file.
2. Modify the entry_points section: Locate the entry_points section and update it to look like this:
entry_points={ 'console_scripts': [ 'talker = my_package.publisher_member_function:main', 'listener = my_package.subscriber_member_function:main', ],},You can see the modified file in Figure 5.

Figure 5. Here are the modifications to make for the setup.py file.
Building the Package
With all the necessary files in place, build the package once more. Use the following commands:
cd ~/demo_wssudo rosdep initrosdep updaterosdep install -i --from-path src --rosdistro humble -ycolcon build. install/setup.bashHere is a breakdown of what the commands do:
cd ~/demo_ws
Switches to the directory where your workspace is located.
sudo rosdep init
rosdep update
rosdep install -i --from-path src --rosdistro humble -y
Ensures all the necessary dependencies are in place. For such a simple package, managing dependencies typically isn’t a problem. However, it is always a good idea to check your dependencies just in case.
colcon build
. install/setup.bash
The last two lines are responsible for building and sourcing the package.
Figures 6 and 7 show these commands in action.
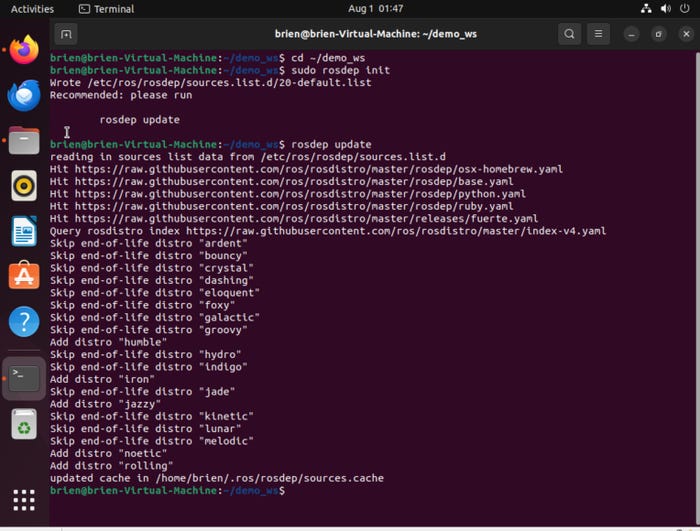
Figure 6. Here are the first few steps of the build process.
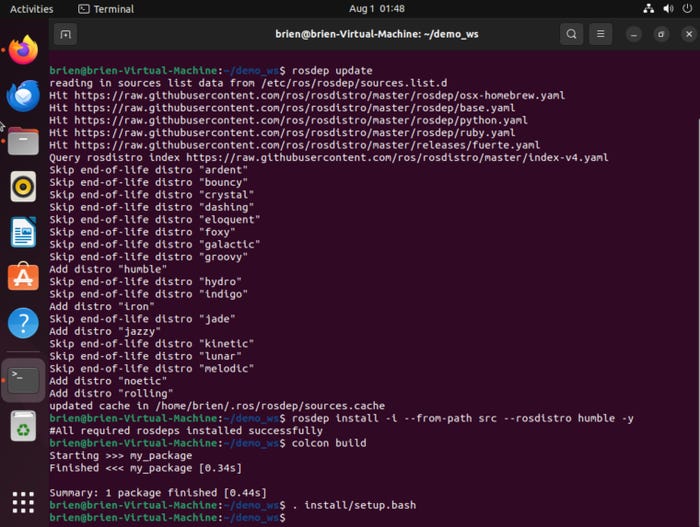
Figure 7. Here is what the build process looks like at completion.
Running the Nodes
It is time to launch the nodes.
1. Launch the ‘talker’ node.
Run the following command to start the talker node (see Figure 8):
ros2 run my_package talker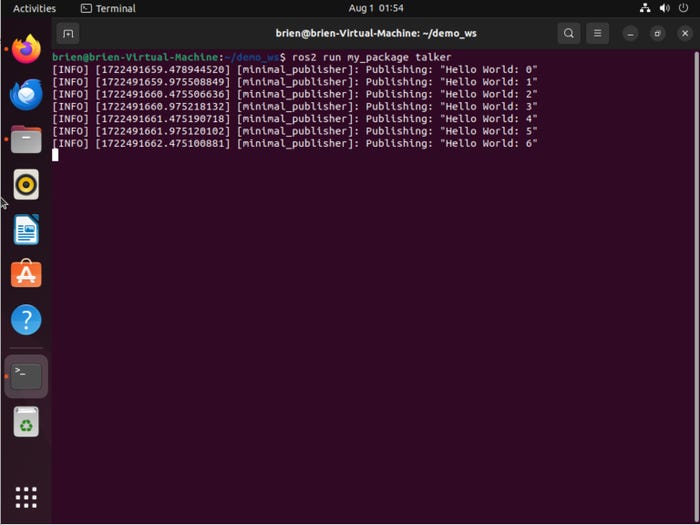
Figure 8. The talker node displays a series of “Hello World” messages.
2. Launch the ‘listener’ node
Keep the talker node running and open a new terminal window. In the new window, execute these commands:
cd ~/demo_ws. install/setup.bashros2 run my_package listenerNote: The second command references setup.bash. Source it each time you open a new terminal window.
After running these commands, the listener node should display the “Hello World” messages published by the talker node. You can see what this looks like in Figure 9.
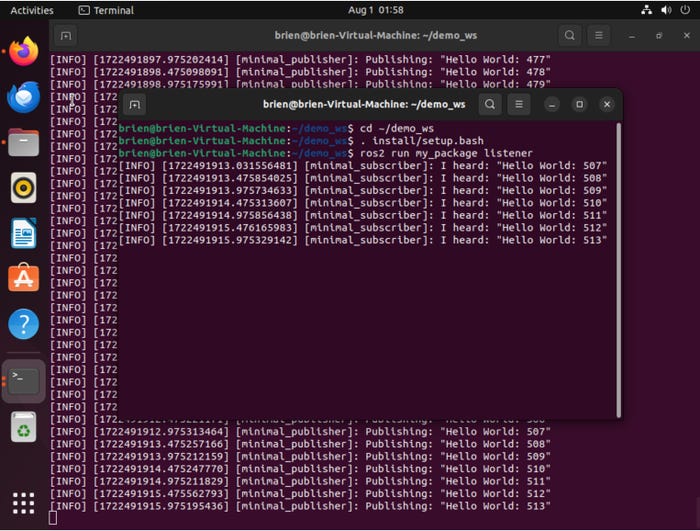
Figure 9. The listener receives the message from the talker.
About the Author
You May Also Like


.jpg?width=700&auto=webp&quality=80&disable=upscale)
