Use PowerShell to Provision Storage Within Windows Server
There are advantages to using PowerShell to provision storage within Windows Servers. Here are PowerShell commands for bringing disks online.
April 15, 2022
This article is the first installment of a two-part series about using PowerShell to provision storage within Windows Server. Part one explains how to identify a newly installed disk and bring the disk online. Part two explains how to initialize the disk and create a partition.
The Disk Management Console is normally the tool of choice when it comes to provisioning storage within Windows Server. As useful as this tool may be, however, it is constrained by its GUI interface and doesn’t scale well for bulk operations. PowerShell, on the other hand, allows you to automate the storage provisioning process. This can be useful for large-scale operations, but it can also be useful in any situation in which you want to dynamically allocate storage to a Windows Server.
In this article, I will explain how to use PowerShell to perform provisioning tasks that are normally performed through the Disk Management Console.
Use Get-Disk For Information About Disks
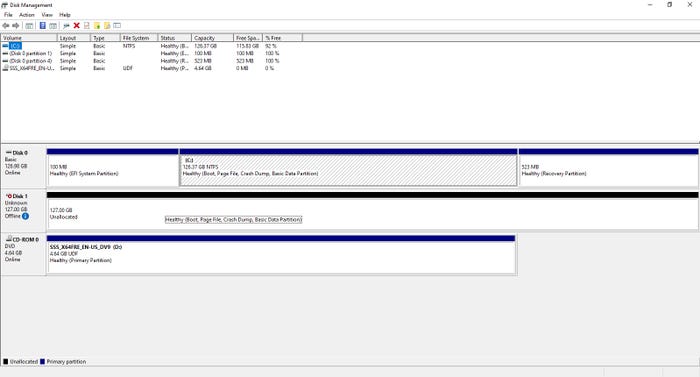
In Figure 1, you can see the Disk Management Console open on a machine that is running Windows Server 2022. A new disk (Disk 1) has been attached to the server, but the disk is currently offline and the space within the disk is unallocated. We could just right-click the disk and then choose the Online command from the shortcut menu to bring it online. From there, we could use the Disk Management Console to create one or more volumes from the unallocated space. But rather than doing that, let’s look at how to perform the entire process through PowerShell.
PowerShell Storage Provisioning 1-1
Figure 1. A new disk has been attached to the server.
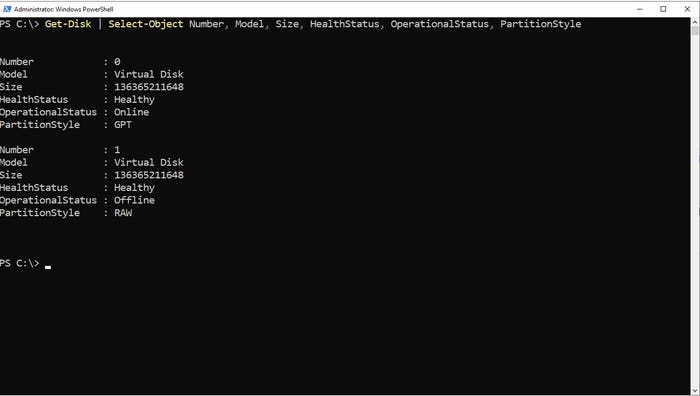
Let’s begin by looking at the disks that exist on this system. The PowerShell cmdlet used for retrieving information about a disk is Get-Disk (you could also use Get-PhysicalDisk). PowerShell can display numerous attributes for a given disk, but, for the purposes of this article, we will look at the disk number, model, size, health status, operational status, and partition style.
To do this, enter the Get-Disk cmdlet, then pipe the cmdlet’s output into the Select-Object cmdlet. Next, list the attributes that you want to examine. In this case, the command that I am using is:
Get-Disk | Select-Object Number, Model, Size, HealthStatus, OperationalStatus, PartitionStyleIncidentally, if you want to see all the available attributes for a system’s disks, you can replace the attribute names with an asterisk. The command would look like this:
Get-Disk | Select-Object *In Figure 2, you will notice two things about my use of the Get-Disk cmdlet. First, the Get-Disk cmdlet returns information related to the disk itself, not the volumes on the disk. In part two of this series, I will show you how to access volume data.
PowerShell Storage Provisioning 1-2
Figure 2. The Get-Disk cmdlet returns a limited amount of information about the disk.
The other thing that you will notice in Figure 2 is that this system contains two disks: the system disk and the disk that we are trying to provision. However, the non-provisioned disk is listed as being offline. Therefore, the question becomes a matter of how we can get PowerShell to bring this disk online.
How To Bring a Disk Online
I mentioned above that you could type Get-Disk | Select-Object * to see all the attributes that are available for a disk. If you tried that, you saw that there are a few dozen attributes available -- far more than the five attributes displayed in Figure 2.
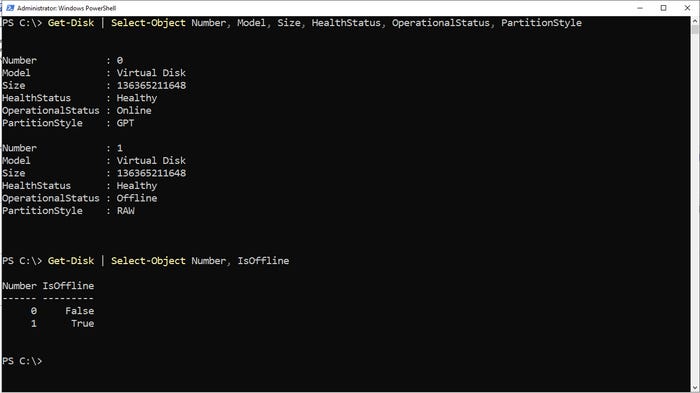
One of the available attributes is called IsOffline. This attribute contains a value of $True for offline disks and $False for online disks. In Figure 3, you can see that I have entered the same command as before, but this time I am displaying the disk number and the IsOffline attribute. This verifies that Disk 0 is online and Disk 1 is offline.
PowerShell Storage Provisioning 1-3
Figure 3. Disk 0 is online and Disk 1 is offline.
The trick to bringing Disk 1 online is to set its IsOffline attribute to $False. If you wanted to bring just this one disk online, you could use this command:
Get-Disk -Number 1 | Set-Disk -IsOffline $FalseI noted the concept of bulk operations at the start of this article. With that concept in mind, imagine that we had lots of disks to bring online. We could do all of them at once by using this command:
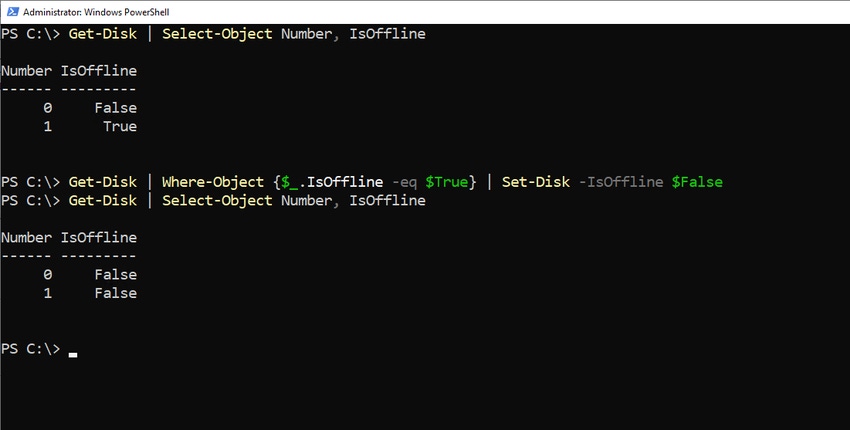
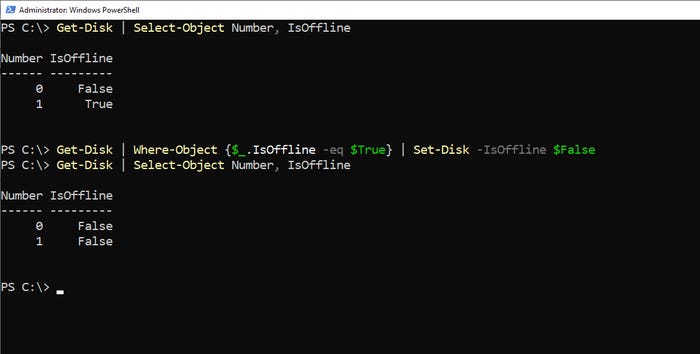
Get-Disk | Where-Object {$_.IsOffline -eq $True} | Set-Disk -IsOffline $FalseThis command retrieves a list of all the disks that are offline, then sets the IsOffline attribute to False for every disk that is currently offline. You can see how this works in Figure 4.
PowerShell Storage Provisioning 1-4
Figure 4. This is how you bring disks online in bulk.
Now that I have shown you how to bring a disk online, read part two of this series to learn how to initialize the disk and create a volume.


