
In a series of recent articles, I talked about reading SQL Server data into PowerShell, filtering that data, and performing basic data analytics with charting. You can expand on these capabilities by adding ChatGPT-based data analytic capabilities to your PowerShell scripts. This article will guide you through the process.
- Overview of Graphical Elements
- Sample PowerShell Script
- How the Script Works
- Uses Cases in Data Analytics
- Conclusion
Before we begin, I recommend reading my articles on two key topics: using PowerShell for charting SQL Server data and accessing ChatGPT with PowerShell. These articles contain information you will need to build a PowerShell script that uses AI-based data analytics for SQL Server data.
Overview of Graphical Elements
In this article, I am going to adapt my existing PowerShell charting script (which you can review here) to include ChatGPT support. To achieve this, we must introduce a few visual components to the Windows form:
- an input box to interact with ChatGPT by asking questions;
- an output box within which to display ChatGPT’s responses; and
- a “submit” button that can be used to initiate a query.
You can see what these elements look like in Figure 1.
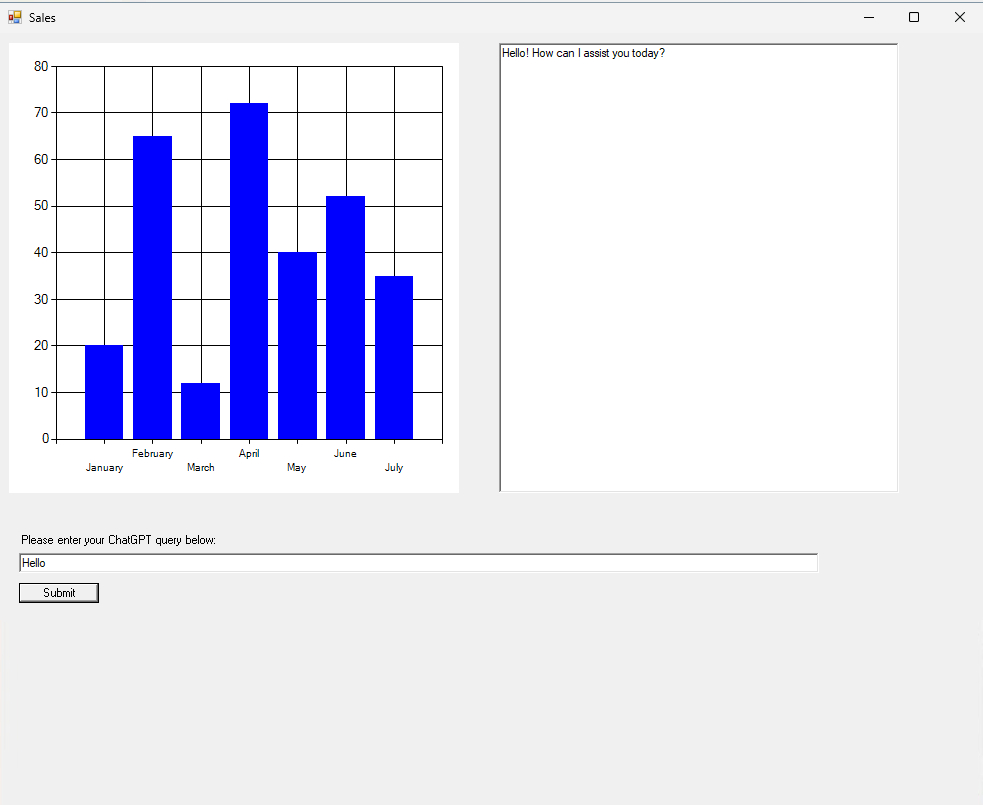
Figure 1. This is what the data analytics app looks like.
One thing that makes this app so unique (besides the fact that we have used PowerShell to ingest SQL Server data and display it graphically) is that ChatGPT typically doesn’t access your personal data. However, in this case, the script provides ChatGPT with the necessary information to analyze and generate insights.
As you can imagine, the script is a bit complex, but let’s start by discussing the graphical elements. When you create any graphical element in PowerShell, like a button or a text box, you begin by establishing a named object. Then, you add the necessary attributes to that object. Finally, you add the object to the Windows form.
Creating labels
To show you what I mean, let’s examine the text displayed in Figure 1, prompting the user to enter their ChatGPT query. Even though it’s just text, it’s treated as a graphical object within the Windows form. Here are the commands used to create this text:
$Label1 = New-Object System.Windows.Forms.Label
$Label1.Text = "Please enter your ChatGPT query below:"
$Label1.Autosize = $True
$Label1.Location = New-Object System.Drawing.Size (20,500)
In the above commands, we start by creating a label object, which we are calling $Label1. Label objects are used specifically for displaying text.
Once this object has been created, we must begin adding attributes. Specifically, we add the text content we want to display, configure the label size (which is being set to automatic), and pinpoint the location on the screen for the label’s placement (20 horizontal pixels and 500 vertical pixels from the upper-left corner of the form).
Once we have defined the label, the next step is to add the label to the form. We can do this by using the following command:
$Form.Controls.Add($Label1)
Whenever you are adding a graphical object to a form, you will use this command, making sure to substitute the name of the object you want to add.
Creating other graphical elements
Although I have only discussed the structure of a label, other graphical elements like text boxes and buttons follow a very similar process. The only real difference is that you may need to specify additional attributes, such as a button’s click action or the size of a text box.
Incidentally, the button in this setup is configured to call a PowerShell function when clicked. Specifically, when a user clicks the button, the script captures any text entered in the input box and then passes that text to a function, which in turn sends the text to ChatGPT. The response from ChatGPT is then displayed in the output box.
Modifying graphical elements
This highlights an important point about how GUI-based PowerShell scripts work. In fact, this is something that I wish someone had explained to me when I was learning to build them.
Whenever you want to make a change to a graphical element, you can do so by simply modifying its attributes. This can be done on the fly, without having to worry about any of the other previously defined attributes.
Let me show you what I mean. Here is the portion of the script that generates the output text box:
$OutputBox = New-Object System.Windows.Forms.textbox
$OutputBox.Text = ""
$OutputBox.Multiline = $True
$OutputBox.Size = New-Object System.Drawing.Size(400,450)
$OutputBox.Location = new-object System.Drawing.Size(500,10)
As you can see, I have created a textbox object named $OutputBox. I also configured several attributes that ensure that the box to initially empty, supports multiline text, and defines the box’s size and position.
So, with that in mind, imagine that I wanted the box to display the words “Hello World.” In this scenario, I would not have to revise any of the code shown above. I need only to write a single line of code:
$OutputBox.Text=”Hello World”
This line of code causes the text box’s contents to dynamically change on the spot. Better still, this is something that can be done from anywhere in the script.
Sample PowerShell Script
Now that I have provided an overview of how the various graphical elements work, I will explain how the rest of the script works and demonstrate its capabilities.
I’m going to begin by sharing the script’s full source code. However, before you can use it, you must make some modifications. Specifically, you will need to provide your unique SQL Server instance details and your own ChatGPT API key.
Here is the script in its entirety:
#Acquire Data from SQL Server
$Data = Invoke-SQLCmd -ServerInstance Win11SQL\SQLEXPRESS -Database MyAppDB -Query “Select Month, ItemsSold From Table1”


$DataSource1= [ordered]@{}
ForEach($Item in $Data){
$CurrentMonth = $Item.Month
$CurrentItem = $Item.ItemsSold
$DataSource1.Add($CurrentMonth, $CurrentItem)
}


#Initialize ChatGPT

# Define API key and endpoint
$ApiKey = ""
$ApiEndpoint = "https://api.openai.com/v1/chat/completions"

# we use this list to store the system message and will add any user prompts and ai responses as the conversation evolves.
[System.Collections.Generic.List[Hashtable]]$MessageHistory = @()


Function Initialize-MessageHistory ($message){
# Clears the message history and fills it with the system message (and allows us to reset the history and start a new conversation)
    $script:MessageHistory.Clear()
    $script:MessageHistory.Add(@{"role" = "system"; "content" = $message}) | Out-Null
}


Function AddTo-MessageHistory ($message){
    $script:MessageHistory.Add(@{"role" = "system"; "content" = $message}) | Out-Null
}


#Main script body - ChatGPT Section


$AISystemMessage = "All queries made pertain to the following dataset consisting of months and numbers. The numbers reflect the number of sales made in each month"
Initialize-MessageHistory $AISystemMessage
ForEach ($Item in $Data){
  $AISystemMessage = "For the month of " + $Item.Month + " the number of items sold was " + $Item.ItemsSold
  AddTo-MessageHistory $AISystemMessage
  }


function Invoke-ChatGPT ($MessageHistory) {
# Function to send a message to ChatGPT. (We need to pass the entire message history in each request since we're using a RESTful API)
    # Set the request headers
    $headers = @{
    "Content-Type" = "application/json"
    "Authorization" = "Bearer $ApiKey"
    }

    # Set the request body
    $requestBody = @{
        "model" = "gpt-3.5-turbo"
        "messages" = $MessageHistory
        "max_tokens" = 1000 # Max amount of tokens the AI will respond with
        "temperature" = 0.7 # Lower is more coherent and conservative, higher is more creative and diverse.
    }

    # Send the request
    $response = Invoke-RestMethod -Method POST -Uri $ApiEndpoint -Headers $headers -Body (ConvertTo-Json $requestBody)

    # Return the message content
    return $response.choices[0].message.content
}

Function Button_Press
{$UserMessage=$InputBox.Text

    # Add new user query to the message history
    $MessageHistory.Add(@{"role"="user"; "content"=$userMessage})

    # Query ChatGPT
    $aiResponse = Invoke-ChatGPT $MessageHistory

    # Show response
    $OutputBox.Text=$AIResponse


    # Add ChatGPT response to list of messages
    $MessageHistory.Add(@{"role"="assistant"; "content"=$aiResponse})
}


$Label1 = New-Object System.Windows.Forms.Label
$Label1.Text = "Please enter your ChatGPT query below:"
$Label1.Autosize = $True
$Label1.Location = New-Object System.Drawing.Size (20,500)

$InputBox = New-Object System.Windows.Forms.textbox
$InputBox.Text = ""
$InputBox.Size = New-Object System.Drawing.Size(800,20)
$InputBox.Location = new-object System.Drawing.Size(20,520)

$OutputBox = New-Object System.Windows.Forms.textbox
$OutputBox.Text = ""
$OutputBox.Multiline = $True
$OutputBox.Size = New-Object System.Drawing.Size(400,450)
$OutputBox.Location = new-object System.Drawing.Size(500,10)

$Button1 = New-Object System.Windows.Forms.Button
$Button1.Location = New-Object System.Drawing.Size (20,550)
$Button1.Size = New-Object System.Drawing.Size(80,20)
$Button1.Text = "Submit"
$Button1.Add_Click({Button_Press})


# Load the assemblies

[void][Reflection.Assembly]::LoadWithPartialName("System.Windows.Forms.DataVisualization")

# Chart Object
$Chart1 = New-object System.Windows.Forms.DataVisualization.Charting.Chart
$Chart1.Location = New-Object System.Drawing.Size (10,10)
$Chart1.Width = 450
$Chart1.Height = 450
$Chart1.BackColor = [System.Drawing.Color]::White

# Chart area

$ChartArea = New-Object System.Windows.Forms.DataVisualization.Charting.ChartArea
$ChartArea.Name = "ChartArea1"
$ChartArea.AxisY.Interval = 10
$ChartArea.AxisX.Interval = 1
$Chart1.ChartAreas.Add($ChartArea)


# Data Series 1 - The series is called Sales
[void] $chart1.Series.Add("Sales")

#Chart parameters
$chart1.Series["Sales"].chartarea = "ChartArea1"
$chart1.Series["Sales"].color = "Blue"
$Chart1.Series["Sales"].Points.DataBindXY($DataSource1.keys, $DataSource1.values)

# Display all of the graphical elements on a form

$Form = New-Object Windows.Forms.Form
$Form.Text = "Sales"
$Form.Width = 1000
$Form.Height = 1000
$Form.controls.add($Chart1)
$Form.Controls.Add($Label1)
$Form.Controls.Add($InputBox)
$Form.Controls.Add($OutputBox)
$Form.Controls.Add($Button1)
$Form.Add_Shown({$Form.Activate()})
$Form.ShowDialog()
How the Script Works
I have covered most of the script’s code in previous articles (noted at the beginning of this article), so I won’t repeat that explanation here. However, I do need to clarify the relationship between the ChatGPT elements, the SQL Server data, and the GUI.
Initialization tasks
The script starts by performing several initialization tasks. It begins by acquiring the data from a SQL Server table and writing that data to a variable named $Data and a hash table named $DataSource1. Additionally, this first portion of the script sets up essential components for ChatGPT, including the API key, the API endpoint, and a hash table named $MessageHistory, which will be used to store the conversation history with ChatGPT.
Below this section of code, there are a couple of functions that I will discuss shortly. Following that, you will find a portion of the script’s main body, followed by additional functions. Even though it may seem weird to intermingle body code with functions in this way, this ordering is intentional. When a more conventional arrangement was used, the code did not work properly.
Main Script Body – ChatGPT Section
The section named “Main Script Body - ChatGPT Section” begins by calling the Initialize-MessageHistory function. This function serves two critical purposes. First, it clears the hash table, preparing it for use. Second, it informs ChatGPT that the script will be providing it with data.
Normally, using ChatGPT for data analytics would not be an option because it lacks access to the data. To enable data analytics, we need to tell ChatGPT about the data it can expect and then provide that data. As such, the Initialize-MessageHistory function tells ChatGPT, “All queries made pertain to the following dataset consisting of months and numbers. The numbers reflect the number of sales made in each month.” Even though this message may seem overly detailed, I have found that less descriptive messages result in ChatGPT struggling to interpret the data accurately.
Next, the script provides ChatGPT with the dataset. Unfortunately, attempting to pass either the $Data variable or the $DataSource1 hash table to ChatGPT proved unsuccessful. Therefore, I had to devise a method for contextualizing the data to help ChatGPT know how to interpret it. What I ultimately came up with was the code block below. This is arguably the most important section of code in the entire script:
ForEach ($Item in $Data){
  $AISystemMessage = "For the month of " + $Item.Month + " the number of items sold was " + $Item.ItemsSold
  AddTo-MessageHistory $AISystemMessage
  }
This block of code starts with a ForEach loop that cycles through the items stored in the $Data variable. This is the data that was originally read from the SQL Server. For each record, represented by the $Item variable, the script generates a message stating that for the month of [month name], the number of items sold was [number of items sold]. This message is then passed to ChatGPT using the AddTo-MessageHistory function. Essentially, this code block parses the data row by row, adds a bit of context, and sends the data to ChatGPT.
Button_Press function
The remainder of the script consists primarily of graphical elements. However, the button is tied to an object called $Button1. When this button is clicked, the script calls a function called Button_Press. Here is what that function looks like:
Function Button_Press
{$UserMessage=$InputBox.Text

    # Add new user query to the message history
    $MessageHistory.Add(@{"role"="user"; "content"=$userMessage})

    # Query ChatGPT
    $AIResponse = Invoke-ChatGPT $MessageHistory

    # Show response
    $OutputBox.Text=$AIResponse


    # Add ChatGPT response to list of messages
    $MessageHistory.Add(@{"role"="assistant"; "content"=$aiResponse})
}
This function first sets the $UserMessage variable equal to $InputBox.Text. The $InputBox.Text variable is equal to whatever the user enters in the input field. The $UserMessage variable is used throughout the script whenever input needs to be sent to ChatGPT. Hence, this line of code tells the script to take whatever the user types and use it as ChatGPT input.
Following this, the function adds the user’s text to the message history and then sends that same text to the Invoke-ChatGPT function. The Invoke-ChatGPT function, in turn, passes the user’s text to ChatGPT. ChatGPT’s response is stored in a variable named $AIResponse. This response is then written to the output text box and added to the message history.
Use Cases in Data Analytics
Now that I have provided a brief rundown of how the script works, let’s explore how the script might be used.
In Figure 2, you will notice that the chart (intentionally) doesn’t display the exact quantity of sales for a given month. Therefore, one thing that we might do is to ask ChatGPT for more specific information, as illustrated in Figure 3.
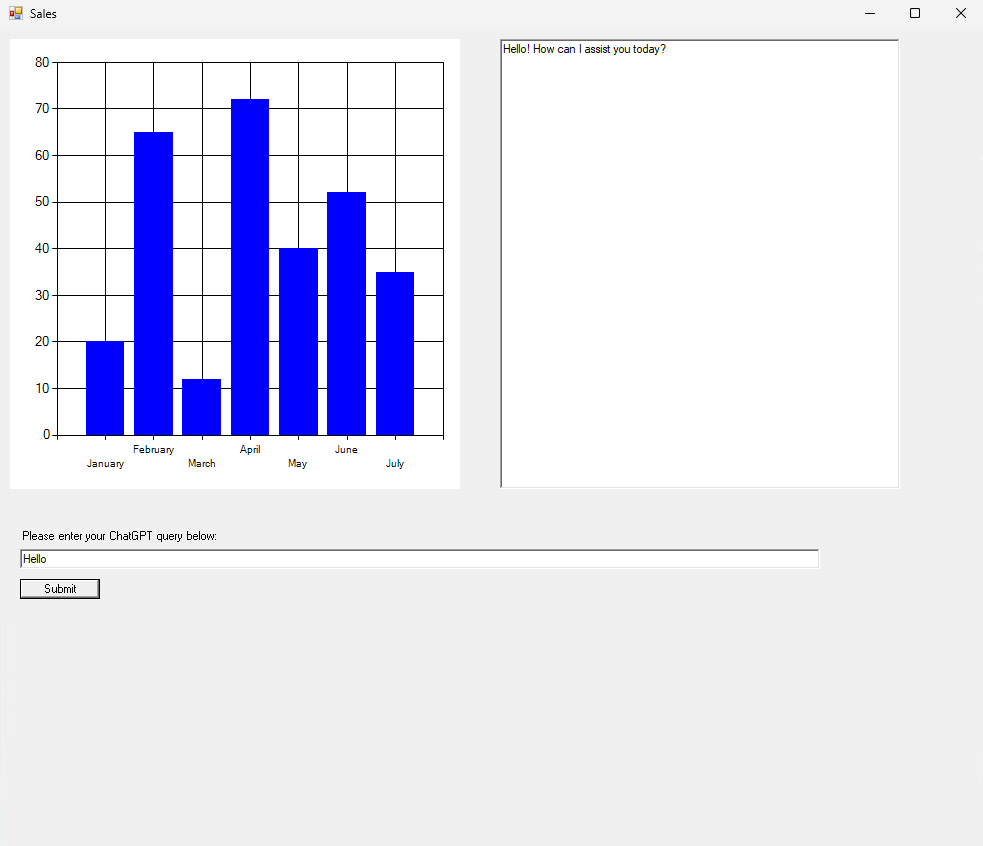
Figure 2. The chart does not show the exact quantity of sales each month, although PowerShell does support adding such numbers to a chart.
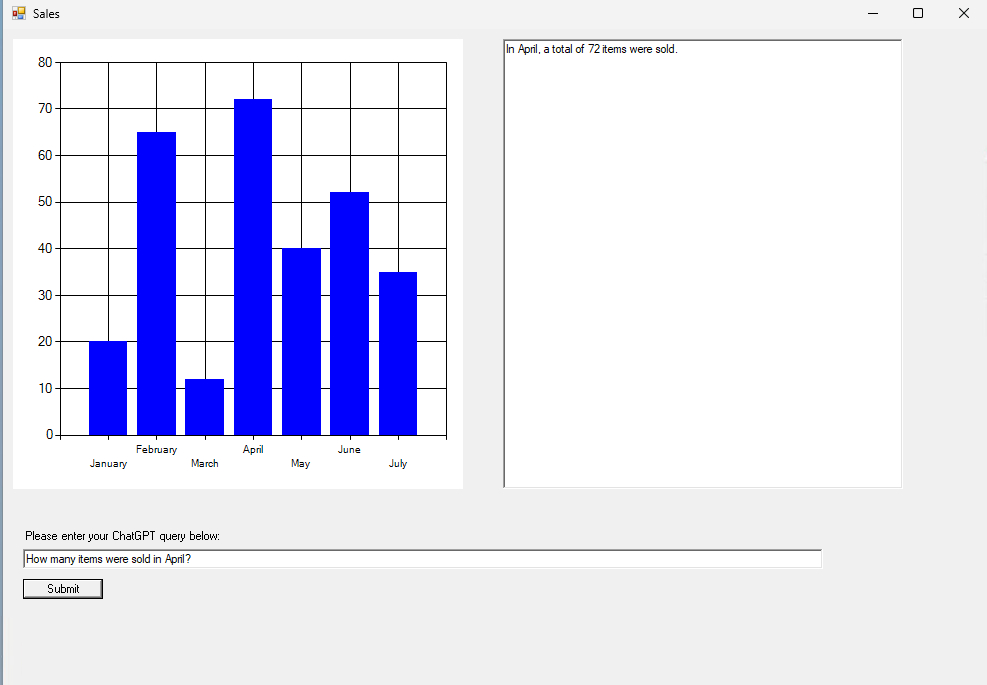
Figure 3. You can ask ChatGPT how many items were sold in a given month.
Another use of the script is to ask ChatGPT to provide you with information about aggregate sales. For example, if you want to know the total number of items sold in the second quarter, you can simply pose this question to ChatGPT. You can see the output in Figure 4.
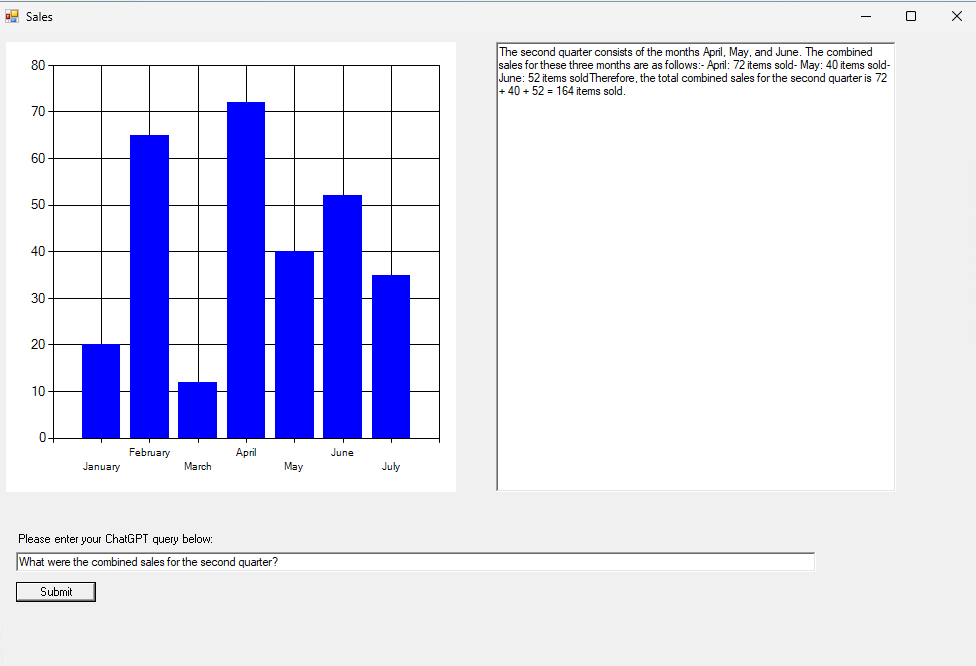
Figure 4. ChatGPT tells me how many items were sold in the second quarter.
Admittedly, it would not be too difficult to build a PowerShell script that can generate answers to these questions without the aid of ChatGPT. Nonetheless, using ChatGPT provides two advantages. First, it reduces the amount of code you need to write. Second, the script is entirely dynamic. You don’t have to predict the questions a user might ask. Instead, users can inquire about anything they want, and ChatGPT is tasked with determining how to provide a relevant response. This is important because certain queries would be challenging to address through hardcoded responses. For instance, if a user wanted to know about future sales estimates based on historical data, you could theoretically write PowerShell code to handle such a query, but it would not be easy.
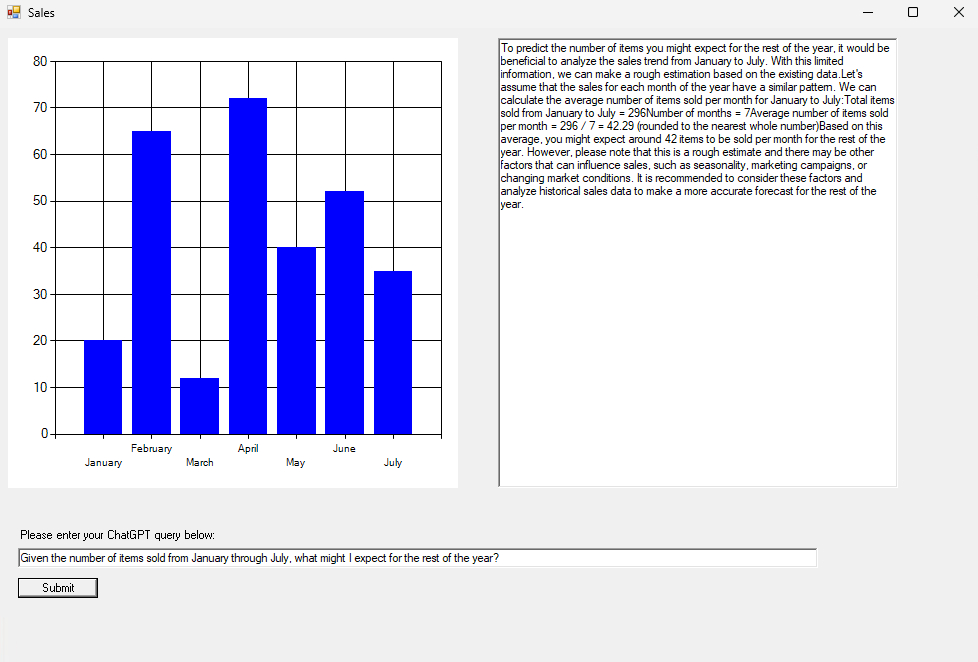
Figure 5. ChatGPT can estimate future sales.
Lastly, the script can be used for comparative analysis. As illustrated in Figure 6, you can ask ChatGPT to compare data sets, such as comparing first-quarter sales to second-quarter sales.
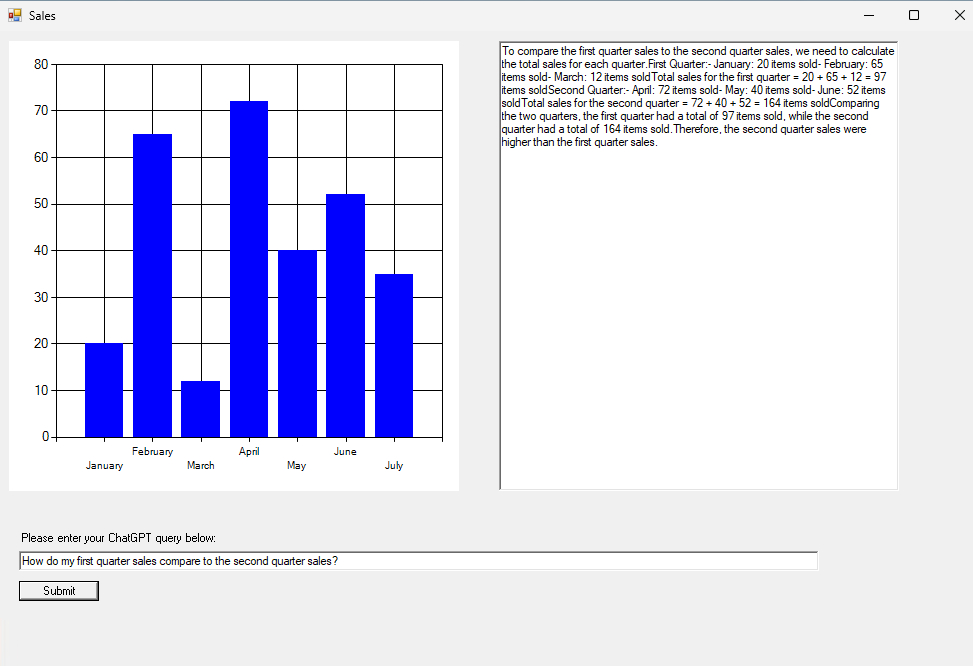
Figure 6. ChatGPT compared first-quarter and second-quarter sales.
Conclusion
The script that I have developed, while powerful, is little more than a proof of concept. There are countless ways to enhance and expand upon the script. PowerShell supports dozens of different chart types, along with numerous visual elements like legends, labels, and visual effects. A single form can accommodate multiple charts, each capable of including multiple data series. Likewise, PowerShell can query multiple data sources and aggregate that data. It is even possible to build an interactive reporting engine using PowerShell and export charts, data, and other information to formats like JPEG images or HTML pages. Ultimately, one could build a full-blown data analytics application in PowerShell.
About the author
 Brien Posey is a bestselling technology author, speaker, and 21x Microsoft MVP. In addition to his ongoing work in IT, Posey has trained as a commercial astronaut candidate in preparation to fly on a mission to study polar mesospheric clouds from space.


